Latest news about Bitcoin and all cryptocurrencies. Your daily crypto news habit.
My hands are in the air right now 🙌
It’s bad practice to hard code credentials, and we all know this. But as developers, we are constantly trying to cut corners to increase our productivity. Handling of credentials and secrets should not be a corner that we look to cut; this will end up with us getting our fingers burnt… and very seriously.
AWS-Vault is a CLI tool for securely storing and accessing AWS credentials in development environments.
This brings me onto the AWS CLI. You would think that the official AWS tooling would have some regard for the handling of credentials responsibly. Unfortunately, you would be wrong. The aws configure command, which is what the AWS documentation instructs us to run straight after installing, writes our precious IAM credentials to the ~/.aws/credentials file in plain text for the world to see. Here’s a whole page on the configuration file in the documentation, plain text example included!
You wouldn’t stick your bank pin to your bank card; so why are we all putting our AWS account credentials in plain text in the one place where everybody expects them to be?
Let me just paint a scary picture… you may remember some serious npm exploits that have happened recently; unfortunately a somewhat frequent occurrence in the Javascript community, but that's a story for another time. Here’s the eslint-scope exploit and the more recent event-stream vulnerability that was downloaded more than 8. MILLION. TIMES.
Now imagine, instead of scraping npm credentials, or attempting to steal your bitcoin wallet, a hacker decided to be a little more adventurous and steal your plain text secrets in ~/.aws/credentials.
Go and run cat ~/.aws/credentials now, is it empty? Oh oh… are those AdministratorAccess credentials? If you’re not sweating right now, you should be. AWS credentials are the target of many attacks, and I’m warning you… they may not have got yours yet, but it’s coming, and I don’t want to be the one to say “I told you so”.
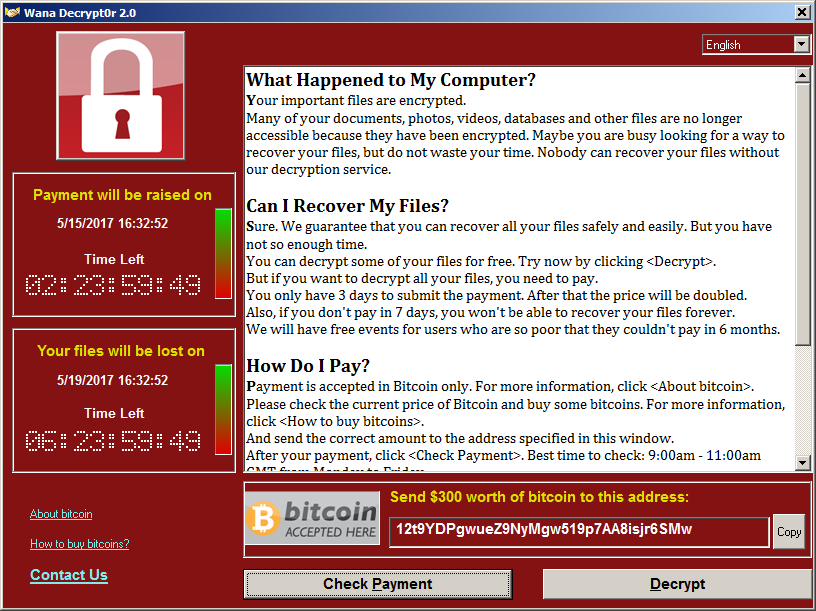
We’ve only got to look at the more recent DockerHub credentials leak, where hackers held git repositories to ransom to highlight how bad an ~/.aws/credentials leak could be. Now imagine your AWS infrastructure being held to ransom all because you left your AWS secrets kicking about for any Tom, Dick and Harry to see. Do you want to be seeing something like this when you visit your home page? WanaCry Internet edition “AWSGeddon”™ is coming.
 WanaCry exploit image. Source Wikipedia
So now that I’ve got your attention, how do we save you from a seriously bad day?
Fortunately for us, the team at 99designs have created an amazing CLI tool called AWS-Vault. This is the tool that’s going to save us from a large % of the internet displaying ransomware pages instead of our sweet content.
AWS Vault stores IAM credentials in your operating system’s secure keystore and then generates temporary credentials from those to expose to your shell and applications.
So what does this mean? Unlike the aws configure command, when you add your AWS credentials using aws-vault add, your credentials are stored in your operating systems secure keychain. Your keys are now encrypted to your secret backend, protecting you from a Peeping Tom and more importantly, an adventurous hax0r.
It’s easy to install too, you can download the latest release from GitHub, or macOS users can run brew cask install aws-vault. You’ve got no excuse, you can get going in less than 5 minutes.
AWS-Vault uses those credentials you’ve just added to generate temporary credentials using Amazon’s Simple Token Service . These temporary credentials can be configured to last anywhere from a few minutes to hours. And even those credentials aren’t exposed as plain text anywhere, instead running aws-vault exec ${profile} -- initiates a new shell and exports your temporary secrets as environment variables to be read by the AWS CLI or anything else you need.
The tool also nicely compliments your existing AWS CLI configuration in ~/aws/.config. It’s aware of your existing profiles and configuration you have already setup.
So first things first, delete the hard-coded credentials in your script-that-needs-aws-credentials.sh and refactor it to pickup those values from environment variables. You will need to make sure you include the AWS_SESSION_TOKEN variable too. You can find more information about STS and temporary credentials on the AWS Documentation. Now you have made your changes, go ahead and run:
$ aws-vault exec ${profile} -- script-that-needs-aws-credentials.shIf you’re curious to see what AWS-Vault is doing, run:
$ aws-vault exec ${profile} -j {"Version":1,"AccessKeyId":"AKIAI44QH8DHBEXAMPLE","SecretAccessKey":"wJalrXUtnFEMI/K7MDENG/bPxRfiCYEXAMPLEKEY","SessionToken":"AQoDYXdzEJr...<remainder of security token>","Expiration":"2019-06-26T16:01:48Z"}Those are the temporary credentials that were issued by Amazon STS, now securely stored by AWS-Vault for future use.
What about my application?
If you are hard-coding credentials into your applications, have an .envfile or something equivalent, then take a look at AWS-Vault server.
$ aws-vault exec ${profile} --serverThis handy tool will start a Local EC2 Metadata Instance and route all your traffic destined for 169.254.169.254 to the AWS-Vault server you have running locally, dishing out temporary security credentials. You can test this out by running curl 169.254.169.254 once you’ve started the server.
Delete those hard-coded credentials, and the AWS-SDKs in your application will automatically use AWS-Vault server to refresh credentials when needed. This means your local applications will start behaving the same way as your EC2 instances with instance profiles that you assign IAM roles to do. (At least I hope that’s how you are doing this in your AWS environment. If this is not you… please read this immediately).
Start using role assumption and Multi Factor authentication
Best practice is to configure your IAM user to have read only access to the console. This means when you login to the console, you can’t change anything, until you assume a role with elevated privileges. This approach is similar to the use of “sudo” in a shell session. Hopefully it will encourage you to be a bit more careful when poking around the console and making changes. You can enforce MFA on these privileged roles too which gives you an extra layer of protection if your credentials are accidentally leaked.
Let’s quickly look at what role assumption looks like with AWS-Vault. If you are familiar with configuring role assumption, you can scroll down to AWS-Vault config below. If not, go ahead and login into the console.
First things first, setup MFA on your user if you haven’t done so already. Find your user in IAM service and click the security credentials tab and setup a MFA device. I use Authy so I can sync my MFA codes across all of my devices (if you’re a little clumsy like me, it helps when you leave your phone at home). Google Authenticator is another suitable option, and just recently AWS-Vault added support for YubiKeys; huge kudos to j0hnsmith for that one. Once setup, jot down the MFA ARN, you are going to need this later.
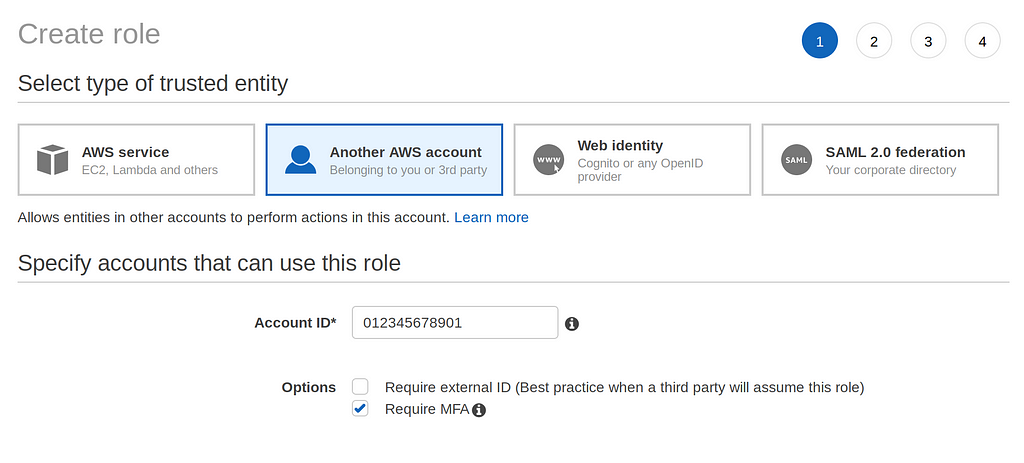
Next, you are going to want to create a new IAM role. We’re going to create an AdministrativeUser role that you will assume. Enter your Account ID in the box like in the screenshot below and tick Require MFA.
Click next, and on the attach permissions policy screen, find the AdministratorAccess policy and attach it to this role. On the next screen, give it a name of AdministrativeUser and create it. This creates a new role with a trust relationship to your own account. What this means is that only users in your account that have authenticated with an MFA device, that you have also granted permissions to do so, can assume this role. Go back to your role and edit the trust relationship, it should look something like this.
{ "Version": "2012-10-17", "Statement": [ { "Effect": "Allow", "Principal": { "AWS": "arn:aws:iam::01234567809012:root" }, "Action": "sts:AssumeRole", "Condition": { "Bool": { "aws:MultiFactorAuthPresent": "true" } } } ]}Now go to IAM users and find yourself in the list. Add an inline policy like the one below. This allows your user to assume the AdministrativeUser role you just created.
{ "Version": "2012-10-17", "Statement": [ { "Effect": "Allow", "Action": [ "sts:AssumeRole" ], "Resource": [ "arn:aws:iam::0123456789012:role/AdministrativeUser", ] } ]}You can test switching role by clicking on your account in the toolbar at the top and clicking “switch role”. Enter your account ID and the new role we created.
You should notice that the menu at the top of the page has changed colour and you should now see your name and the currently assumed role.
So how do we assume roles with AWS-Vault?
Open up ~/.aws/config in your favourite editor and add an administrator profile like below. You can find your mfa_serial in the security credentials tab of your IAM user. You’ll need to amend the values as necessary. The source_profile should be the one you created with the aws-vault add command.
[profile readonly]region=eu-west-1
[profile administrator]source_profile=readonlymfa_serial=arn:aws:iam::0123456789012:mfa/steverole_arn=arn:aws:iam::0123456789012:role/AdministrativeUser
Now go and run the login command below. You will notice that it prompts you for an MFA token. If this is successful, you should find yourself in the AWS console with administrator access.
$ aws-vault login administratorEnter token for arn:aws:iam::0123456789012:mfa/steve:
This works for cross account role assumption too. For those of you that are managing credentials for multiple aws-accounts, I’d suggest you take a look at this AWS cross account role assumption article here.
Okay so how do I rotate my credentials in AWS-Vault?
Well as it happens there’s a fantastic command that will rotate your IAM credentials for you. You won’t believe how easy this is:
$ aws-vault rotate ${profile} Rotating credentials for profile "${profile}" (takes 10-20 seconds)Enter token for arn:aws:iam::0123456789012:mfa/steve: 123456Done!With aws-vault, there are no excuses for not handling secrets in your development environment securely. You can get a quick win by deleting the credentials from ~/.aws/credentials and adding them to aws-vault by running aws-vault add new-profile. Now simply execute the same AWS CLI commands you did before but with the aws-vault prefix.
$ aws-vault exec new-profile -- aws s3 ls
I’d just like to say thank you to 99designs for creating a tool to safeguard our IAM credentials locally. This should be the standard way to configure AWS profiles for use with the AWS CLI. I hope someone from the team at AWS is reading this; I would like to see AWS remove support for retrieving credentials from ~/.aws/credentials or ~/.aws/config.
You only need to read AWS blog posts and watch re:Invent videos to understand that AWS really are pioneers of security, take a look at this twitter thread for instance. But we’re falling short on the basics and making it too easy for engineers to be sloppy. We’re seeing a huge change in development philosophy with DevSecOps, driving a ‘Security as Code’ culture. Let’s encourage others to adopt best practices together.
So you’ve seen how easy it is to use AWS-Vault by spending a few minutes reading this post. Using AWS-Vault is easy. You can thank me later when you aren’t affected by WanaCry Internet edition “AWSGeddon”™.
Thank you for reading.
Securing AWS credentials in development environments was originally published in Hacker Noon on Medium, where people are continuing the conversation by highlighting and responding to this story.
Disclaimer
The views and opinions expressed in this article are solely those of the authors and do not reflect the views of Bitcoin Insider. Every investment and trading move involves risk - this is especially true for cryptocurrencies given their volatility. We strongly advise our readers to conduct their own research when making a decision.

