Latest news about Bitcoin and all cryptocurrencies. Your daily crypto news habit.

I got my Echo device last week and I thought it would be cool to develop a custom Alexa skill. Hence I took whole Saturday to develop a radio stations skill, it is exciting to ask Alexa to play my favourite radio stations while i am programming.
In this post I show an example skill of building custom skill for Echo using the Alexa Skills Kit (ASK) v2+ for Nodejs. The project is forked and modified from Skill Sample NodeJS Audio Player.
Use case
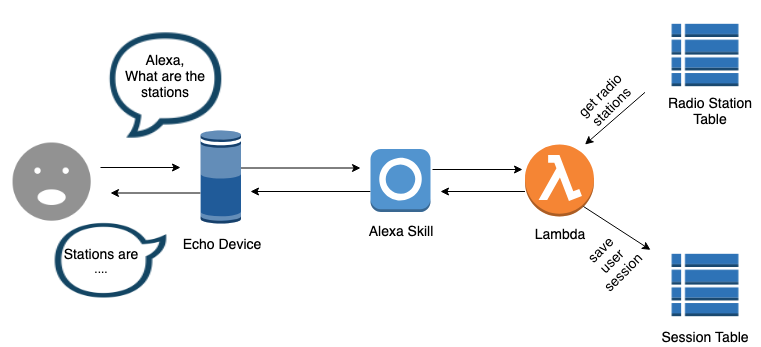
My radio skill is the way of listening to your multiple radio stations, you can say “Alexa, play <radio station name>” and Alexa will start streaming the radio station. You can, add or delete the stations, the radio stations are stored in DynamoDB. so you would have a completely personalised music playing experience.
Pre-requisites
We need an AWS account and an Amazon developer account to create an Alexa Skill.
- We need to install AWS CLI with npm install -g ask-cli.
- Configure the AWS CLI with $ ask init.
- We need to install and to initialize ASK CLI.
This is a Alexa Skills Kit command line interface quick start.
Create a DynamoDb Tables
We need 2 DynamoDB tables, MyRadiosSession stores user sessions, and MyRadios stores radio stations streaming URL.
$aws dynamodb create-table --table-name MyRadios --attribute-definitions AttributeName=id,AttributeType=S --key-schema AttributeName=id,KeyType=HASH --provisioned-throughput ReadCapacityUnits=5,WriteCapacityUnits=5
$aws dynamodb create-table --table-name MyRadiosSession --attribute-definitions AttributeName=id,AttributeType=S --key-schema AttributeName=id,KeyType=HASH --provisioned-throughput ReadCapacityUnits=5,WriteCapacityUnits=5
Then, we need to insert the radio stations streaming urls to MyRadio table.
aws dynamodb batch-write-item --request-items file://./request-stations.json
Here are the contents of request-stations.json .
Create a policy
We need a policy with the DynamoDb and Cloud watch permissions. Let’s create it.
$aws iam create-policy --policy-name my-radio-skill-policy --policy-document file://./policy.json
The file policy is a JSON document in the current folder that grants permissions to Dynamodb Tables and Cloudwatch logging:
Note that you have to replace ACCOUNT_ID to your AWS account id.
After the policy created, we get policy ARN from output, Copy the ARN, we will need to attach it to our lambda function after skill deployed in last step.
Create new skill
With your account set up, we are now going to build our custom Alexa skill.
$ask new -n myradios --lambda-name ask-custom-mradio-default
Select Node.js V8 as runtime and hello world as template.
That command creates a project directory “myradios” with the all required files. We have also configured the name of a lambda function to be “ask-custom-mradio-default”.
The myradios directory contains following files:
- skill.json - The configuration of the skill
- models/en-US.json - An interaction model of the skill for en-US locale.
- lambda/custom/index.js - A lambda function of the skill
- lambda/custom/package.json - The npm package file
- .ask/config - deploy settings configuration file
Configure skill manifest
The skill manifest is the JSON representation of your skill, and provides Alexa with all of the metadata required. Let’s start editing skill.json, change examplePhrases to:
“examplePhrases”: [ “Alexa, open My Radios”, “Alexa, ask My Radios to play ABC NEWS”, “Alexa, tell My Radios to play Fox FM” ],
We also need to change the summary and descriptions which are shown when viewing the list of skills.
Next, let’s move on to interaction model models/en-US.json , the sample model should look like as below:
Note that the “SATION” is custom slot, you can add as many as the radio station names into slot values, Sample utterances for sentence structure should like
"begin the {STATION}", "begin playing the {STATION}", "start the {STATION}", "start playing the {STATION}"Slots are a very powerful accessory for building a custom Alexa skill. For example, the statement “Tell me about {player}” means that the user can ask our skill about any chess player from the slot player. Furthermore, multiple slots provide the possibility of using dialogs in which the Alexa skill prompts the user to fill all slot values in order to fulfill the intent.
Creating the AWS Lambda Function
Once the interaction model is created, we need to create and configure the AWS lambda function lambda/custom/index.js.
On the top of the file we are importing SDK and assigning it Alexa constant for later use:
const Alexa = require('ask-sdk');Then move to the bottom of the file, we can see the following code:
const skillBuilder = Alexa.SkillBuilders.standard();exports.handler = skillBuilder .addRequestHandlers( CheckAudioInterfaceHandler, LaunchRequestHandler, HelpHandler, SystemExceptionHandler, SessionEndedRequestHandler, YesHandler, NoHandler, StationListHandler, LoadMoreStationsHandler, StartPlaybackHandler, NextPlaybackHandler, PreviousPlaybackHandler, PausePlaybackHandler, ExitHandler, AudioPlayerEventHandler, CanFulfillIntentRequestHandler ) .addRequestInterceptors(LoadPersistentAttributesRequestInterceptor) .addResponseInterceptors(SavePersistentAttributesResponseInterceptor).addErrorHandlers(ErrorHandler) .withAutoCreateTable(false) .withTableName(constants.skill.dynamoDBTableName) .lambda();
This is where we register your our interceptors, adding requestHandler to the skillBuilder by using .addRequestInterceptors. The .lambda() method serializes the object to JSON ready for the Alexa Skill to read.
Now, let’s move to intent handlers, Alexa Skill’s request and response interceptors are passed a HandlerInput instance when invoked, Let’s take LaunchRequestHandler and an example:
When a customer starts skill by saying, “Alexa, open my radio”, our skill receives a request of type “LaunchRequest”. handlerInput.requestEnvelope.request.type === “LaunchRequest” in “canHandle” function makes sure it would be doing just handling launch requests.
All the other intent handlers are quite similar, some of the intents use reprompt(speechText). That gives the command to Alexa to wait for a response from a user, Alexa speaks the reprompt if the microphone has been open for eight seconds without user input.
Now that you saw all those details about Alexa Skill Development, we are ready to deploy and test the skill.
Deploy the skill
To deploy the skill run the following command .
$ask deploy
The ask deploy command automatically enables your deployed skill, it create a lambda function, IAM role and link them together.
Attach policy to IAM role
Alexa skill kit would create a default IAM role “ask-lambda-myradio” for our lambda function after skill deployed. Now we can attach our policy created in previous step to lambda function’s IAM role.
$aws iam attach-role-policy --role-name ask-lambda-myradio --policy-arn "arn:aws:iam::ACCOUNT_ID:policy/my-radio-skill-policys"
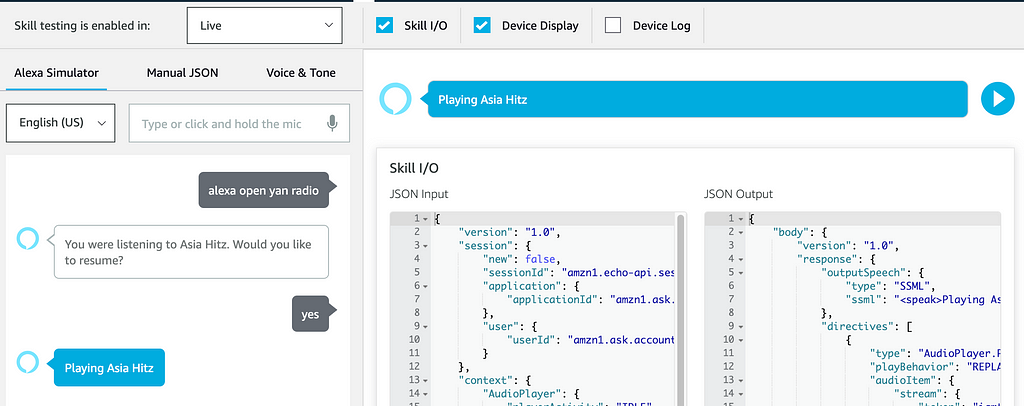
That’s about it! we can now use our skill from your device or simulator.
I hope you have found this article useful, You can find complete project in my GitHub repo.
Building a Multi Streaming Alexa Skill with the Alexa Skills Kit was originally published in Hacker Noon on Medium, where people are continuing the conversation by highlighting and responding to this story.
Disclaimer
The views and opinions expressed in this article are solely those of the authors and do not reflect the views of Bitcoin Insider. Every investment and trading move involves risk - this is especially true for cryptocurrencies given their volatility. We strongly advise our readers to conduct their own research when making a decision.


