Latest news about Bitcoin and all cryptocurrencies. Your daily crypto news habit.

Welcome to one of the most exciting fields in the world; Web Design & Development! The main intention of writing this article is to emphasize and describe the web design & development concepts and techniques which have been used to design my web application; “An Online Technical Support Management System”. At the very beginning of the article, I clearly identify the most fundamental parts of my web application. They are:
- Problem Statement
- Project Goals and Objectives
- Actors and Activities of My Web Application
- Target Audience
Identification of these things is very important before writing any line of code.
Throughout the article, I describe each and every step of building my web application by following the steps of “The Website Development Cycle”. Coding is just one step of the development cycle. As there is the technology that helps to write HTML, CSS, JS, PHP and MySQL codes easily, we don’t need to worry about coding. In my article, I emphasize other web design & development concepts and techniques rather than explaining the coding. I also describe the importance of writing semantically and syntactically correct codes.
Now, it’s time to go through the Website Development Cycle and describe each step of building my web application.
1. Conceptualization
1.1. Identify the problem statement
Design a web application for an online technical support management system (here I name it as “Tech Support Expertise”) which facilitates to find technicians for customers and provide technical support for them. There are two main actors which should be distinguished in my web application. They are clients and customers. The clients are the technicians who have their own profiles and duties and want to provide service for customers. The customers are people who want to get service (technical support) from technicians. There is an interaction between clients and customers in my web application.
1.2. Set goals and objectives
My goal is for all technical support services of the company to be made on the website through the client-server interaction and I expect to increase the number of website visitors by 75% at the end of this year.
To achieve the above goal, I have to follow the objectives listed below.
- Create 3 separate login systems for clients, customers and admins.
- Enable to register for new clients and customers.
- Data validation when a new customer or client registration occurs — I use PHP to validate data before they go to the database. By doing this, there will be no incorrect and unwanted data in the database. It means that users can log in using accurate data.
- Organize technicians’ profiles under different technical categories — By doing this, customers can find technicians very easily.
- Customize the home page to the currently logged in user — I use the email address of the user to display a welcome message when he logged in.
- Use different colour schemes for the header, navigation bar and content areas — This will enhance the readability of contents and will attract and engage many website visitors (target audience).
- Add administrative functions to the web application — By using these functions, the admins can View, Edit, Delete and Add customer and client data.
1.3. Determine the target audience, main actors and activities of our web application
The target audience is the people (basically customers and technicians) who use my website. My intended target audience is specific such as college students, young people and senior citizens. When I design my web application, I consider the fact that my website should appeal to and meet the needs of the target audience. That’s why I add appealing graphics, contents and necessary functional requirements to my website.
I have already defined two main actors in our web application. They are clients and customers. All the actors in my web application are listed below.
- Client — Represents one of the primary actors in my web application. Clients are technicians who provide technical support services (Electrical, Computer, Automobile and Telecommunication support) for customers.
- Customer (End-User) — Represents the other primary actor in my web application. Customers are people who get technical support services from clients.
- Administrator — Administrator of my web application is responsible for several tasks. As an example, the administrator can View, Edit, Delete and Add customer and client data. The administrator can also make changes to the website interface; changing the page layout and background images, etc.
- Database Server — In my web application, I use MySQL as the database server. It acts to store the client and customer authentication information (email addresses and passwords) and their personal details such as name, gender, etc. The database server also adds information about a new customer or client when a new customer or client registration occurs.
- Web Server — Web server takes care of storing, processing and delivering web pages of my web application to the website users. When the web server receives a request from the client (here client means web browser, in web design terminology), it responds to the request and delivers web pages and associated files to the client (web browser). This is called “The Client-Server Model”.
Based on the above actors, I can identify the following activities in my web application.
- The customer starts the process by logging in to the website. If the customer enters his or her username and password correctly, he or she will direct to the home page and sees a welcome message with the email address. If the username and/or password is incorrect, he or she will not be able to log in and will see an error message “Invalid username or password” until he or she enters the correct username and password.
- In case of a new customer who doesn’t already have an account, he or she has to register (sign up) on my website. He or she is asked to fill all the fields of the form and then to submit. If he or she leaves any form field empty or enters incorrect password combinations or enters the email address in invalid format, the form is not submitted and data will not go to the database. In any of these cases, an appropriate error message is displayed. I use PHP to validate data before they go to the database. This type of validation is necessary to prevent store incorrect and unwanted data in the database. If the user enters all data correctly, data will go to the database when the form submits. It means that the registration process was successful. Now he or she can log in as discussed earlier.
- After logging in, the customer can search profiles of the technicians to find the technician in the desired support category. Once the customer has chosen a suitable technician, he or she can contact that technician by phone or through the contact form by sending a message.
- After the technician receives the message from the customer, he will reply to it as soon as possible. In this way, there is an interaction between technicians and customers in my web application.
2. Analysis
2.1. Determine information topics
I have organized the information to be presented on the site into categories and created a hierarchy.
e.g. I have organized the “Technical Support Fields” (Electrical, Computer, Automobile and Telecommunication Support) into one category called Services.
These information topics were used later as a starting point for developing the site navigation and getting an idea about the exact number of web pages in my web application.
2.2. Determine functional requirements
HTML is to define the content of web pages. CSS is to specify the colours and layout of web pages. HTML and CSS together create just the website interface. This is an example of a static website. The only interactivity is hyperlinking. To fulfil the functional requirements, I have to create a database and connect it with a server using a server-side scripting language (PHP). After adding PHP, SQL and JS, my site will be a dynamic website which has various functions. I have identified the following functional requirements in my web application.
- My website will perform form validation using PHP. The email and password combinations will be validated before added to the database. It is important that the data submitted by a user is as accurate as possible before adding to the database.
- Customers can send emails to the technicians.
- My website will handle log in processes using data stored in the database.
- My website will handle new customer registrations by validating and adding data into the database.
- The admins can View, Edit, Delete and Add customer and client data.
2.3. Determine software & other tools
- Web server: Apache
- Database server: MySQL
- Code editor: Microsoft Visual Studio Code
- Graphics editor: Microsoft Paint
- Visual site map tool: GlooMaps (online)
- Colour extracting tool: colr.org (online)
- Colour contrast checking tool: snook.ca (online)
- Database management GUI: phpMyAdmin (Part of XAMPP)
3. Planning & Design
3.1. Choose a site organization
There are three common types of website organization: Hierarchical, Linear and Random.
In my web application, I have used the hierarchical website organization. A diagram of the organization of a website is called a site map. I created the following site map for my web application.
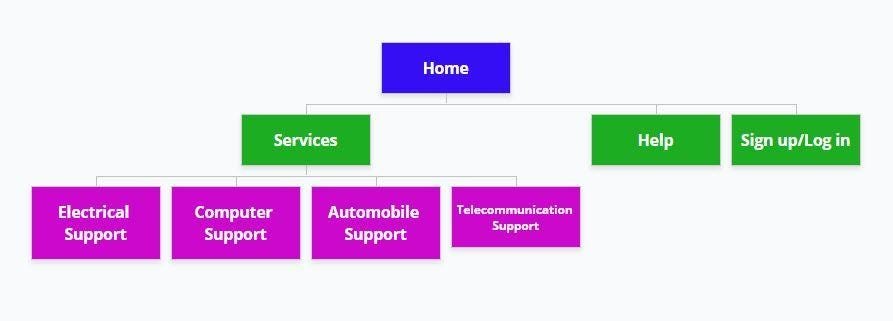 The site map for my web application3.2. Set a folder hierarchy (folder structure)
Folder hierarchy is a diagram that illustrates the organization of website files and images. The following diagram shows the folder structure of my web application.
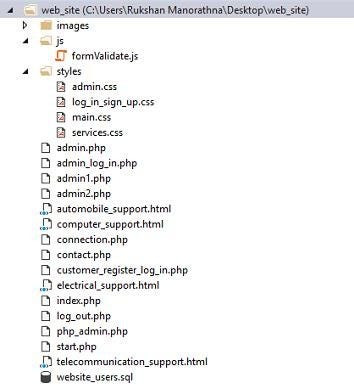 The folder structure of my web application
As in the above diagram, I considered placing images, JavaScript and CSS files in separate folders for a better arrangement of website files. I also determined the following naming convention for website files, folders and images.
Naming Convention for Website Files, Folders & Images
Web servers are case-sensitive. Browsers, web servers and scripting languages do not handle spaces consistently. Therefore, it is best to get into the habit of writing folder, file and image names with lowercase letters with no spaces and with word separated by underscores.
- web_site folder: This is where all my website files live.
- index.php file: This is the home page. This goes inside the web_site folder.
- images folder: This folder will contain all the images that I used on my site. This is created inside the web_site folder.
- js folder: This folder will contain all JavaScript files.
- styles folder: This folder will contain all the .css files. This is created inside the web_site folder.
3.3. Design page layouts (wireframes)
A wireframe is a sketch or diagram of a web page that shows the structure of basic page elements such as the header, navigation, content area and footer. It depicts the overall structure of the web page. The following image shows the actual home page and its wireframe of my web application.
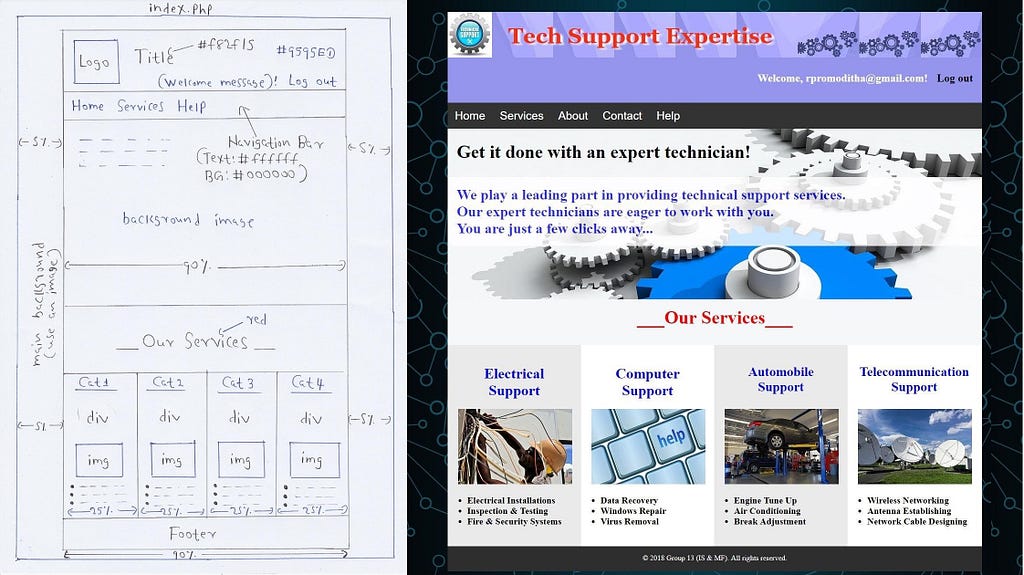 The actual home page (right) & its wireframe (left)3.4. Choose colour schemes
There are two colour combinations for each colour scheme. They are text colour and background colour. We should choose background colours and text colours with a high amount of contrast. The contrast ratio between background and text colour should be at least 4.5:1 for small text. If the text has a larger font, the contrast ratio can be as low as 3:1.
Colour Scheme for the Navigation Bar
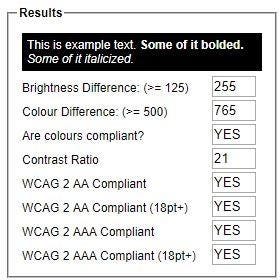 Colour contrast check for the navigation bar
- Text Color: #FFFFFF
- Background Color: #000000
Colour Scheme for the Automobile Support Page
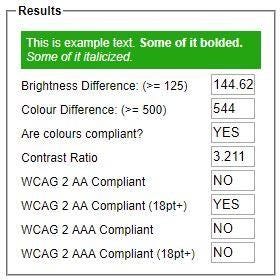 Colour contrast check for the Automobile Support Page
- Text Color: #FFFFFF
- Background Color: #24A613
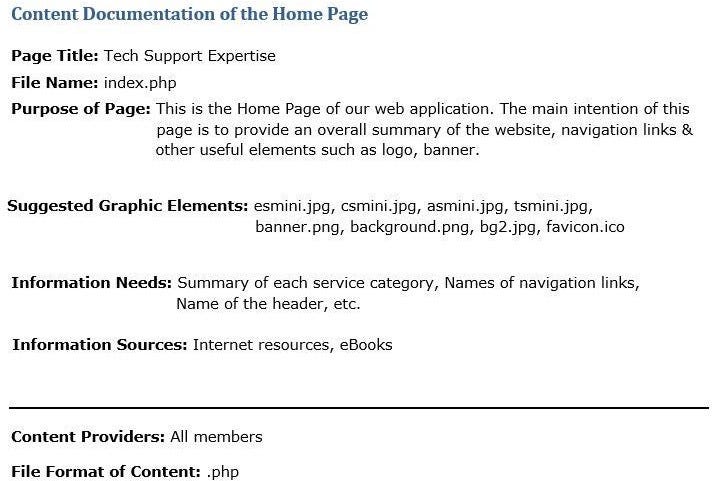
3.5. Document each page
Prepare a content sheet for each page is a good practice. Content documentation describes the functionality of the document, text and graphics content requirements and source of the content.
4. Production and Testing
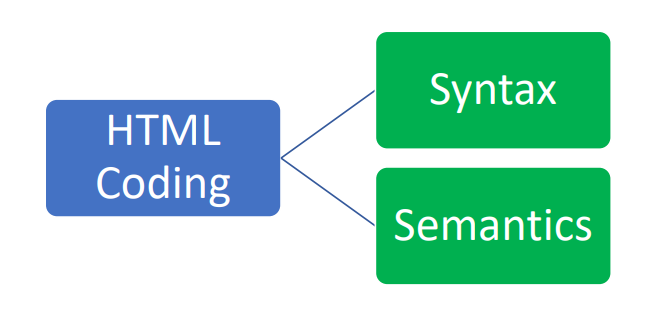
- Syntax is the arrangement of elements and attributes to create well-formed documents.
- Semantics is concerned with meaning. In HTML, a semantic element clearly describes its meaning to both the web browser and developer. div element is a non-semantic element. header, nav, footer, main elements are semantic elements.
- Rather than using div element to configure divisions of the web pages, I used semantic structural elements (header, nav, footer) to configure specific areas (head section, navigation bar, footer) of the web pages in my web application.
The Importance of Using Semantic Markup
Semantic markup is a descriptive markup that identifies the intended use of document sections. When we use semantic markup, the document elements match the meaning and usage of document sections: p signifies a paragraph, nav signifies a navigation area, but non-semantic div element just describes a division. Writing semantic HTML markup has a variety of important advantages.
- Maintainability: Web pages with semantic markup are easier to update.
- Faster: Web pages with semantic markup can easily be found by search engines.
- Accessibility: Web pages with semantic markup can easily be read from screen readers.
4.2. Create a database
I need to handle data related to our web application. The process of structuring application data is called database normalization. The key to database normalization is to build my database so that my web application can quickly and easily modify, delete, search and find data. There are standard rules that I have to follow for creating a database for my web application. These rules are called normal forms. Each normal form defines a set of standards to follow for organizing data.
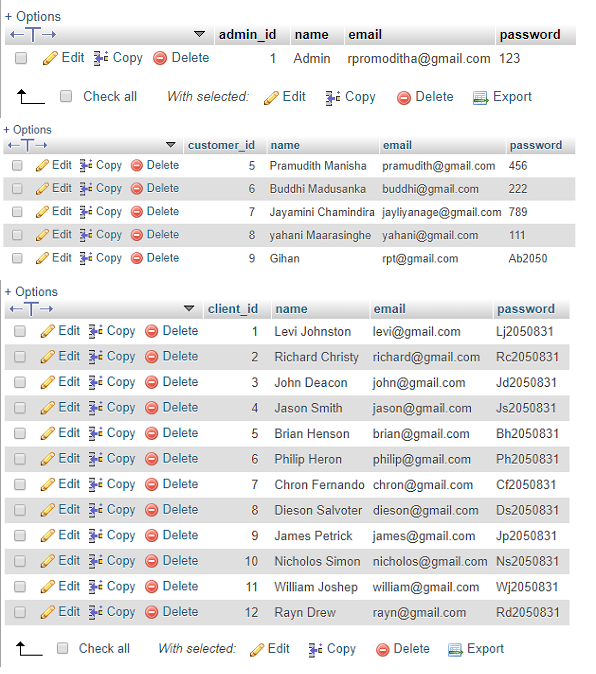
I first created a database called website_users. Then I added three tables into that database.
- A table called clients in which I stored client sign up and log in data. There are four fields (columns) in this table. They are client_id, name, email and password.
- A table called customers in which I stored customer sign up and log in data. There are four fields (columns) in this table. They are customer_id, name, email and password.
- A table called admins in which I stored admin sign up and log in data. There are four fields (columns) in this table. They are admin_id, name, email and password.
Data fields hold individual data elements. Each column of tables represents data fields. Each row of tables represents data records.
Using the First Normal Form
- First part: This specifies to group related data into separate tables. In my database, I created three tables to store sing up and log in data by grouping client information into the clients table, customer information into the customers table and admin information into the admins table. That covers the first part of the first normal form.
- Second part: This specifies that I need to provide a way to uniquely identify each individual data record in each of the tables. I did that by defining a primary key data field (client_id, customer_id, admin_id) for each table. I cannot define the name field as the primary key because there could be multiple clients, customers or admins with the same name.
- Third part: This specifies that I should eliminate any redundant data contained in the table. For example, in my database, one service category consists of multiple clients. The solution is to create a separate table with the service category information.
4.3. Open a connection to the MySQL database
Before I can access data in the MySQL database, I need to establish a connection to the MySQL database server using a PHP code. The connection creates a database session from which I can submit queries and retrieve results. The following lines of code will open a connection to the MySQL database in my web application.
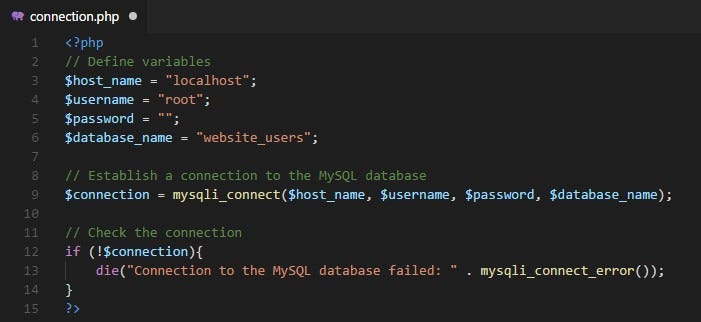 PHP script to open a connection to the MySQL database4.4. Configure the email functionality
In my web application, users can send emails to the technicians by submitting an HTML form. To send emails from localhost (127.0.0.1) in PHP using XAMPP, we need to do some mail configurations in the php.ini file and sendmail.ini file.
Step 1: Open php.ini file. In XAMPP, the default location is: C:\xampp\php\php.ini
Step 2: In the php.ini file, find extension=php_openssl.dll and remove the semicolon from the beginning of that line to make SSL working for Gmail for localhost.
Step 3: In the php.ini file, find [mail function] and configure parameters as follows.
 The Configuration Parameters in [mail function] in php.ini File
Step 4: Open sendmail.ini file. In XAMPP, the default location is: C:\xampp\sendmail\sendmail.ini
Step 5: In the sendmail.ini file, configure parameters as follows.
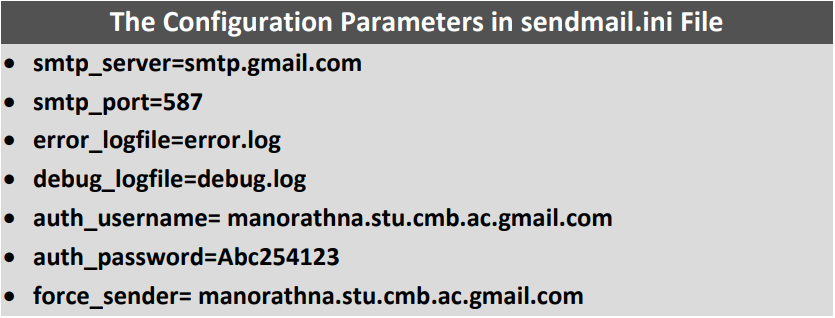 The Configuration Parameters in sendmail.ini File
Step 6: Restart the web server to take effect the changes.
4.5. Test the email functionality
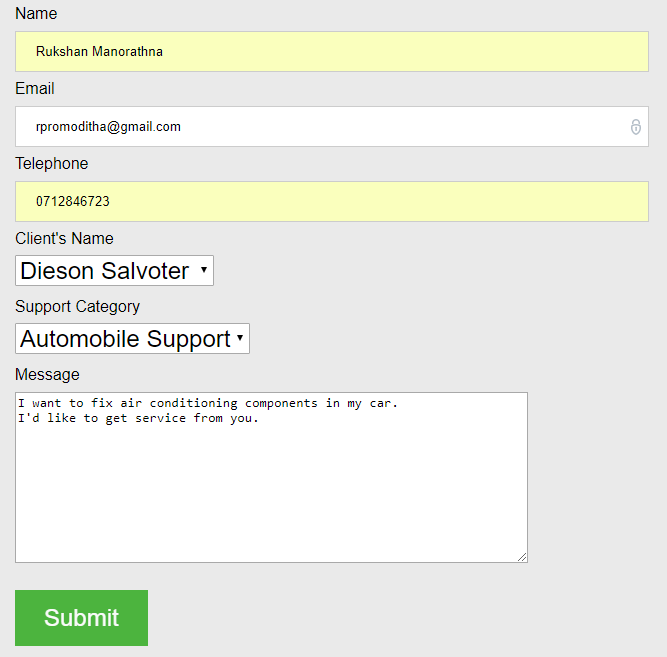
Let me test the email functionality by actually sending an email from my web application. Imagine that a customer is about to send a message to a technician. He has filled the following HTML form.
After the user clicks the Submit button, the following message appears if the message has been sent to techexpertise2018@gmail.com successfully. techexpertise2018@gmail.com is the email account from which all the technicians send and receive messages.
If there is a problem in sending the message, the message will not send and the following error message will appear.
Let me go to the inbox of techexpertise2018@gmail.com. I can see an email message if the form was successfully submitted.
 Inbox of techexpertise2018@gmail.com
I can see the following output after opening the above email.
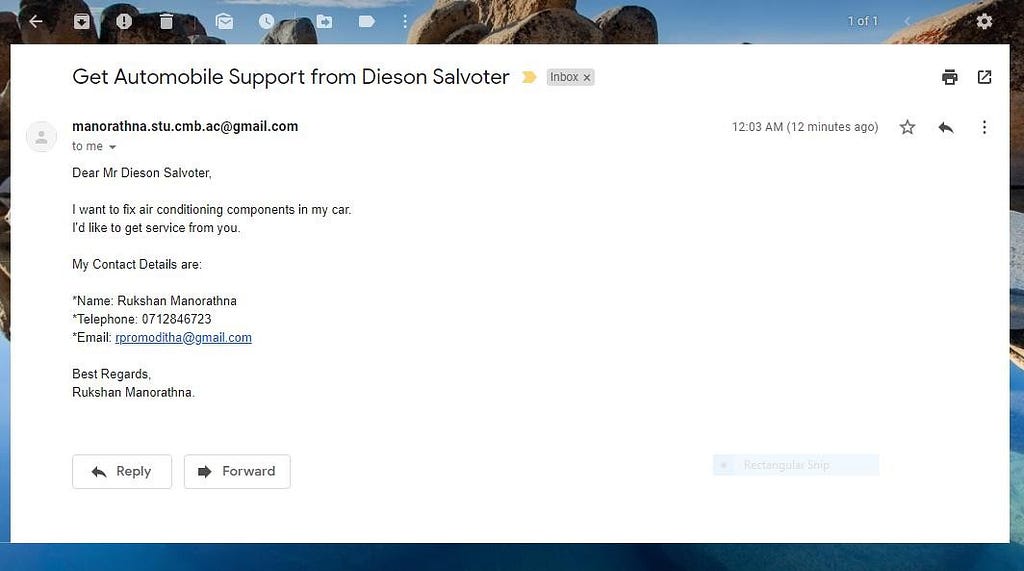 Message Received from the Customer
Note that the subject and the body of the above email was automatically created from the data entered by the user in the HTML form. The following PHP script did the task.
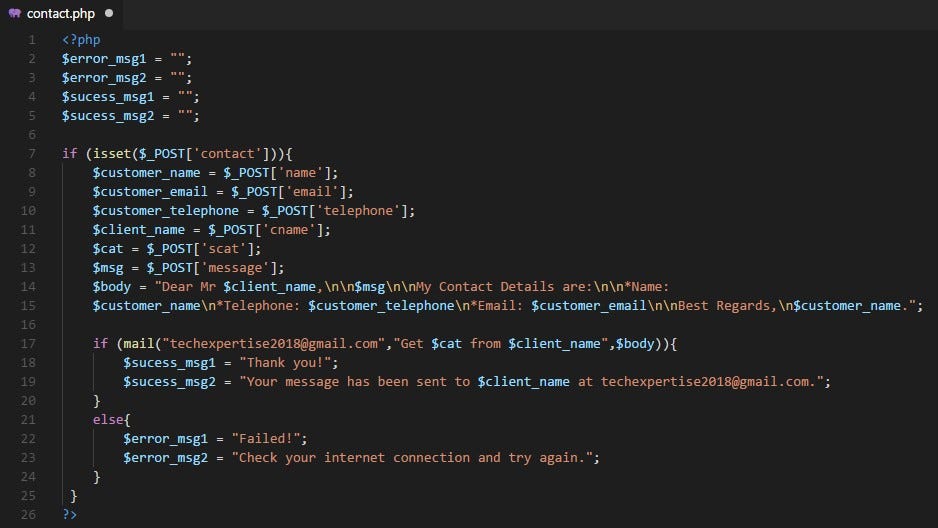 PHP script to create an email from the data entered by the user4.6. Create administrative functions
My web application has 3 separate login systems.
- Login system for the customers
- Login system for the clients
- Login system for the administrator(s)
I created a database with 3 separate tables to hold data for these 3 login systems.
The administrator can log in through the following form.
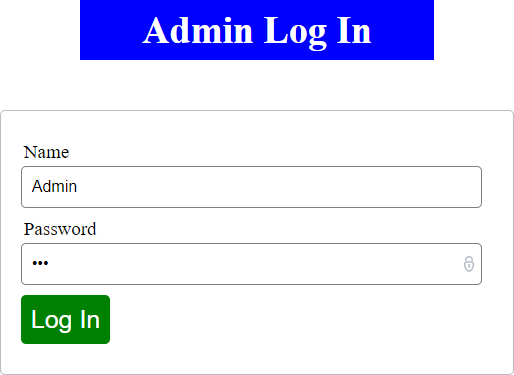 HTML Form to Login for the Administrator
After logging in, the administrator will go to the home page. In addition to typical tasks, the administrator can view, edit, delete or add data by clicking the link View or Update Data.
View data
The administrator can view data through the browser window. In my web application, I arranged Customer data, Client data and Admin data in 3 separate tabs for ease of access.
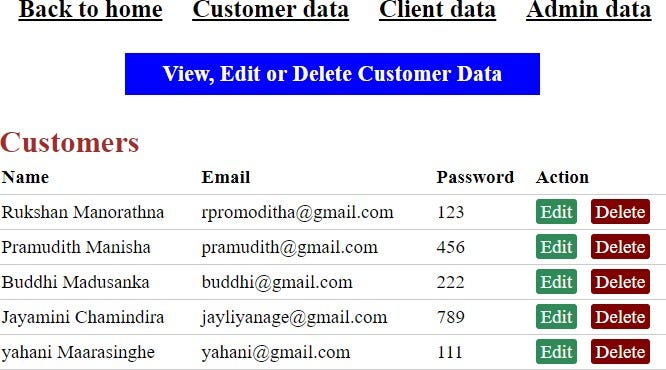 View Customer Data
 Related SQL Query to View Customer Data
Edit data
The administrator can edit data through the following form.
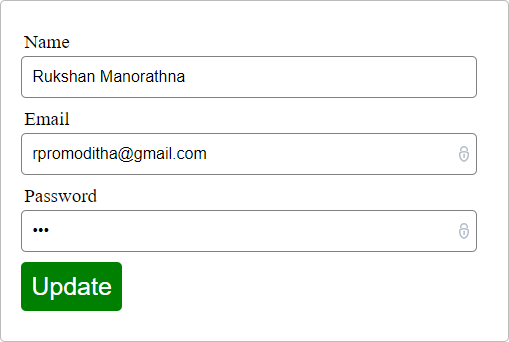 HTML Form to Edit Customer Data
 Related SQL Query to Edit Customer Data
Delete data
The administrator can delete data by clicking the delete button.
 Related SQL Query to Delete Customer Data
Add data
The administrator can add data through the following form.
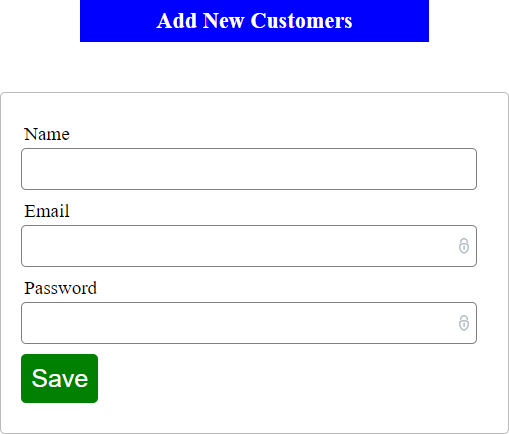 HTML Form to Add Customer Data
 Related SQL Query to Add Customer Data
This is the end of explaining the Website Development Cycle which consists of steps in both front-end (the visible parts of a website) and back-end (the “under the hood”: databases and infrastructure) development. The front-end of a website is the part that a user sees and directly interacts with. The front-end is built with languages such as HTML, CSS & JavaScript. The back-end is much more behind-the-scenes; databases and infrastructure. The back-end is built with languages such as PHP, SQL. A hybrid of front-end & back-end development is referred to as full stack development. My website is an example of a full stack website because it consists of both front-end & back-end parts.
I want to hear from you…
As a writer & a web developer, I highly appreciate your feedback which is my most valuable asset. Please tell me what you think of this article at:
rukshanpramoditha@gmail.com
If you have any question regarding this article, please feel free to drop a message at:
rukshanpramoditha@gmail.com
+94712846723 (SMS only)
Thank you for reading my article. Next time, I will meet you with another exciting topic; Big Data Concepts (To Unlock Value in Massive Datasets). Have fun!!!
Copyright: All the contents & images, except the cover image, are completely copyrighted by Rukshan Pramoditha Manorathna; the writer of this article.
Explaining the Website Development Cycle with an Example Project was originally published in Hacker Noon on Medium, where people are continuing the conversation by highlighting and responding to this story.
Disclaimer
The views and opinions expressed in this article are solely those of the authors and do not reflect the views of Bitcoin Insider. Every investment and trading move involves risk - this is especially true for cryptocurrencies given their volatility. We strongly advise our readers to conduct their own research when making a decision.
