Latest news about Bitcoin and all cryptocurrencies. Your daily crypto news habit.
 https://www.arc-magazine.com/wp-content/uploads/2018/06/KL-Sports-City.jpg
Some time back I wrote an article on implementing MVVM Design Pattern in iOS using Swift programming language. I received a lot of great feedback on the article. which led me to publish my Udemy course “MVVM Design Pattern in iOS”.
This article is an update to my original article and focuses on the new techniques when implementing iOS applications incorporating MVVM Design Pattern.
The premise of the article revolves around a Coffee ordering application. The barista takes the order from the customer which includes the following:
- name
- coffee type
- coffee size
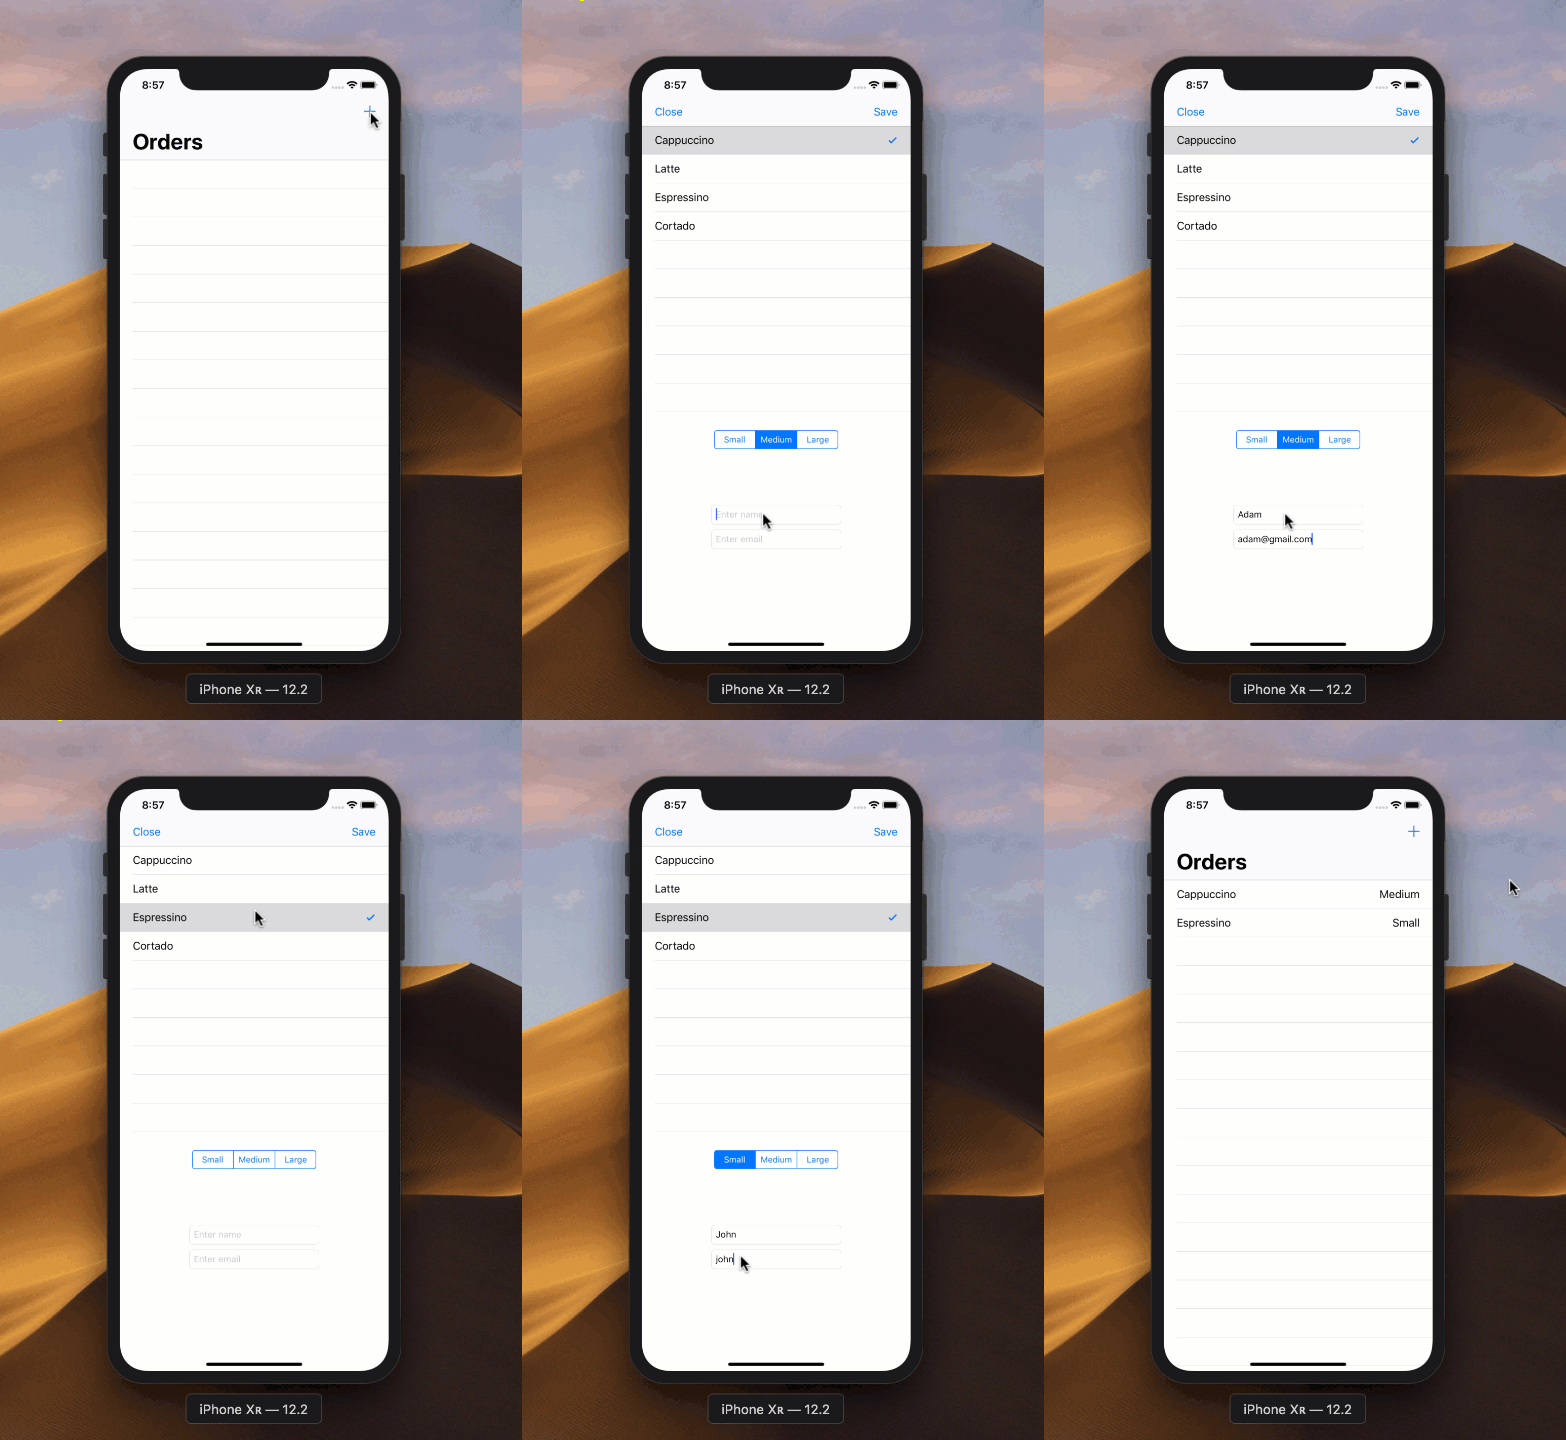
The order is sent to the server and saved. Finally, the barista is able to view all the orders from the customers in a list. The demonstration of the app is shown below:
Let’s get started.
Server
I implemented the server in NodeJS using Express. The server is really not that important for the purpose of this article. The complete implementation of the server is shown below:
As you can see, no database is used for our server. The coffee orders are stored in memory. In an actual app you will definitely use a database or else all the orders will magically vanish when the server restarts, resulting in angry customers.
The server is also hosted publicly on heroku at the following URL:
https://guarded-retreat-82533.herokuapp.com
Webservice Client
Our first task is to retrieve all the orders from the server. For this we will implement a Webservice API client in our iOS application.
We will start by creating our Resource struct which will represent resource type, URL and the method (GET/POST) used to access the resource.
Next we will implement the Webservice client as shown below:
The Webservice class is taking advantage of the new Result type in Swift 5 programming language. The Result allows us to associate the success and failure functions, which makes it cleaner to handle the two cases. If you want to learn more about Result type then check out my video below:
The Webservice will return the JSON data that can be mapped to our model. In the next section we will implement our Order model.
Implementing Model
Once the Webservice returns data we need to map it to our model. Swift 4 introduced Codable protocol which helps us to seamlessly map the JSON result to a class or struct, conforming to Codable protocol.
The implementation for the Order model is shown below:
The Order struct exposes the same properties as returned by the Web API. Keep in mind that properties of the model does not have to match to the response returned from the API. You can use CodingKey protocol to provide custom mapping. Custom mapping is out of the scope of this article, if you want to learn further about JSON mapping in Swift 4 then check out my Udemy course “The Complete Guide to JSON Parsing Using Swift 4”.
Our Order model also consists of some helper methods which allows it to create a resource. Take a look at the following methods:
Each method will be responsible for returning a Resource object which provides information on how to work with the resource. The create method takes in a View Model object and uses it to instantiate an order and then pass the order object to the webservice.
Once the models are populated they need to display the data on the view. This is where the concept of View Models comes into play.
Implementing View Models
The basic idea of the View Model is to take the data from the model and then provide the data to the view. Let’s check out the implementation of the OrderViewModel which is responsible for displaying order related data on the screen.
The OrderViewModel is a plain view model, which simply returns the data as primitive type to the view. Since it does not return a complex object, the data can be easily displayed on the view.
View Models can either be smart or plain. Smart view models can have logic to make Webservice calls through the web service layer. A view model is said to be plain when it simply provides data to the view and does not perform any complex operation.
The OrderViewModel represents each order, which will be displayed in a UITableView control. Although you can simply use an array of OrderViewModels and populate your UITableView, I recommend creating a parent view model which represents the entire view. This way you will always have the flexibility to provide data for additional view items like SegmentedControl, PickerView etc.
The parent view model in our app is called OrderListViewModel. The OrderListViewModel represents the entire screen which is responsible for displaying orders.
The second view model we will implement is called the AddCoffeeOrderViewModel. This view model is responsible for providing data as well as gathering input data from the Add Coffee Order screen.
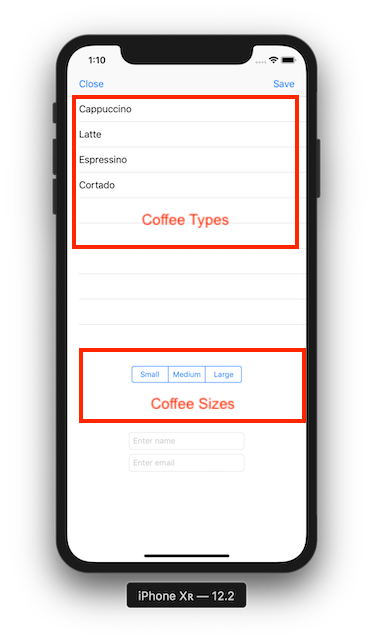
If you look at the coffee ordering screen below you will realize that the coffee ordering screen requires couple of different things before we can order coffee.
Luckily all this information can be provided to the view by AddCoffeeOrderViewModel.
One thing to notice is the types and sizes properties of the AddCoffeeOrderViewModel. Both properties returns [String] which is later binded on the screen. By returning primitive types we make it easy to display information on the screen.
Adding a New Coffee Order
Now that we have displayed the coffee types and sizes on the screen, the only remaining step is to order a new coffee. This is implemented in AddCoffeeOrderViewController. When the person presses the save button we gather all the selections from the UI, populate the instance of AddCoffeeOrderViewModel and then make a request through the webservice which inserts the new order. The implementation is shown below:
Keep in mind that after populating the view model with the user selections we are converting the view model into a resource using the Order.create function and then sending it to the server using our web service layer.
In this article we did not use any third party framework for UI to VM binding. You can use RxSwift or Bond framework to perform uni-directional (UI to VM) binding in your application.
MVVM design pattern allows us to divide our interface into smaller components. This helps us to build more customizable apps and also helps us with writing unit tests for our application.
Keep in mind that just because you are using MVC design pattern does not mean that you will end up massive controller. There are ways to refactor your controller and make sure it is lean. It is never a good idea to blame a design pattern for your own mistakes. In the end it is just a design pattern.
Thanks for reading! If you want to support my work then buy my MVVM Design Pattern course below:
MVVM Design Pattern Using Swift in iOS | Udemy
Resources:
MVVM in iOS (Revisited) was originally published in Hacker Noon on Medium, where people are continuing the conversation by highlighting and responding to this story.
Disclaimer
The views and opinions expressed in this article are solely those of the authors and do not reflect the views of Bitcoin Insider. Every investment and trading move involves risk - this is especially true for cryptocurrencies given their volatility. We strongly advise our readers to conduct their own research when making a decision.

