Latest news about Bitcoin and all cryptocurrencies. Your daily crypto news habit.
Kickstarting Dockers — Beginner Friendly
It’s been a while that I have heard about the dockers but never got a chance to explore it, until recently when I have been assigned a blockchain related project. Blockchain is a beast in itself, depending on the platform that you are using, it requires a lot of dependencies to be installed. Since blockchain is based on the concept of decentralization, there are high chances that you will need to set up multiple nodes which means you have to deal with all the dependencies drama over and over again. So, it is a high time to kickstart dockers. This article represents some of my understanding and learnings in dockers which I had found really useful in my journey of development so far.
So let’s get started.
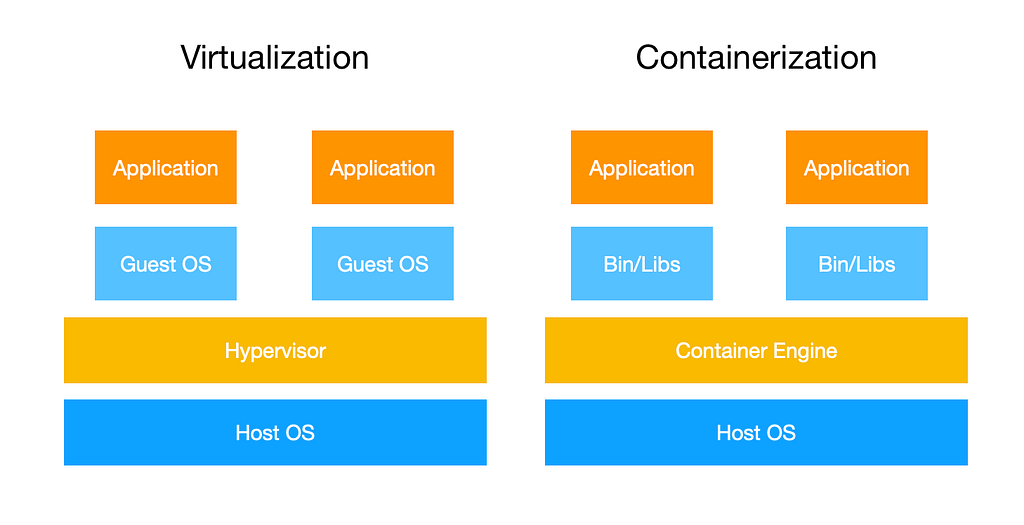
First, let’s clear the differences between virtualization and containerization.
Dockers are based on containerization, which is far more lighter and faster than using VM’s. In virtualization, any Virtual Machine created has its own OS, binaries, libraries or drivers. It sits on top of the hypervisor and occupies a fixed memory as allocated during VM creation. So even if the VM actually uses only half of the memory, it will still occupy full memory. Whereas in containerization, the host OS, drivers etc are shared between the containers. Therefore, the size of containers reduces dramatically which makes containers lighter and faster. In dockers, the role of hypervisor is taken up by Docker engine. Dockers allow us to create more containers as compared to VMs within the same amount of memory.
Now, let’s look at a typical docker workflow.
A developer creates a file called Docker File, which has a set of instructions to create a Docker Image. When you run a Docker Image, it will create a Docker Container. Same docker image can be run multiple times to create multiple Docker Containers. We will look into each of these components.
Ah! Wait! If you want to get your hands on actually running the docker, you might want to install the pre-requisites ( git, docker) and clone this repo- https://github.com/heychessy/nodejs-docker
Install git — https://git-scm.com/book/en/v2/Getting-Started-Installing-Git
Install Docker — https://www.docker.com/get-started
Docker File is a text file with instructions to build an image. It automates the creation of docker images. You can also pull pre-build images from docker hub repository. Consider the docker file below (you will find this in the above git repo), which will build an image for a nodejs application-
#Dockerfile
FROM node:8 # use node image from docker hub
WORKDIR /usr/src/app #create app directory
COPY package*.json ./
RUN npm install #install app dependencies
COPY . . # copy source files from current directory to docker image
EXPOSE 8080 #expose port 8080 of the docker container
CMD ["npm", "start"] # command to run when container is created
To execute the above docker file, run
docker build -t mydockerimage .
This will create a docker image tagged as “mydockerimage”. A Docker image is made up of dependencies and it may include system libraries, tools, or other files required for the executable code.
To view all the available docker images in your system, run
docker images
Docker images when run becomes docker containers in Docker engine. In other words, Docker containers are running instances of a docker image.
Let’s understand the docker environment a bit.
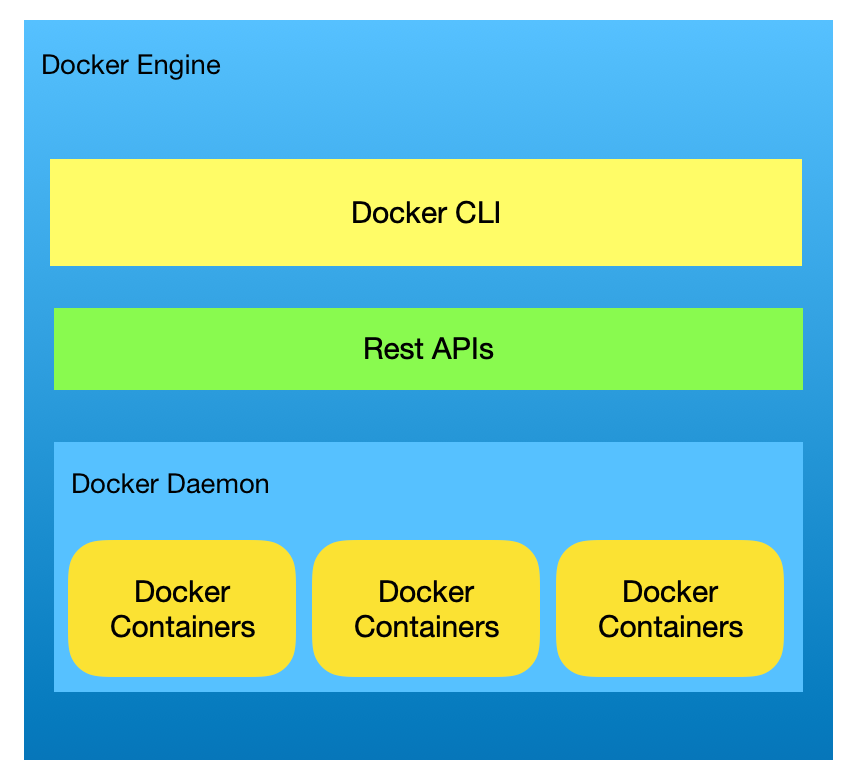
Docker is based on client-server architecture. A cli based client is used to interact with docker daemon which acts as the server. A docker client communicates to the docker daemon using REST APIs. Docker daemon is responsible for managing the docker images, containers, networks or volumes. These all components together form a Docker Engine.
Now, we will spin a container out of the docker image created above
docker run -p 3030:8080 -d mydockerimage
You can check whether the container is running or not, using-
docker ps # this will list all the running containers
You may visit http://localhost:3030 in your browser to check whether your nodejs docker app is running or not.
So, now you know how to create a basic docker container. Let's look at some of the functionalities of docker such as managing volumes, managing networks, opening ports to applications running inside the docker. We will also look into docker-compose and docker swarm.
Docker Volumes
Whenever you create docker container and do not specify any volume to be used, then all the data generated or used by the docker container will be lost once you stop the docker container. By default files created inside a container are stored on a writable container layer. Therefore, data does not persist. To keep the data persistent docker provides two ways- volumes, bind mounts, and tmpfs mounts.
Volumes are just like folders or directories which are created and mounted to docker container. The data is stored in those specified directories and managed by the docker. This data should not be allowed to be modified by non docker services. Volumes are the best way to persist data for containers.
Bind mounts are similar to volumes on the host system and these can be external mounts as well. tmpfs mounts live in hosts memory rather than the filesystem. We will be covering only volumes as a part of this post.
Let’s mount a volume to our container. We will first stop the above container and delete the container.
docker stop <container id> # use docker ps to get container iddocker rm <container id>
Now let’s create a new container with a mounted volume.
docker run -p 3030:8080 -v /directory/to/mount:/usr/src/app/output -d mydockerimage
Check whether the container is running or not
docker ps
Now visit http://localhost:3030/. You may observe that an output.log file will be created in your directory which you mounted. Whenever you visit the localhost URL, this log file will also get updated. This is because docker container is using this file to log the node server requests. Now even if you stop the container, the log file will still exist. Congratulations, now you know to make the data persistent in docker containers. You may even use volumes to share data between docker containers.
Docker Network
Currently, there are 3 types of networks in dockers- default bridge networks, user-defined networks and overlay networks ( generally used for swarm services, docker version ≥17.06).
You can view the existing docker networks by running -
docker network ls
Default bridge network- This is setup automatically. You can view this network by running -
docker network inspect bridge
In the output, you will observe the subnet and gateway for this network. Also, you will be able to view the details of the container connected to this network along with their ip addresses. By default, every container you will create will be on this network.
To test this out create two containers. Now, attach to those containers in separate terminal using,
docker exec -it <conatiner id> /bin/bash
To view the ip address of this container use,
ip addr show # run this inside the container
Using the ping command you should be able to check the connectivity with other containers.
ping -c 2 <ip of other container> # pinging other container
To get the ip of other container either inspect the network or attach to the running docker container and run ‘ip addr show’ command. Now, you have an understanding of the default bridge network.
User-defined networks — Using custom bridge network you may create your own bridge and connect containers running on the same host. This is more suitable for production environment.
Let’s create a custom network.
docker create network --driver bridge custom-network # '--driver bridge' part is optional
docker network inspect custom-network
When you inspect your newly created network, you will observe that no containers will be present on that network. To start a container on your custom-network use,
docker run --network custom-network -d <image name>
#OR
docker run --name container1 --network custom-network -d <image name>
Similarly, you can start other containers and those will be present on the same network which you defined. You can also connect a container to both the networks — user defined and bridge network at the same time. Assuming, your container is connected to custom-network and now you also want it to connect to default bridge network, use this command
docker network connect bridge <name of the container>
Great, now you have a basic understanding of how docker network works.
I don’t want to flood you with docker overdose. I will cover other docker related topics such as docker compose and docker swarm in the next article.
Hope this post has helped you in kick starting with dockers. There is a ton of cool stuff that you can achieve using Docker. So keep on exploring and remember not to get lost. Cheers! Happy Day!
Feel free to add me on LinkedIn and on Instagram!
References:
Kickstarting Dockers was originally published in Hacker Noon on Medium, where people are continuing the conversation by highlighting and responding to this story.
Disclaimer
The views and opinions expressed in this article are solely those of the authors and do not reflect the views of Bitcoin Insider. Every investment and trading move involves risk - this is especially true for cryptocurrencies given their volatility. We strongly advise our readers to conduct their own research when making a decision.


