Latest news about Bitcoin and all cryptocurrencies. Your daily crypto news habit.

Control your Ozobot Evo with a Raspberry Pi via Bluetooth
I like to move it move it: How to reverse engineer the Bluetooth protocol of a toy robot to control it with code.
Although you can control the toy robot Ozobot Evo with an App, there is no API or tutorial how to do the same with code, but I needed that for a little side project. After some searching on google I tried to reverse engineer the Ozobot Evo by myself, which was challenging for me because I didn't had any prior experience on that field. Eventually I succeeded and in this article I want to share my learnings.
The Goal
In order to get into Reinforcement Learning (RL), I wanted to set up a small real-world playground with a toy that I could remotely control with my Raspberry Pi.
I chose to realize that with an Ozobot Evo and my goal was to code the following two features: Use my Raspberry Pi to make the Ozobot move and to set its LEDs to specific colors. The article will therefore cover all the steps of the understanding and coding necessary to reach this goal.
Overview
- First of all, I used the App nRF Connect to get a first overview of the Bluetooth communication between the Ozobot Evo App and the robot itself.
- Then I sniffed the Bluetooth communication with the Android bug report and analyzed it with Wireshark and some plots.
- After understanding the protocol, I eventually coded the Python API to control the Ozobot Evo with my Raspberry Pi.
1) Getting a first idea of the Bluetooth protocol
I used the Ozobot Evo Android App to learn something about its Bluetooth protocol. For this I installed as well the App nRF Connect, which shows you the features of all Bluetooth devices conntect to your Smartphone.
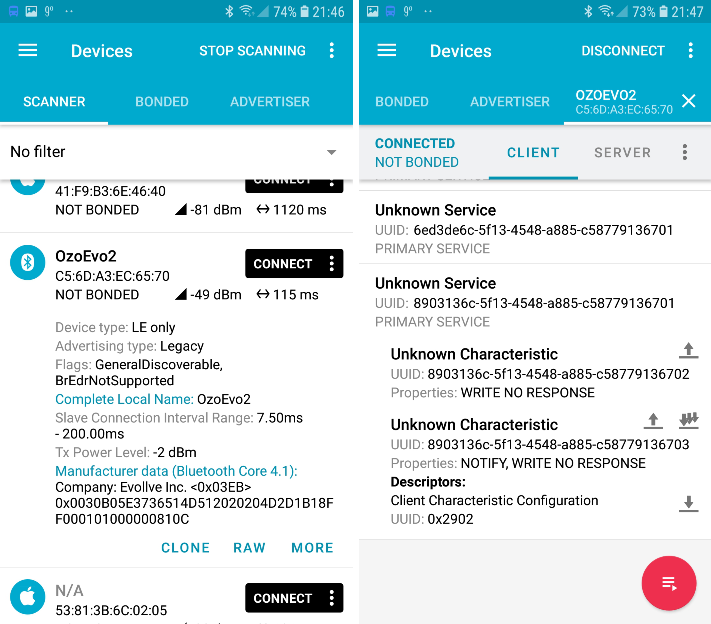 Use the nRF Connect App to get the first overview
On the first screenshot, you can see that there is Bluetooth device called “OzoEvo2” with the MAC address C5:6D:A3:EC:65:70. The MAC address is the information we need to connect to a Bluetooth device.
If you connect with the toy robot in the Ozobot Evo App, you can check its characteristics in nRF Connect.
Characteristics are the states of a device that are exposed to other devices through Bluetooth. E.g. the color of the LEDs or the speed of the wheels are some of the states of the Ozobot Evo. In the App we see different characteristics but right now, we don’t know how to interpret or use them. How to do so, we will cover in the next section. Therefore, we just note them down for now.
2) Understand the Bluetooth Communication
From our first step, we got the name and MAC address of the Ozobot Evo and we learned, that it is exposing some of it states through characteristics. To understand the characteristics, we will use the Ozobot Evo App to move the toy robot and set the LED color while recording all of the resulting Bluetooth communication.
Get a sample of Bluetooth traffic
Android has means on board to sniff all of its Bluetooth communication which is pretty awesome for our project. You have to activate developer mode for your Smartphone and then you can create a bug report that contains everything that happened on your phone including Bluetooth communication.
To be able to understand some patterns, I created two bug reports. In the first one, I switched on and off again multiple times the LED at the top of the Ozobot Evo. In the second sample, I drove the Ozobot straight ahead for some seconds.
When you have retrieved the bug report on your computer, you have to drill down rather deep to find the Bluetooth report:
YOUR-BUG-REPORT.ZIP\FS\data\log\bt\btsnoop_hci.log
Analyse the Bluetooth traffic with Wireshark
Wireshark is a free network package analyzer and we will use it to understand the communication between the Ozobot Evo App and the Ozobot itself. You can open the hci log files retrieved with the bug report.
 Setting filtes on packages sent between the Raspberry Pi and the Ozobot
At the beginning, I usually scroll down until I find some traffic between the devices I am interested in and set a filter to focus at those devices.
Here we already see something interesting: The Ozobot Evo has now a different MAC address (E4:70:7B:5B:39:11), but still the same name(OzoEvo2). We have to keep this in mind when we want to connect manually to the toy robot later.
Changing LED colors
Checking the packages for the first example (switching the LED on the top on and off again multiple times), we can already see some patterns:
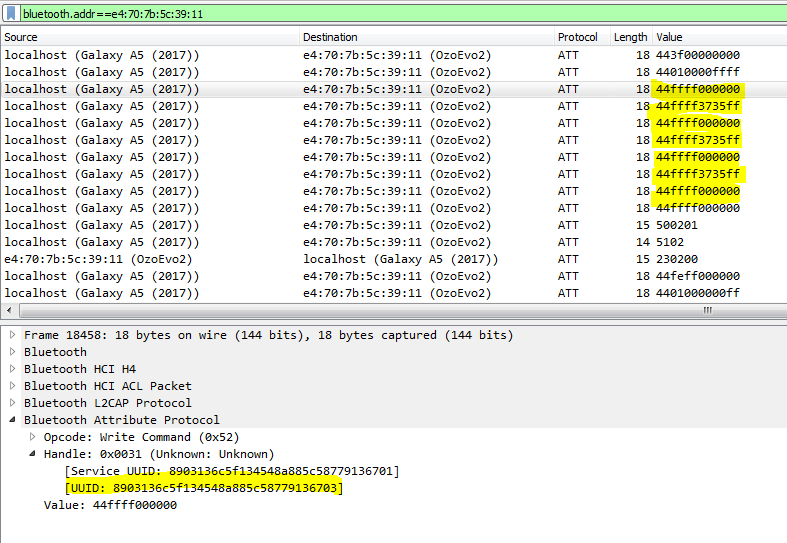 Bluetooth traffic for switching the led on the top of the Ozobot Evo on and off again multiple times
It seems like the commands for LED start with the hex byte 44 followed by an identifier of the LED consisting of two bytes (ff ff). After that, there are 3 bytes alternating between all 0 and some values for the color. Seeing 3 bytes is already a strong indicator for having one byte per color (red, green, blue).
Another information we get from this test is, that the characteristic highlighted in the screenshot is at least the right address to change the color of the LEDs.
Driving the Ozobot Evo
Compared to the LED command, driving was much harder to figure out.
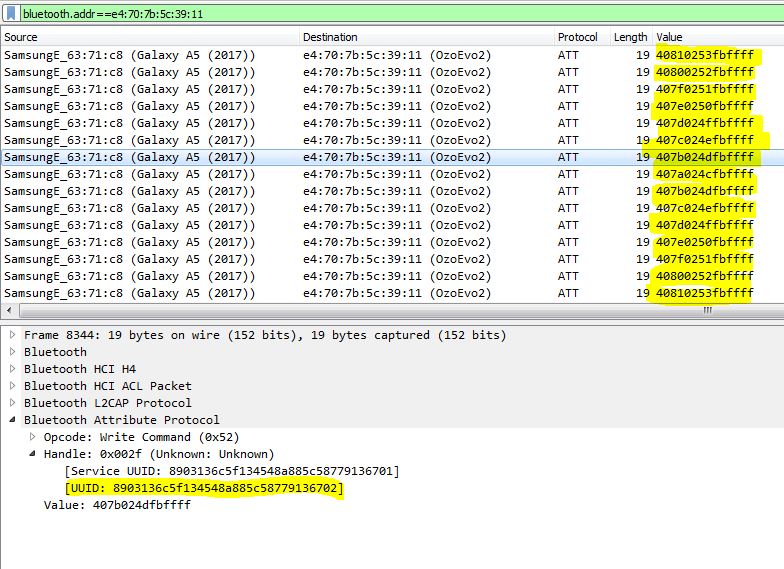 Bluetooth traffic from driving the Ozobot Evo straight ahead
First of all, we see that there is another characteristic used for the driving command.
If we look at the value of the messages, we see that there is a byte with the value 40 that apparently indicates a driving command. After that, it becomes a bit harder to understand. We see another 6 bytes, two of them consistently changing although I only drove the bot straight. The two bytes at the end are at “max value” ff all the time.
Since it was hard to understand just by looking at payloads, I transformed the hex values to integers and plotted the relevant bytes to explore the payloads visually.
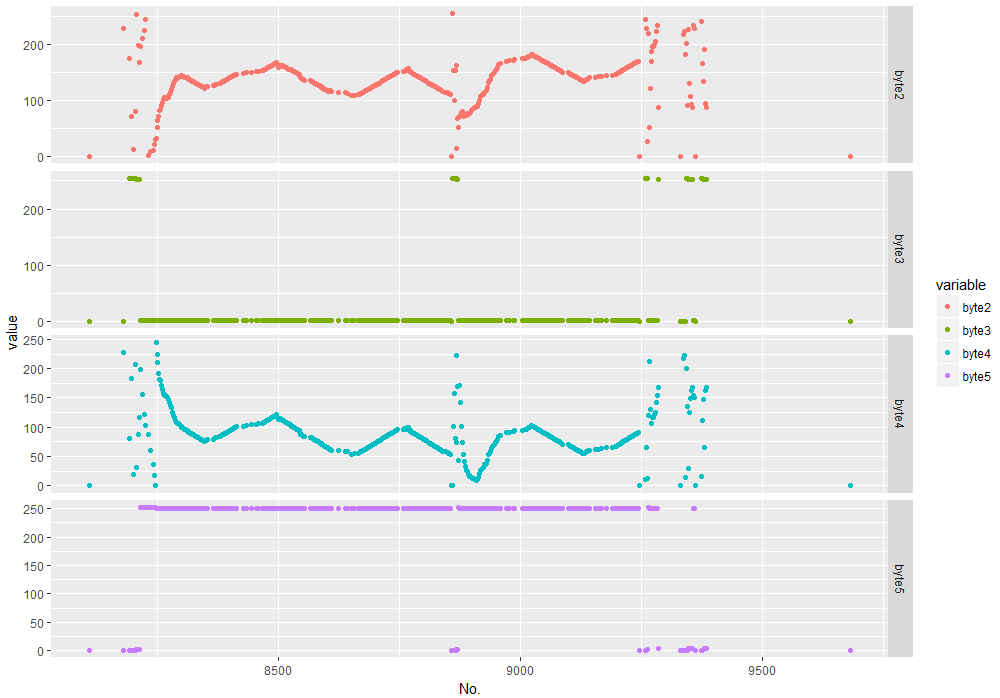 Plotting the byte arrays of the driving command: Message Id on the X axis, integer values of the bytes on the Y axis.
Seeing the pattern makes it a bit clearer what is happening. It seems like with have pairs of 2 by 2 bytes. One showing incrementing and decrementing payloads, the other showing very stable value throughout the sample.
After some trial-and-error my guess was that we see the increasing and decreasing speed rates because the Ozobot Evo App is smoothing the commands that are sent to the Ozobot if you use the joystick in the App for steering.
If we see differences between the wheels, than this was due to the fact that I moved the joystick a little bit to the right or left. So my conclusion was that byte 2 and byte 4 contain the speed of the left and right wheel.
Concerning byte 3 and 5, they seem to be a smoothed / cut off version of the other two bytes. Again after long trial-and-error and checking different sources online, my conclusion was that they must be a transformation based on bit operators.
Eventually, the content of the last two bytes is less hard to entangle when you try to send commands and the Ozobot is only moving for a blink of an eye: They contain the desired duration of the command execution in milliseconds.
3) Code the API in Python
Equipped with the understanding from part 2), we can now move on to the actual implementation of the Ozobot Evo API in Python.
You can find the code and some additional documentation in a Github repository: https://github.com/raphaelbink/raspberry-pi-ozobot-evo
Scan for the Ozobot Evo Bluetooth device
In the first step, you have to find the Bluetooth device of the Ozobot Evo and connect to it.
For this, I use the bluepy package
from bluepy import btlerobots = []scanner = btle.Scanner().withDelegate(btle.DefaultDelegate())devices = scanner.scan(10.0)
This scan will of course find all available Bluetooth devices like cell phones etc. Therefore we have to iterate through the devices found and search for the ones whose names start with “OzoEvo”.
Usually while reverse engineering Bluetooth devices, we would focus on the MAC address, but each Ozobot uses a bunch of different MAC addresses which it is iterating through at each startup.
for dev in devices: for (adtype, desc, value) in dev.getScanData(): if(adtype == 9 and value.startswith('OzoEvo')): print(adtype, dev.addr, value) robots.append(Robot(dev.addr, value))Each device is sending advertisement data, which we retrieve with dev.getScanData() in the snippet above. To get the name, we only check for the adtype == 9.
Connect to the Ozobot Evo via Bluetooth
The connection consists of two steps:
- Instantiate a peripheral object
- Get the right characteristic of the Bluetooth device to send commands to
Instantiating a peripheral object is pretty straight forward. We just have to know the MAC address of the targeted device:
_p = btle.Peripheral(robots[0]._mac, btle.ADDR_TYPE_RANDOM)
Regarding the right characteristics, we obtained them from our analysis with Whireshark (as described above in step 2). We have one characteristic for sending drive commands and another for all other types of commands:
TRANSMIT_UUID_DRIVE = "8903136c-5f13-4548-a885-c58779136702" TRANSMIT_UUID_CONTROL = "8903136c-5f13-4548-a885-c58779136703"_p_transmit_drive = self._p.getCharacteristics(uuid=self.TRANSMIT_UUID_DRIVE)[0]_p_transmit_control = self._p.getCharacteristics(uuid=self.TRANSMIT_UUID_CONTROL)[0]
Create drive and LED commands
Having the connection between the Raspberry Pi and the Ozobot Evo all set, we can now send commands to the characteristics.
In order to make this more convenient, we can write functions that handle the transformation from our parameters to the escaped byte strings which are the actual payload of the commands:
def drive(self, leftWheel, rightWheel, duration): byteArray = [] byteArray.append(64) byteArray.append(leftWheel & 255) byteArray.append(leftWheel >> 8 & 255) byteArray.append(rightWheel & 255) byteArray.append(rightWheel >> 8 & 255) byteArray.append(duration & 255) byteArray.append(duration >> 8 & 255) command = bytes(byteArray) return(command)
def led(self, led, red, green, blue): byteArray = [] byteArray.append(68) byteArray.append(led & 255) byteArray.append(led >> 8 & 255) byteArray.append(red) byteArray.append(green) byteArray.append(blue) command = bytes(byteArray) return(command)
Here we can make use of the understanding we got about the command payloads from step 2. An important step is to convert the byteArrays into an escaped hex string with the function bytes() . This function is new in Python 3.#, so make sure to start your python script with python3 on your Rasperry Pi.
Another related important information is, that you have to sudo your script execution because you need root access in order to be able to interact with the Bluetooth devices on your Raspberry Pi via Python.
Steer the Ozobot Evo with Python
Having all that prepared, there is only one other tricky requirement before you can eventually control your Ozobot Evo with your Raspberry Pi via Bluetooth.
After start up, the Ozobot Evo internally launches some random behavior. I guess this is to make it appear more“alive” and relateable. The issue with that is, that you cannot send manual commands to the Ozobot Evo until you have disabled this. After another long session of trial-and-error, I found a command that is stopping random behavior and makes the Ozobot responsive to manual commands.
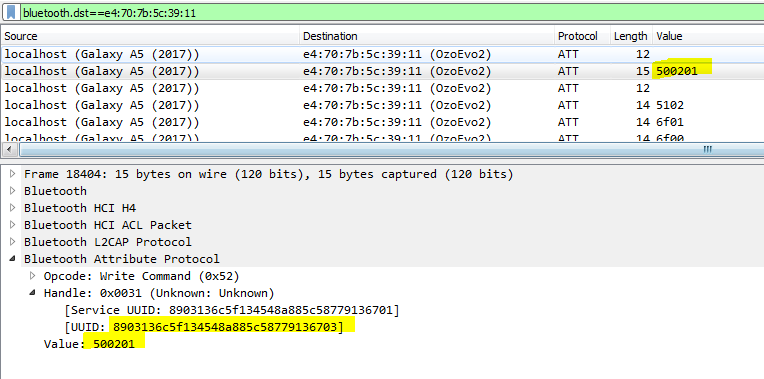 The command that stops the random behavior of the Ozobot Evo
So make sure to send the following command always first:
_p_transmit_control.write(b"\x50\x02\x01")
Only after that step, you can send all the commands you like to the Ozobot Evo with the write function and make it actually move and change its color:
_p_transmit_drive.write(drive(500,500,1000)) _p_transmit_control.write(led(255,100,100,20))
Summing Up
Reverse engineering a Bluetooth protocol is not easy if you don’t have any prior knowledge like me at the beginning of the project. At this point I would like to give credits to Kenneth Keiter, whose live Coding session on reverse engineering a smart light helped me to get into the topic.
Controlling the wheels and the LEDs of the Ozobot Evo is just the tip of the iceberg regarding the different functions of the toy robot, so I would love to see what you are finding out about the Bluetooth protocol.
Also, let me know about your ideas and projects built on top of the combination of the Ozobot Evo and the Raspberry Pi.
- In this article, there are affiliate links to Amazon.com
Control your Ozobot Evo with a Raspberry Pi was originally published in Hacker Noon on Medium, where people are continuing the conversation by highlighting and responding to this story.
Disclaimer
The views and opinions expressed in this article are solely those of the authors and do not reflect the views of Bitcoin Insider. Every investment and trading move involves risk - this is especially true for cryptocurrencies given their volatility. We strongly advise our readers to conduct their own research when making a decision.
