Latest news about Bitcoin and all cryptocurrencies. Your daily crypto news habit.
ML.NET: Machine Learning framework by Microsoft for .NET developers
Whenever you think of data science and machine learning, the only two programming languages that pop up on your mind are Python and R. But, the question arises, what if the developer has knowledge of other languages than these?
We have a solution in the form of Microsoft’s recently introduced build 2018 of its own version of the machine learning framework especially for .NET and C# developers. The framework is open source and cross-platform and can also run on Windows, Linux, and macOS.
The developers always wanted to have a NuGet package which they can plug in with a. Net application for creating machine learning applications. After the release of the first version,
ML.NET is still a baby but it is already showing the capability to turn into a tech giant.
In this version, we can perform several machine learning tasks such as classification, regression and much more with the help of advanced ML algorithms. We can also train the model and predict using models along with other basic MAchine Learning tasks and algorithms.
ML.NET can be further extended to function with ML libraries like TensorFLow, Accord.NET, CNTK and many more.
What is inside ML.NET?
As we had seen how the framework can be extended to work with any third-party libraries for smooth functioning. It also consists of some awesome libraries as well. For tasks like regression and classification, both training and consumption are present in ML.NET.
Other than this, it also supports core data types, extensible pipelines, data structures, tooling support, advanced performance math and etc.
Let us learn how to add this NuGet package in yours.Net applications. First of all, you need to have installed .NET Core 2.0 or later versions as ML.NET currently runs in a 64-bit process.
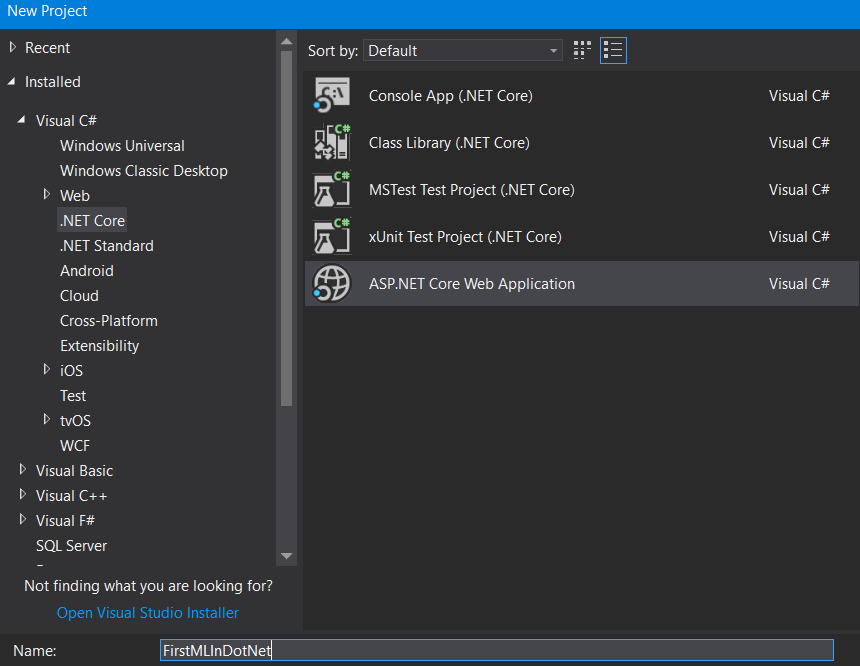
- After you are done with this, open up your Visual Studio 2017 → Create New Project → Select Core Web application as shown in the picture.
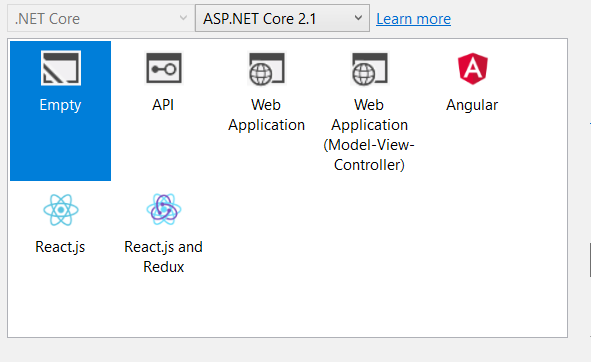
- Click on Empty option for now:
- Start by creating your application and once it is done, add the required Microsoft.ML NuGet package. Proceed your search with ‘Microsoft.ML’ in NuGet Package Manager and then click on Install:
- After completing all the steps, your package is safely installed and ready to use.
- You can also get started with ML.NET NuGet by installing it from the CLI:
dotnet add package Microsoft.ML
- Also, from package manager as:
Install-Package Microsoft.ML
Furthermore, you can create your framework directly from GitHub.
What are the ML.NET core components?
ML.NET framework has been launched as a part of the .NET foundation and today the repo consist the .NET C# APIs for both consumption and model training along with the variant transformations and learners are required for many popular ML tasks like regression and classification.
ML.NET is aimed to provide E2E workflow for infusing ML into .NET applications across different specializations like pre-processing, feature engineering, modeling, evaluation, and operationalization.
You can also create your own sample application that will demonstrate how to use the ML model in your app by using ML.NET templates which can be directly utilized in your applications.
Things to know before starting with ML.NET
- Initialize your Model
When working with machine learning, firstly, you need to pick the best fit ML algorithms as machine learning has methods like clustering, regression, classification, and anomaly detection modules.
- Train the Model
You need to train the machine learning model as training is the procedure of analyzing input data by model to learn the pattern by saving it as a trained model. For instance, if you create a CSV file in your application and in the CSV file by giving stock details like ItemID, Location, InQTY, OutQTY, TotalStock quantity and many more. You are needed to give this CSV file as an input to the model which can get trained and analyze this data to predict the results. Once the model is trained, it understands the pattern of the input and the resultant model needs to be saved for predicting the result.
- Prediction
The prediction is also known as score where it needs to have the same column as the trained model. The score helps to generate the results based on the trained model.
- Evaluation
After the model training is completed, evaluate will be performed. It performs by comparing the model with the test data and predicts the final results.
Creating a C# Console App in Easy steps
Step #1: Create an app
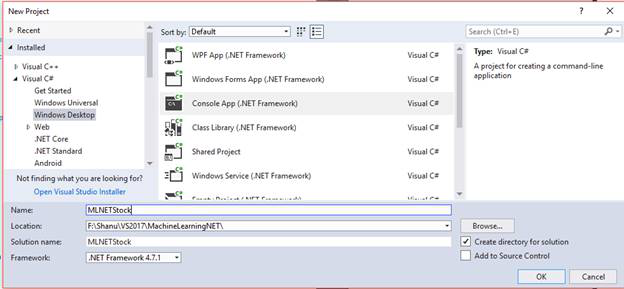
After installing all prerequisites, Select Visual Studio 2017 from Programs in Start → New Project → Click Visual C# → Windows Desktop → Console APP in dot Net framework. Input your project name and Select OK.
Step #2: Push down Microsoft ML package
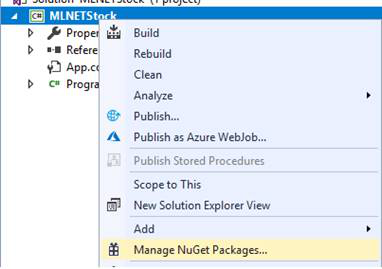
By right-clicking on your project, select Manage NuGet Packages…
Then, search for Microsoft.ML in the Browser tab.
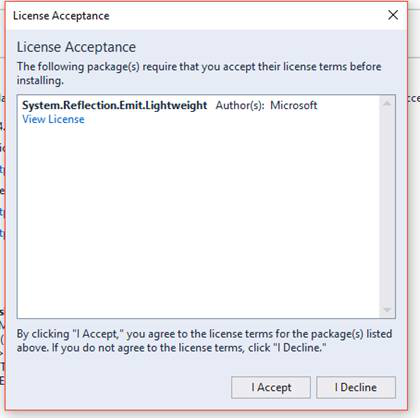
Select Install, Accept the policy and wait until the installation proceeds.
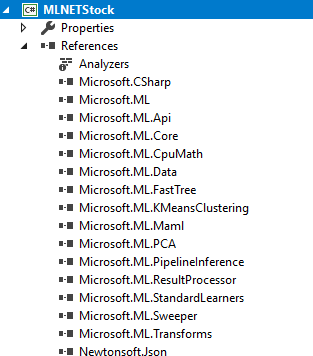
You will see Microsoft.ML package gets installed and all the Microsoft.ML references have been inserted into your project references.
Step #3: Create Training and Evaluating the Data
Now, you need to create a Model training and evaluation for the dataset by adding two CSV files by making a new folder called data in your project to add it to CSV files.
- Add the folder of Data
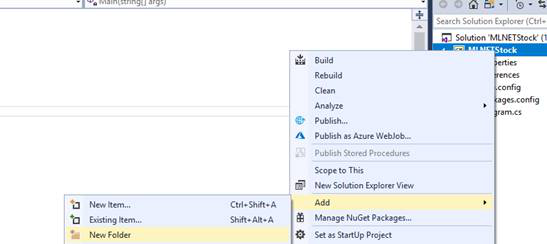
By right-clicking the project, Add New Folder named ‘Data’.
- Create Train CSV file
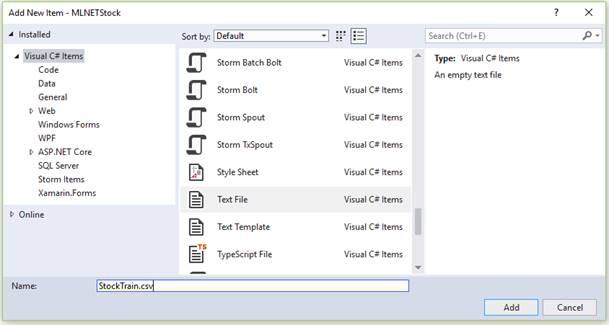
On right-clicking the Data folder Select Add → New Item → Text file; name as ‘StockTrain.csv’.
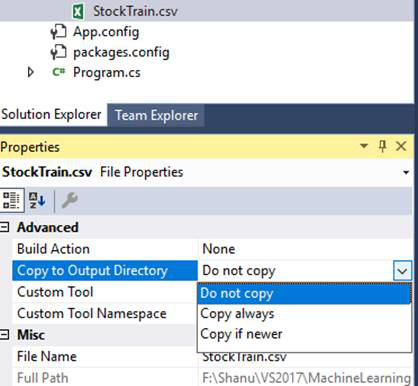
Click on properties for changing the Copy to Output Directory to ‘Copy always’.
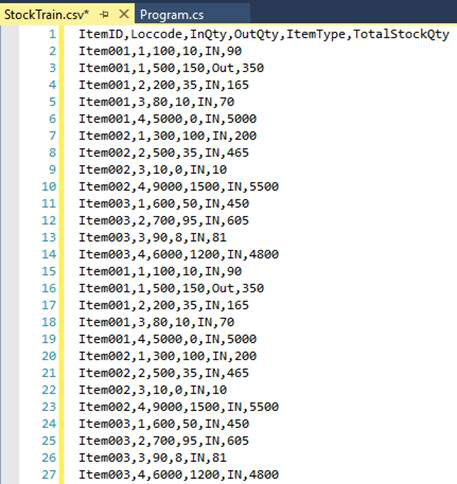
Add CSV file details as shown in the figure.
Here’s a note to the users that you have to fix the label and the features. A label field is the one
which we need to predict in our sample.
ItemID — Product Item ID (Feature)
LocCode — Warehouse Location (Feature)
InQty — Total Item arrived at location (Feature)
OutQty — Total Item delivered to the location (Feature)
ItemType — ItemType “In” means local manufactured and “out” means outsourcing. (Feature)
TotalStockQty — Total no of item stock. (Label)
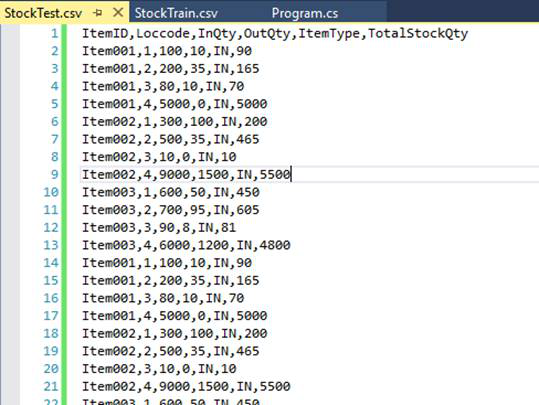
Keep in mind that you always need a minimum of 100 records of the data to be added to train your model. Similarly, you will have to add an another CSV file for evaluating by creating a new file namely ‘StockTest.csv’.
Step #4: Create a class for Input Data and Prediction
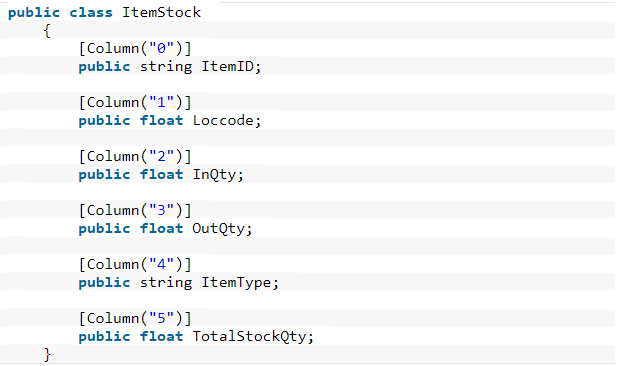
Now, you need to create a new class for Input Data and prediction by right-clicking your project and adding a new class as ‘ItemStock.cs’. You first need to import the Microsfot.ML.Runtime.API in your class as given:
Further, we need to add all the columns in the same order as in the class and try to set the column as 0 to 5.
Next, you need to create a prediction class to add your prediction column. It is noted that the prediction column needs to be renamed as ‘Score’ with the float as the data type. The scoring column contains the predicted results in the regression model.
Step #5: Program.cs
You need to open ‘program.cs’ file to work with ML.NET and import all the required references.
Dataset Path
You need to give the ‘StockTrain.csv’ path for the train data as the final trained model needs to be saved for evaluation and result productions. Set the model path as ‘Model.zip’ file and the trained model will be saved in the zip file during runtime of the program in your bin folder automatically.
static readonly string _Traindatapath = Path.Combine(Environment.CurrentDirectory, “Data”, “StockTrain.csv”);
static readonly string _Evaluatedatapath = Path.Combine(Environment.CurrentDirectory, “Data”, “StockTest.csv”);
static readonly string _modelpath = Path.Combine(Environment.CurrentDirectory, “Data”, “Model.zip”);
You can also change the Main method to async Task Main method like the code given below:
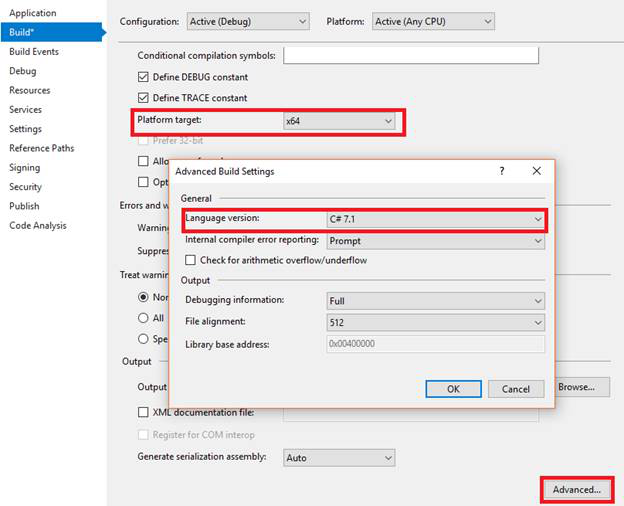
Before that, you need to perform two crucial tasks to run your program successfully. First, set Platform Target as x64 as ML.NET runs in x64 and second is to run the program with async Task Main method, change the language version to c#7.1.
Work with the Training Model
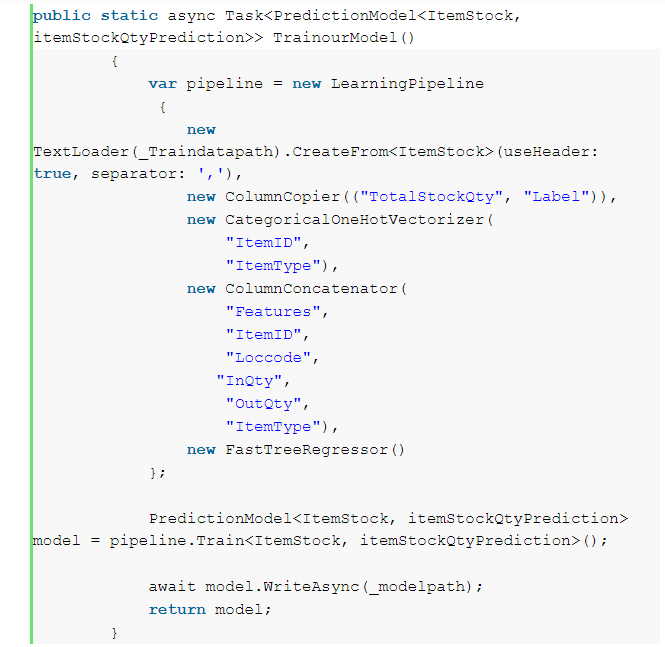
Firstly, you need to train the model and later save it to the zip file which is your main method to call the prediction model and pass the ItemStock itemStockQtyPrediction class to return the model to the main method:
In the method shown above, you need to add the function to train the model and save it to the zip file. In training, first of all, you will be working with the LearningPipeline() as it loads all the training data to train the model.
Second, comes the TextLoader to get all the data from the train CSV file for training and set the use header to avoid reading the first row from the CSV file. The essential part is the predicted values to be defined in the training model. It needs numeric features to transform the categorical data and you have to add all the featured columns to be trained and evaluated.
Adding Learning Algorithm
In this code snippet, you are going to use FastTreeREgressor learner which has to get added to your pipeline. Finally, you need to train and save the model by the method given below:
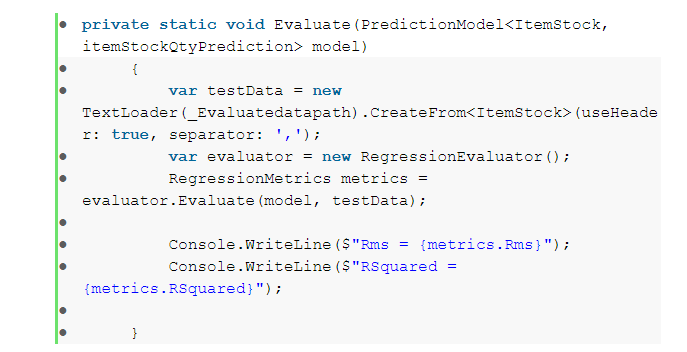
More to this, you need to evaluate the model by checking out the model with the test data and predict the final results. For doing so, you are required to call the Evaluate method from your main method and pass the trained model to this model.
We pass the trained model in the Evaluate method with the sample CSV test data. Using text loader, load all the data from test data CSV file for model evaluation.
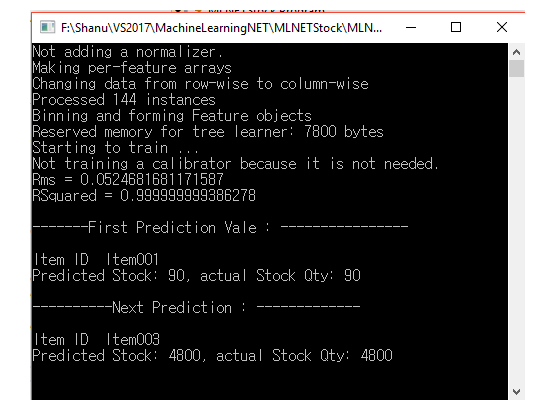
Using RegressionEvaluator method we can evaluate the model with the test data and produce evaluation metrics by displaying both the Root Mean Squared (RMS) and RSquared metrics value.
Final Prediction Results
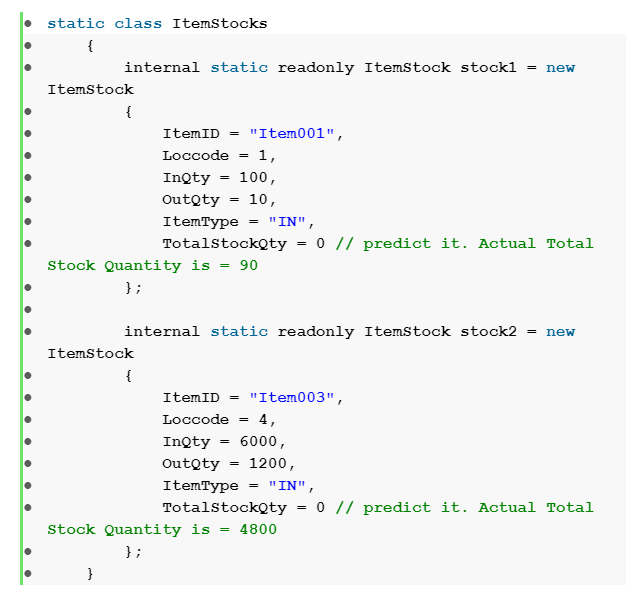
Now it’s time to produce the final results. Begin by creating a new Class named ‘ItemStock.cs’ and add values to it that are created and defined in the columns for Model training.
You can also run the program and see the results in the command window as given below:
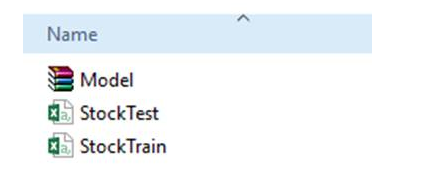
After creating and running the program we can see the Model.zip file in the folder name ‘Data’ inside the application root bin folder to see our StockTrain and StockTest CSV file. The model gets trained with the help of this CSV file and the results will get stored in Model.zip file.
Summing Up
We can conclude ML.NET is an amazing framework for all the .NET developers who are looking forward to working with machine learning. In the present times, only the preview version of ML.NET is available but we cannot really wait for the public version to get released. If you are a .NET developer and not aware much about the machine learning framework then ML.NET is definitely for you. I hope you enjoyed reading this article. Keep Learning!
Author Bio:
HP Morgan working as a Tech analyst at Tatvasoft.com.au. A customer Software Development company in Australia. In leisure time he likes blogging and also published his bylines at major publications.
ML.NET: Machine Learning framework by Microsoft for .NET developers was originally published in Hacker Noon on Medium, where people are continuing the conversation by highlighting and responding to this story.
Disclaimer
The views and opinions expressed in this article are solely those of the authors and do not reflect the views of Bitcoin Insider. Every investment and trading move involves risk - this is especially true for cryptocurrencies given their volatility. We strongly advise our readers to conduct their own research when making a decision.

