Latest news about Bitcoin and all cryptocurrencies. Your daily crypto news habit.
 Migrating from bare-bones Envoy to Istio
This post is part of the “Service Mesh” series. If you haven’t read the previous posts, I would urge you to do so, it will help understand this article better. Here are the previous articles
- Service Mesh with Envoy 101
- Microservices monitoring with Envoy Service Mesh, Prometheus & Grafana
- Distributed Tracing with Envoy Service Mesh & Jaeger
In the previous articles we looked at installing Envoy as a side car proxy to our services and saw how the Service Mesh setup helped in managing traffic between the services and to collect and visualise tons of telemetry data about the traffic.
There were a few annoying things in the setup though
- Installing the Envoy side car manually
- Routing traffic to the side car proxy manually
- Managing the configurations for all the Envoy side cars
Regarding #3, as we saw already in one of the previous posts, we can use Envoy’s xDS server to manage the configuration in a central way and update them dynamically without needing a restart. Yes, this reduces the pain to a level, but still you have to maintain the configuration for all the side car proxies.
Data Plane vs Control Plane
Before improving our setup, we need to understand these terms which are widely used in a service mesh context.
Data Plane is the one which actually does all the ground work like routing traffic, collecting telemetry and sending to the metrics store(e.g.: statsd), managing traffic with circuit breaking, rate limiting, etc.. An example of Data Plane would be our Envoy side car.
Control Plane is the one which configures the side car proxies in the service mesh. Till now we were acting as a Control Plane manually and configuring the side car proxies, but we can use a tool which will act as a Control Plane and configure our side car proxies for us. Example of a Control Plane is Istio.
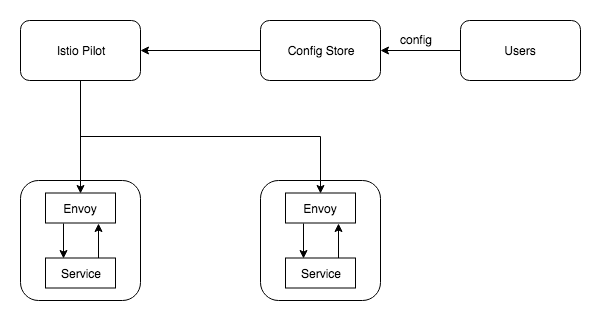
So now you don’t directly configure any side car proxies, we submit our configurations(traffic shifting, fault injection, etc.. )to the config store, Istio Pilot(a component in Istio) looks for changes in the config store and then pushes these changes to the side car proxies.
Note: The above diagram shows only Istio Pilot, but Istio has several other components like Citadel, Galley, etc…
Demo
Let’s look at an example of setting up a Service Mesh with Istio. We will deploy our services in a Kubernetes cluster
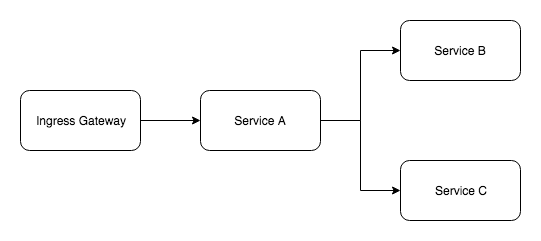 Service ArchitectureInstalling Istio
Pre-requisites:
- You need to have a Kubernetes cluster up and running
- Have Helm client and tiller configured in your cluster. Refer here
- Clone the official Istio repo
kubectl apply -f install/kubernetes/helm/istio/templates/crds.yaml
helm install install/kubernetes/helm/istio -name istio -namespace istio-system
Note: Am using Helm version v2.9.1 and the Kubernetes cluster is in GKE. You can find installation instruction for other environments here.
Deploying the Services
When we were dealing with only Envoy, we had to manually route the requests to the side car. This time we would not do that, we would let Istio do the magic. The source code of the services can be found here. Nothing special, just a service calling a couple of other services. Also there is no Envoy configuration for each service, Istio will take care of the side car configurations. Service A while calling Service B and Service C, uses the Kubernetes service name, “serviceb.serviceb” and “servicec.servicec” respectively
We are creating Kubernetes namespaces for our services and we are adding a special label to each namespace, we will discuss why that is necessary shortly. We are managing our applications with helm and you can find the helm charts for the applications in the same repository under the “helm” directory . If everything went well, your pods should be up and running
If you watch closely there are two containers(in each pod) running for every service, but in our helm chart definition we had only one container defined. This happened because Istio watches over all the deployments and adds the side car container to our pods.This is achieved by leveraging what is called MutatingAdmissionWebhooks, this feature was introduced in Kubernetes 1.9. So before the resources get created, the web hook intercepts the requests, checks if “Istio injection” is enabled for that namespace, and then adds the side car container to the pod. So that is how Istio solves the problem of manually adding a side car proxy to each of our services.
Note: Namespace labels is not the only way to add the side car, you can even use the “istioctl” command line tool to generate the specification and deploy
Next we create a Ingress rule to route traffic to Service A.
Gateway and VirtualService are Kubernets CRDs(Custom Resource Defnitions) created when we installed Istio. We will see more about these in the next post, for now just understand that we are asking all requests to be routed to Service A.
Let’s hit the gateway’s public ip to generate some traffic.
You can find the external ip of your gateway by
kubectl get services istio-ingressgateway -n istio-system
We can use any load testing tool to generate some traffic, am using hey
hey -z 30s http://x.x.x.x
Istio comes with tools to monitor what is going on in the service mesh, let us look at Kiali and Grafana.
Note: When we installed Istio with Helm, tools like Grafana, Prometheus, Zipkin, Kiali, etc.. would have been automatically installed. You can control what is installed and their configurations by modifying the values file.
Kiali
kubectl port-forward service/kiali -n istio-system 20001:20001
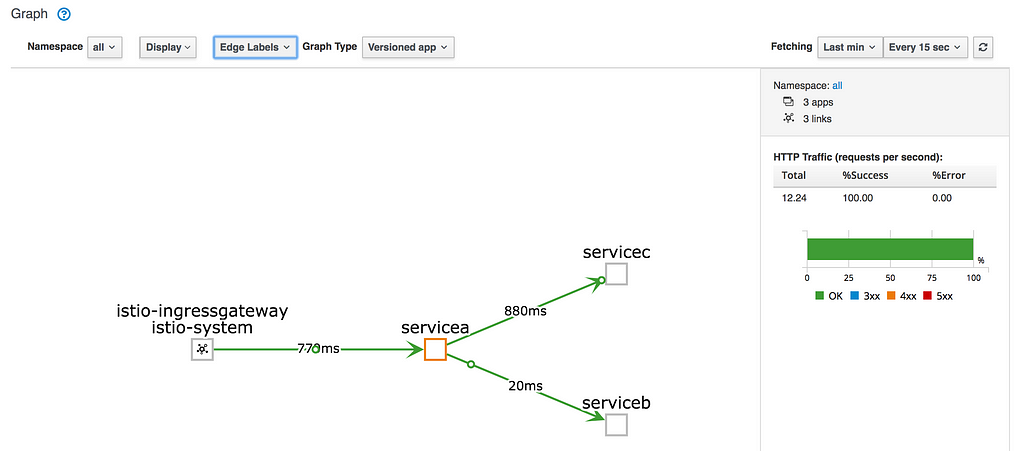 Kiali service mesh visualisationGrafana
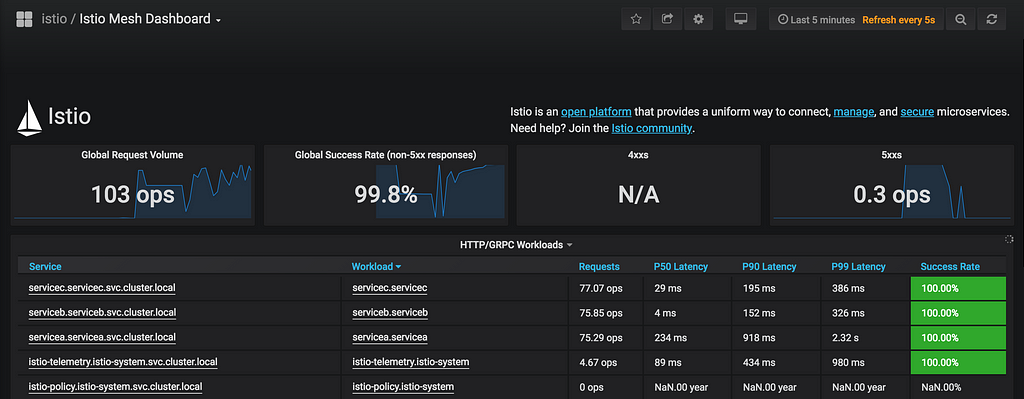
kubectl port-forward service/grafana -n istio-system 3000:3000
As you can see, we have our Service Mesh with Istio setup and we have all the metrics and visualisations. But a thing to note is we did not manually route traffic to the side car proxies, it automagically happened. Istio uses IP Table rules to route incoming and outgoing traffic to side car proxies first. More details about the rules here.
Configuring Istio
We saw that you don’t directly configure the side car proxies with Isito. So how do we configure traffic control rules? For this purpose when you install Istio a lot of Kubernetes CRDs (custom resource definitions) are created, E.g: VirtualService, DestinationRule… We see an example of a configuration to controlling traffic below:
The above rule is an example of doing canary deployment, routing 10% traffic to the new version of the service. So we submit these rules to the config store, Istio Pilot watches the store and pushes the configuration changes to the appropriate side car proxies.
Conclusion
With Istio, there is literally no code change that the service developer has to do to get all the benefits of a Service Mesh. They can instead concentrate on building business features. In fact, the developer wouldn’t even know that there is a Service Mesh setup.
This post was just to see how migrating to Istio solves some of the annoying issues we had with Envoy. And that is why we didn’t delve deeper into Istio. Istio is much bigger and has many more things to it. In the next post we will explore more about Istio.
You can find all the code here. I gave a talk on this topic which you can find here
Service Mesh: Moving from bare-bones Envoy to Istio was originally published in Hacker Noon on Medium, where people are continuing the conversation by highlighting and responding to this story.
Disclaimer
The views and opinions expressed in this article are solely those of the authors and do not reflect the views of Bitcoin Insider. Every investment and trading move involves risk - this is especially true for cryptocurrencies given their volatility. We strongly advise our readers to conduct their own research when making a decision.
