Latest news about Bitcoin and all cryptocurrencies. Your daily crypto news habit.
In this article we will briefly discuss about what this “Service Mesh” buzz is all about and how we can build one using “Envoy”
WTH is a Service Mesh?
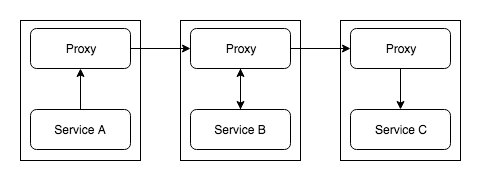
Service Mesh is the communication layer in your microservice setup. All the requests to and from each one of your services will go through the mesh. Each service will have its own proxy service and all these proxy services together form the “Service Mesh”. So if a service wants to call another service, it doesn’t call the destination service directly, it routes the request first to the local proxy and the proxy routes it to the destination service. Essentially your service instance doesn’t have any idea about the outside world and is only aware about the local proxy.
When you talk about “Service Mesh”, you will definitely hear the term “Sidecar”, a “Sidecar” is a proxy which is available for each instance of your service, each “Sidecar” takes care of one instance of one service.
 sidecar patternWhat does a Service Mesh provide?
- Service Discovery
- Observability (metrics)
- Rate Limiting
- Circuit Breaking
- Traffic Shifting
- Load Balancing
- Authentication and Authorisation
- Distributed Tracing
Envoy
Envoy is a high performant proxy written in C++. It is not mandatory to use Envoy to build your “Service Mesh”, you could use other proxies like Nginx, Traefik, etc… But for this post we will continue with Envoy.
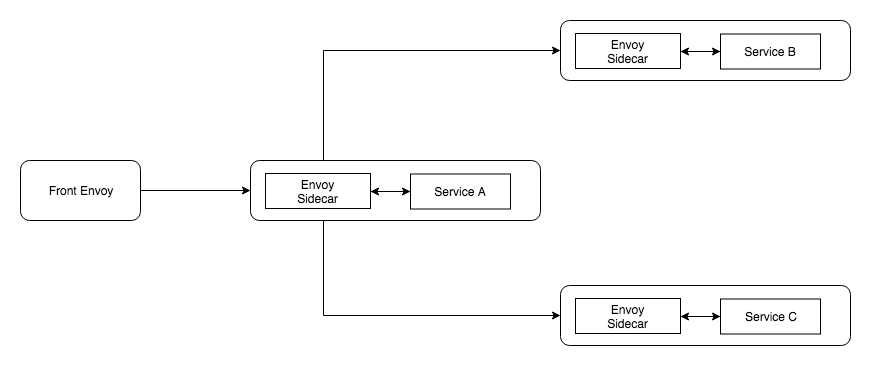
Okay, Let’s build a “Service Mesh” setup with 3 services. This is what we are trying to build
 services setup with sidecar proxiesFront Envoy
“Front Envoy” is the edge proxy in our setup where you would usually do TLS termination, authentication, generate request headers, etc…
Let us look at the “Front Envoy” configuration
Envoy configuration majorly consists of
- Listeners
- Routes
- Clusters
- Endpoints
Let’s go through each one of them
Listeners
You can have one or more listeners running in a single Envoy instance. Lines 9–36, you mention the address and port of the current listener, each listener can also have one or more network filters. It is with these filters that you achieve most of the things like routing, tls termination, traffic shifting, etc… “envoy.http_connection_manager” is one of the inbuilt filters that we are using here, apart from this envoy has several other filters.
Routes
Lines 22–34 configures the route specification for our filter, from which domains you should accept the requests and a route matcher which matches against each request and sends the request to the appropriate cluster.
Clusters
Clusters are the specifications for upstream services to which Envoy routes traffic to.
Lines 41–50, defines “Service A” which is the only upstream to which “Front Envoy” will talk to.
“connect_timeout” is the time limit to get a connection to the upstream service before returning a 503.
Usually there will be more than one instance of “Service A”, and envoy supports multiple load balancing algorithms to route traffic. Here we are using a simple round robin.
Endpoints
“hosts” specify the instances of Service A to which we want to route traffic to, in our case we have only one.
If you note, line 48, as we discussed we do not talk to “Service A” directly, we talk to an instance of Service A’s Envoy proxy, which will then route it the local Service A instance.
You could also mention a service name which will return all the instances of Service A, like a headless service in kubernetes.
Yes we are doing client side load balancing here. Envoy caches all the hosts of “Service A”, and for every 5 seconds it will keep refreshing the hosts list.
Envoy supports both active and passive health checking. If you want to make it active, you configure health checks in the cluster configuration.
Others
Lines 2–7, configures the admin server which can be used to view configurations, change log levels, view stats, etc…
Line 8, “static_resources”, means we are loading all the configurations manually, we could also do it dynamically and we will look at how do it later in this post.
There is much more to the configurations than what we have seen, our aim is to not go through all the possible configurations, but to have minimal configuration to get started.
Service A
Here is the Envoy configuration for “Service A”
Lines 11–39, defines a listener for routing traffic to the actual “Service A” instance, you can find the respective cluster definition for service_a instance on 103–111.
“Service A”, talks to “Service B” and “Service C”, so we have two more listeners and clusters respectively. Here we have separate listeners for each of our upstream (localhost, Service B & Service C), the other way would be to have a single listener and route based on the url or headers to any of the upstreams.
Service B & Service C
Service B and Service C are at the leaf level and do not talk to any other upstreams apart from local host service instance. So the configuration is going to be simple
so nothing special here, just a single listener and a single cluster.
We are done with all the configurations, we could deploy this setup to kubernetes or use a docker-compose to test it. Run docker-compose build and docker-compose up and hit localhost:8080 , you should see the request pass through all the services and Envoy proxies successfully. You can use the logs to verify.
Envoy xDS
We achieved all of these by providing configurations to each of the side car, and depending on the service, the configuration varied between the services. It might seem okay to hand craft and manually manage these side car configurations initially with 2 or 3 services, but when the number of services grow, it becomes difficult. Also when a side car configuration changes you have to restart the Envoy instance for the changes to take effect.
As mentioned earlier we can completely avoid the manual configuration and load all the components, Clusters(CDS), Endpoints(EDS), Listeners(LDS) & Routes(RDS) using an api server. So each side car will talk to the api server to get the configurations and when a new configuration is updated in the api server, it automatically gets reflected in the envoy instances, thus avoiding a restart.
More about dynamic configurations here and here is an example xDS server which you can use.
Kubernetes
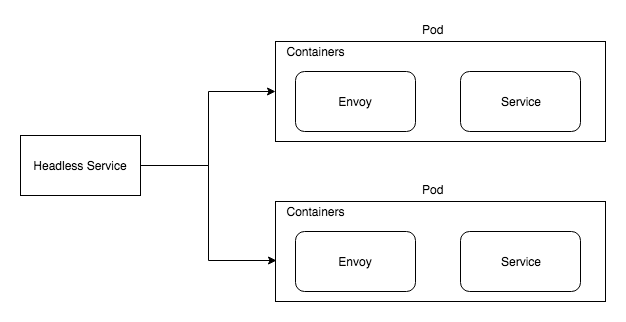
In this section let us look at, if we were to implement this setup in Kubernetes what would it look like
 single service with envoy side car
So changes are needed in
- Pod
- Service
Pod
Usually Pod spec has only one container defined inside it. But yeah as per definition a Pod can hold one or more containers. Since we want to run a side car proxy with each of our service instance we will add the Envoy container to every pod. So for communicating to the outside world, the service container will talk to the Envoy container over localhost. This is how a deployment file would look like
If you see the containers section, we have added our Envoy side car there. And we are mounting our Envoy configuration file from configmap in lines 33–39.
Service
Kubernetes services take care of maintaining the list of Pod endpoints it can route traffic to. And usually kube-proxy does the load balancing between these pod endpoints. But in our case if you remember, we are doing client side load balancing, so we do not want kube-proxy to load balance, we want to get the list of Pod endpoints and load balance it ourselves. For this we can use a “headless service”, which will just return the list of endpoints. Here is what it would look like
line 6 makes the service headless. Also you should note that we are not mapping the kubernetes service port to app’s service port but we are mapping it Envoy listeners port. Traffic goes to Envoy first.
With that you should be good to go with kubernetes as well.
That’t it. Looking forward for your comments.
This article is kind of a pre-requisite for the articles Distributed Tracing with Envoy & Monitoring with Envoy, Prometheus & Grafana. Please go through them if you are interested.
You can find all the configurations and code here.
Service Mesh with Envoy 101 was originally published in Hacker Noon on Medium, where people are continuing the conversation by highlighting and responding to this story.
Disclaimer
The views and opinions expressed in this article are solely those of the authors and do not reflect the views of Bitcoin Insider. Every investment and trading move involves risk - this is especially true for cryptocurrencies given their volatility. We strongly advise our readers to conduct their own research when making a decision.
