Latest news about Bitcoin and all cryptocurrencies. Your daily crypto news habit.

I love VS Code. I also love Azure Durable Functions. And unit testing is pretty sweet. Put them all together and you get… somewhat unchartered territory.
Most .NET Core 2 unit testing principles apply to Durable Functions, but there a few additions. Especially if you are only running Visual Studio Code. This should get you started with:
- Project Setup
- Packages & Extensions
- Dependency Injection and Azure Functions
- Testing Durable Functions
- Running Tests
- Code Coverage
- Debugging Unit Tests
Project Setup
.NET unit tests should be in their own directory with their own project, all part of the entire solution. Assuming you already have some code to test in a src directory, follow these steps to setup your test directory:
- Create a new directory to house unit tests. test is probably a good name.
- Create a unit test projecta. Move to the test directoryb. Run dotnet new mstest (Creates a new unit test project using MSTest) You could also pass NUnit or xUnit.c. Add the main project(s) to this testing project - dotnet add reference ../src/MyProject.csproj
- Move back to the root directory and add the unit test project to the solution — dotnet sln add test/MyProject.Tests.csproj
Packages & Extensions
You’ll want to install the following packages into the unit test project.
Also recommended are the following VS Code extensions:
- .NET Core Test Explorer — A UI for running tests
- Coverage Gutters — Display covered lines of code right in VS Code.
Dependency Injection and Azure Functions
Because of the static nature of Azure Functions, they do not currently support dependency injection (DI). This is an issue as DI is imperative to unit testing in C#. Fortunately, there are ways to implement DI. This is the easiest I've found.
- Install this package which “contains binding extensions for dependency injection”.
- Create a file in the root of the main project called Startup.cs with these contents:
3. This works very similar to a normal .NET Core project, where you can add singleton references in a startup file.
4. Notice that ConfigureServices is where you instantiate your abstract functions or interfaces. In the above example, we create an instance of the ISendGridClient (for sending emails). We then add it as a singleton and now anytime an ISendGridClient is Injected, this instance will be passed in.
5. Now unit tests can pass in their own mocks of the class like normal:
Testing Durable Functions
Durable functions are pretty unique in the C# world. So it should be expected that testing them is pretty unique as well. Any normal function in a Durable Function project can, of course, be tested like normal. For those specific to Durable Functions, follow these steps. See this article from Microsoft for more info.
Starters
You should append Base to the DurableOrchestrationClient parameter.
This DurableOrchestrationClientBase class can now be mocked and then passed directly to the starter function.
HTTP Starters
HTTP starters have an HttpRequestMessage parameter, which is not easy to mock (at all)! See an example TestHelper file that does the necessary setup in this Gist.
Once you have the SetupHttp function, you can use it as follows in this complete example:
Orchestrators
You should append Base to the DurableOrchestrationContext parameter.
This DurableOrchestrationContextBase class can now be mocked and then passed directly to the orchestrator function.
Activities
Activities can be tested just like any other .NET function. You can just pass the parameter as you normally would, despite the ActivityTrigger decorator
You can simply pass the MyClass model in directly as normal. If you happen to be using DurableActivityContext instead of a model directly, like this:
There is currently no Base class that can be mocked. But that is currently in the dev branch of Durable Functions. Ensure thatDurableActivityContext is needed, you may be able to just use the model directly. If not, tough 😃. It’s coming!
Running Tests
Once you’re in your testing directory, dotnet test is the easiest way to run your tests. You can also run dotnet watch test and tests will re-run every time you change a file.
If you don’t like typing, you can create a task in VS Code. Open up tasks.json and add the following JSON snippet. Be sure to replace the MyProject stuff with the the location of your project.
Then you can open the VS Code command palette and run “Tasks: Run Test Task”
Code Coverage
Code coverage is built into .NET Core, but doesn’t work great cross platform. We’ll use the Coverlet package we installed earlier instead. To run a test with code coverage enabled, you can run dotnet test /p:CollectCoverage=true.
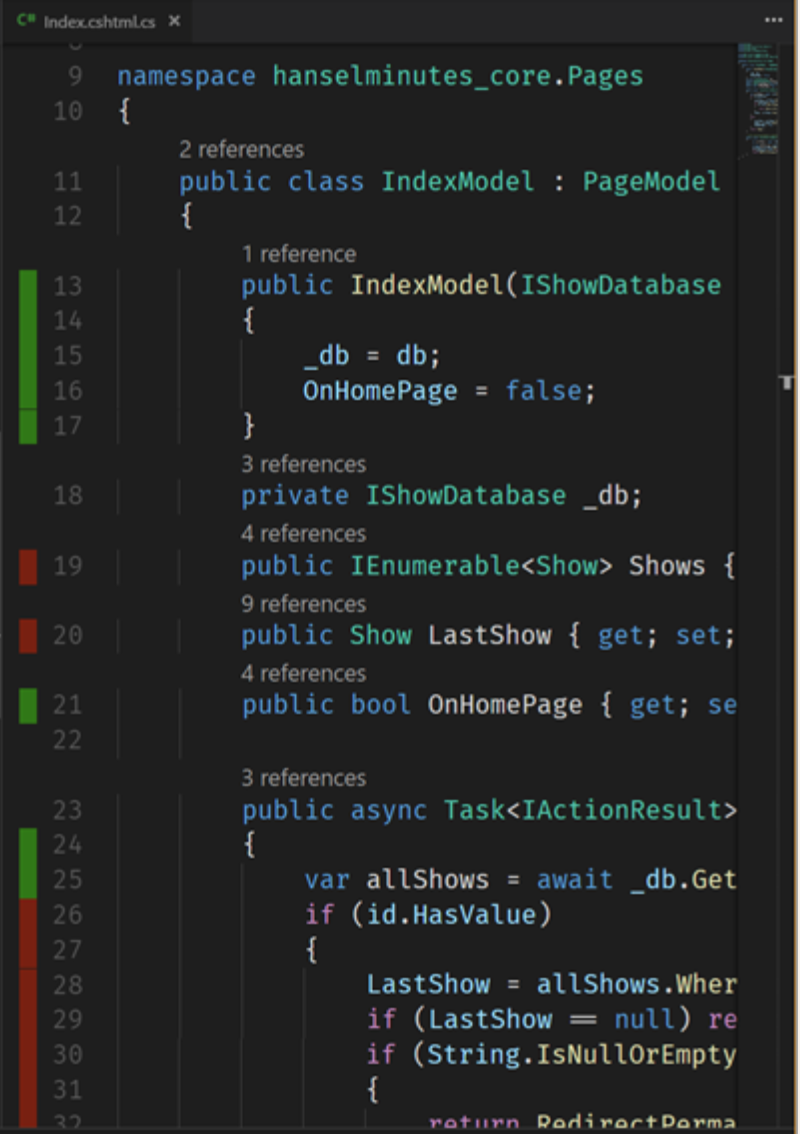
The Coverage Gutters extension we installed earlier can show covered lines right in VS Code.
 Taken from Scott Hanselman’s Article on Coverage Gutters
This requires a specific file format. To create the correct file format, run this really short command:
dotnet test /p:CollectCoverage=true /p:CoverletOutputFormat=lcov /p:CoverletOutput=./lcov.info
This simply tells dotnet to collect coverage and create it in lcov format, which Coverage Gutters requires. Then you can use the command palette and either run "Coverage Gutters: Display Coverage" or "Coverage Gutters: Watch". Watch is cool because it automatically updates as tests are added. Combined with dotnet watch test, it's all pretty nice and automated.
Debugging Unit Tests
Debugging is fun and necessary. It doesn’t play too well with all of the above fun stuff, but it’s still doable.
First, you need a debug command to attach to a process. Open launch.json and add a new configuration:
This will let you attach the VS Code debugger to any process. Let’s get VS Code ready for that.
- Run the command export VSTEST_HOST_DEBUG=1. This tells VS code to get ready to do some debugging.
- Run dotnet test
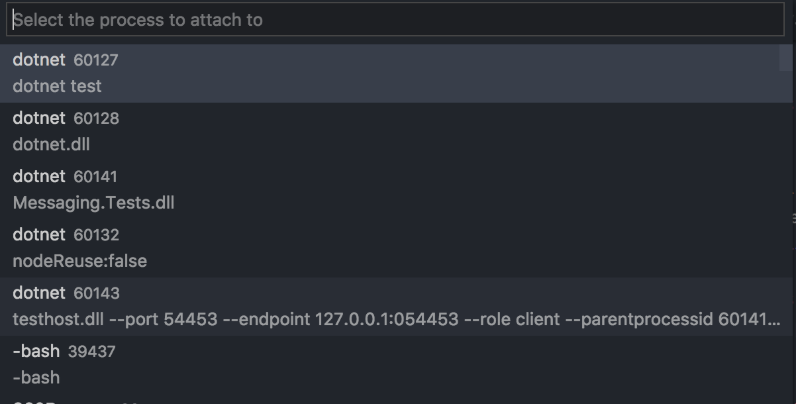
- Rather than running the tests, it will wait for you to attach to the process:
Host debugging is enabled. Please attach debugger to testhost process to continue.Process Id: 60143, Name: dotnet
- Run your .NET Core Attach command from the debug tab. Pick the process ID that was shown earlier (60143 in this example).
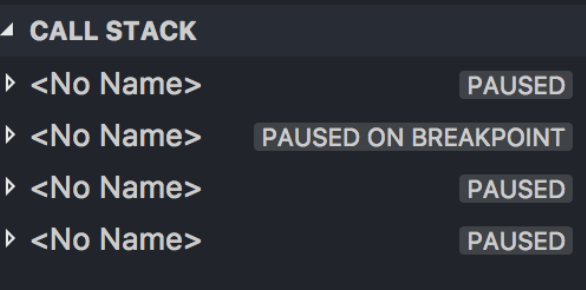
- Almost there. All of this gets you connected, but not quite into your tests yet. Over in the “Call Stack” tab, you should see something that says “<No Name> Paused On Breakpoint”
- Click “Paused on Breakpoint” now you can hit Continue in the debugger, and you should be taken to the first breakpoint that you set!
- When you figure out your problem, you can run export VSTEST_HOST_DEBUG=0 to go back to normal.
Conclusion
That’s it! Hopefully you found this helpful. There’s a bit to it, but with a little bit of setup you can do just about anything you’d want to do in VS Code to unit test Durable Functions.
Complete Guide to Unit Testing Durable Functions with VS Code was originally published in Hacker Noon on Medium, where people are continuing the conversation by highlighting and responding to this story.
Disclaimer
The views and opinions expressed in this article are solely those of the authors and do not reflect the views of Bitcoin Insider. Every investment and trading move involves risk - this is especially true for cryptocurrencies given their volatility. We strongly advise our readers to conduct their own research when making a decision.

