Latest news about Bitcoin and all cryptocurrencies. Your daily crypto news habit.
We are building an amazing chatbot Lemonade
In this section we are going to work on the Dialogue part for “building a simple chatbot using RASA conversational AI solution”.
If you haven’t went through part 1 I recommend you to first read part 1 and only then read this one.
Now things are getting interesting, chatbot wise — till now we’ve built the NLP/U part and now we are going to work on the dialogue side.
As I mentioned in part 1, for every chatbot that actually do a little bit more that just question answering, the very basic one is a chatbot that supports “slot filling”, which means (in our example) to interact with the user to get the mandatory slots that it needs (according to the “domain definition” — don’t worry we’ll get to that later on).
One slot filling scenario could be:
- user: “I want Pizza” ; #missing slots: [size, toppings, etc.]
- bot: “what size?”
- user: “large”
- bot: “Which toppings would you like?”
- user: “Olives”
In this example we have 2 interactions with the user — 2 slots to fill.
Similar to what we’ve built in the NLU (part 1 mentioned above) we should create the domain and the training data.
Building the Domain
Here we would create the file chat_domail.yml.
You can use this file:
Pay attention to the last one — more info below on the explanation part.
But if you create your own or changing this one, it is always a good practice to validate the format (this is a fragile format and things won’t work in case you break it):
Link to online yml validation.
Let’s try to explain the file above.
- Intents — is the parent structure, usually are the supported actions of your bot (but there are exceptions)
- Entities — are the words that you want the bot to extract from the free text
- Slots — Defining them here, is like saying to the bot which entities to track through the dialogue, for example, if the user is saying: “I want pizza”, we want the bot to interact with the user to get the “size” or the “topping” slots fulfilled.
- Actions — are either utterances, which means, the output that we want to send the user, or you can actually create your own class that inherent form Action. In our example its: “actions.ActionOrderPizza”, here again Rasa has a very cool interface, you should inherent from Class Action and add your logic in the derived class according to what you need, here is an example — create the file action.py:
Top 3 Bot Tutorials
1. Best chatbot platforms to build a chatbot2. Build simple ChatBot in Python with RASA — Part 13. How I developed my own ‘learning’ chatbot in Python
In the above example I created it as “stubs” no real logic there, just for the sake of the example.
Building the Training Data for the Dialogue
Here we are going to build a mark down file, we’ll named it: stories.md, as the name implies here we describe the possible dialogue flows as user stories.
Here you may raise a concern that its a very manual process but don’t worry RASA has a great tool for you to online train you dialogue! or even more load pre-trained dialogues.
But first let’s create a very short and basic flow, and train the dialogue model, we’ll get back to the online training later on.
For the basic flow you can use this file stories.md:
Pay attention that in the above flow we are covering the following scenario:
- Bot: “Hello, how can I help you?”
- User: “I want pizza” #missing the slots: “size” and “toppings”
- Bot: “What size?”
- User: “large”
- Bot: “what toppings would like on your pizza?”
- User: “cheese”
Now we are ready to train a dialogue using the above training data.
Let’s write some code, you can use this file:
Now run:
python dialogue_model.py
Note: the code above is running with no errors on Python3 but for some reason I had some issues with Python2.
If everything went well you should have the model trained and the output is under, models/dialogue/, it should look like this:
NOW we are ready for the online training! yay!!!
As I promised RASA has an amazing capability to online train your bot and create a much more elaborated stories.md file for you to use after online training session is finished.
Now create the online_train.py:
No we are ready to run:
python online_train.py
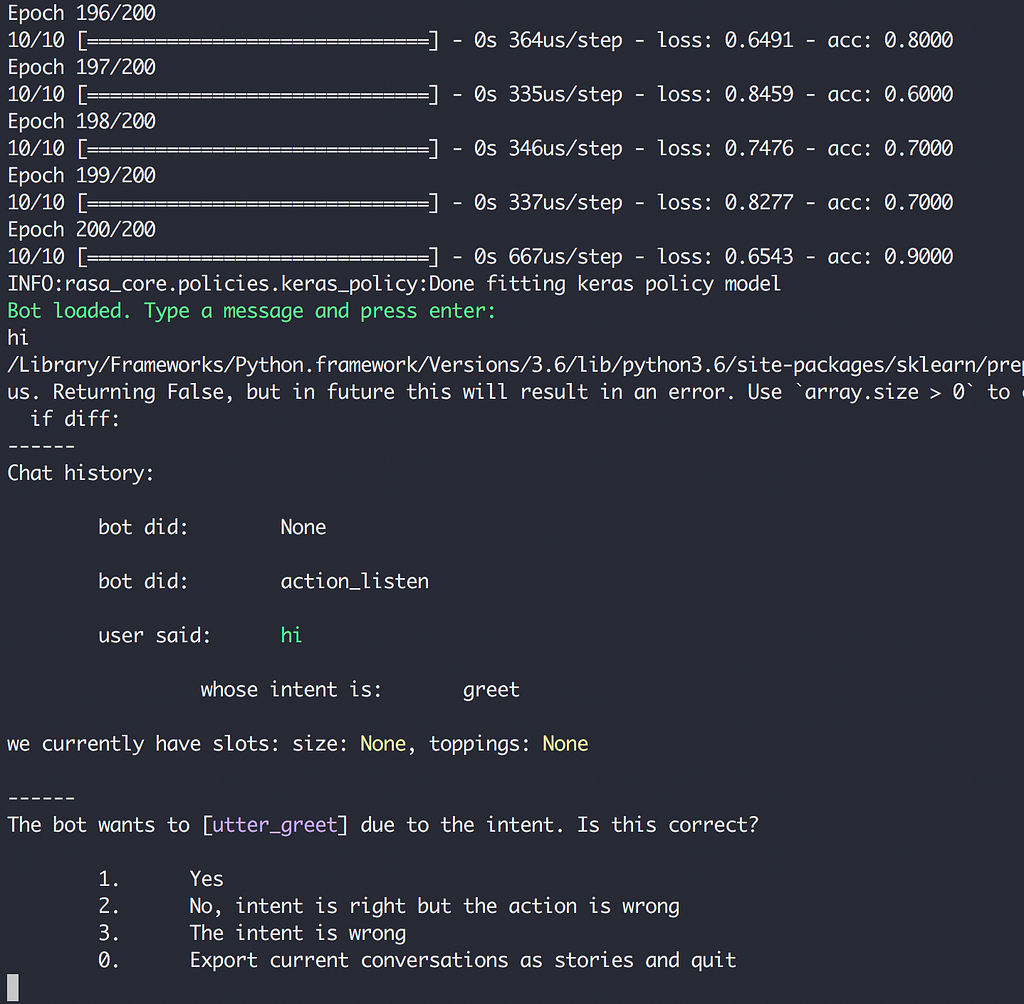
You should get an interactive session in which you should follow the expected flow, for example:
- In the first green line it says that the bot has been loaded and is waiting for the user input.
- Next we type: “hi”
- Now you can see that the system prints the “Chat history”:
- we can see that the flow is correct:
- bot did: action_listen
- user said: hi
- whose intent is: greet
4. Now the system is waiting for your feedback, in this case the flow is correct, so we should type: 2.
5. You can continue doing this as long as you want, when you finish type “0” to export the new stories.md file (give it new name, such: “stories_v1.md”).
Now replace the previous stories file (back it up first!) or concatenate them in the same stories file, that way you should have more and more training data!
That’s it — now the last part is to test it — more to come…
Please feel free ask question here or go to relevant gitter section:
Build a simple ChatBot in Python with RASA — Part 2 was originally published in Hacker Noon on Medium, where people are continuing the conversation by highlighting and responding to this story.
Disclaimer
The views and opinions expressed in this article are solely those of the authors and do not reflect the views of Bitcoin Insider. Every investment and trading move involves risk - this is especially true for cryptocurrencies given their volatility. We strongly advise our readers to conduct their own research when making a decision.


