Latest news about Bitcoin and all cryptocurrencies. Your daily crypto news habit.
AWS Amplify now has built-in components for the Vue library. This means that you can scaffold out pre-configured components for functionality like authentication flows, chatbots, & photo-pickers with just a few lines of code.
You can also implement serverless AWS AppSync GraphQL APIs, Lambda functions, analytics, hosting, VR / AR scenes & more using the Amplify CLI & library with Vue.
In this tutorial, we’ll walk through how to set up authentication, storage, and a GraphQL API using AWS Amplify & Vue.
Getting Started
Creating & configuring the Vue project
To get started, we’ll first install the Vue CLI & create a new project:
npm install -g @vue/cli
Next, we’ll create a new Vue project:
vue create vue-serverless-project
For the preset, choose babel.
Next, we’ll change into the new directory & install the AWS Amplify libraries:
cd vue-serverless-project
yarn add aws-amplify aws-amplify-vue@beta
Installing & configuring the Amplify CLI
Now that the Vue project has been created, we can install the AWS Amplify CLI:
npm install -g @aws-amplify/cli
Next, we’ll need to configure the CLI with an AWS IAM user. To do so, we can run the configure command:
amplify configure
For a walkthrough of how to configure the CLI, check out this video.
Now that the CLI has been installed & configured, we can create a new Amplify project inside the root directory of the new Vue project we just created:
amplify init
☝️ Here you can choose the text editor you are using & then choose the default option for the rest of the choices.
Adding Authentication
Now that the Vue project is created & the Amplify project has been initialized, we can begin adding & using services.
The first service we’d like to add is authentication. To add a service we can run the amplify add command, so we’ll run the following command:
amplify add auth
- Do you want to use the default authentication and security configuration? Y
Next, we’ll run the push command to create & enable the resources in our account:
amplify push
Configuring the Vue Project
Now, the authentication service has been created in our account & we can begin using it.
You can now view the Cognito authentication service anytime in your account here.
The next thing we need to do is configure the actual Vue project to recognize & use the new Amplify project. To do this, we open main.js & add the following:
import Amplify, * as AmplifyModules from 'aws-amplify';import { AmplifyPlugin } from 'aws-amplify-vue';import aws_exports from './aws-exports';Amplify.configure(aws_exports);Vue.use(AmplifyPlugin, AmplifyModules);
Now, let’s open App.vue and add the authentication flow. To get started, let’s update App.vue to have the following code:
Now, save the file & run the app:
vue serve
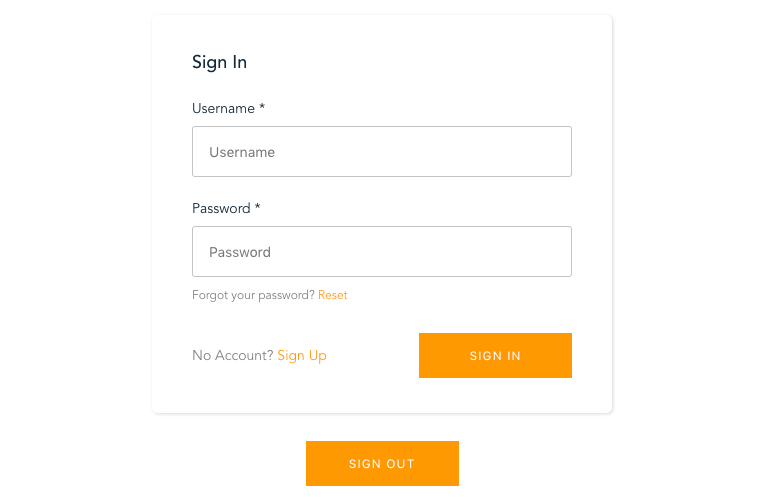
We now see both a sign in / sign up form as well as a sign out button. The <amplify-authenticator> component is what renders the sign in / sign up form, & the <amplify-sign-out> component is what renders the sign out button.
This is a good start, but really we only want to show the sign out button if the user is already signed in & the sign up /sign in form if the user is not already signed in. Let’s update our code to maintain some state that will control what is and isn’t shown.
In the above code, we’ve set some initial state to set the signedIn property to false. When the app loads, we check to see if the user has been signed in, if so we then update the signedIn value to be true in order to show our application as well as the sign out button.
If the user is not signed in, then we show the form. We also create an event listener that will update the signedIn value whenever the user signs in or out.
If you’re interested in learning how to create protected routes using Vue Router & AWS Amplify, this is pretty easy & I’ve created some sample code here for you to check out.
Amplify also has an Auth class if you’d like to build your own custom authentication flow. There are over 30 methods available on the Auth class including signUp(), confirmSignUp(), signIn(), confirmSignIn() & forgotPassword(). To view all of the available methods, check out the docs here & the API here.
Adding a Photo Picker with Amazon S3
The next thing we’ll do is add storage using Amazon S3. One very popular use case for S3 is storing media such as video & image files. Since that is the case, let’s look at how to implement a photo picker using the preconfigured Vue components.
To add storage with S3, we’ll again run the amplify add command:
amplify add storage
- Please select from one of the below mentioned services: Content (Images, audio, video, etc.)
- Please provide a friendly name for your re
Disclaimer
The views and opinions expressed in this article are solely those of the authors and do not reflect the views of Bitcoin Insider. Every investment and trading move involves risk - this is especially true for cryptocurrencies given their volatility. We strongly advise our readers to conduct their own research when making a decision.

