Latest news about Bitcoin and all cryptocurrencies. Your daily crypto news habit.
 Go and docker is a really nice combo. I’m not using any Go in this article but it’s a cute image :)
A couple of months ago I’ve written about my experiences setting up a development environment in the Google Pixelbook. Back then the Linux (beta) feature was only available in the development channel, but nowadays this feature has been released on the stable channel as well.
While I did manage to write some decent amount of code on the Pixel, some system update killed my VS Code installation. I was able to launch the application, but the window just didn’t render… looking at the logs the application seemed to be working though, but in a “headless” state.
I don’t have the skills to debug it further, so I almost gave up. But since the feature I’ve needed was released in the stable branch I decided to power wash the device and start over again, this time on the stable channel.
Just as a side note: before resorting to that I’ve also tried to run the Pixelbook in developer mode, but I didn’t like the user experience at all. Every time I started XFCE it messed completely my resolution and colors on the Chrome OS, making switching between both worlds impracticable. If you have different experiences regarding that please let me know.
After the power wash I’ve setup the VS Code and Go binaries again. I won’t repeat the steps here, but you can refer to my previous article or the official website for the step by step:
This time I went a little further and installed Docker as well. Here I document my experiences.
First add the Docker repository (output omitted for brevity):
$ sudo apt-get update
$ sudo apt-get install \ apt-transport-https \ ca-certificates \ curl \ software-properties-common
$ curl -fsSL https://download.docker.com/linux/ubuntu/gpg | sudo apt-key add -
$ sudo add-apt-repository \ "deb [arch=amd64] https://download.docker.com/linux/ubuntu \ $(lsb_release -cs) \ stable"
Then install Docker:
$ sudo apt-get update$ sudo apt-get install docker-ce
Everything should be working right now, so we issue a docker run hello-world to test the installation:
$ sudo docker run hello-worlddocker: Error response from daemon: OCI runtime create failed: container_linux.go:348: starting container process caused "process_linux.go:402: container init caused \"could not create session key: function not implemented\"": unknown.ERRO[0000] error waiting for container: context canceled $
Ooops! It seems that we may have a problem!
This changed in the newest versions of ChromeOS… the last time I’ve tried to run docker it worked just fine. With a little investigation I’ve found this issue: https://bugs.chromium.org/p/chromium/issues/detail?id=860565
And this reddit post summarizes the solution: https://www.reddit.com/r/Crostini/comments/99jdeh/70035242_rolling_out_to_dev/e4revli/
I don’t have the background even to pretend I’m actually understanding what this is about, but basically, we are messing with some system privileges here.
The workaround is to launch the Chromium Shell (Ctrl+Alt+T) and unset a blacklisted syscall. After pressing Ctrl+Alt+T you should see the crosh> prompt on a new Chrome tab. Type the following commands:
crosh> vmc start termina(termina) chronos@localhost ~ $ lxc profile unset default security.syscalls.blacklist(termina) chronos@localhost ~ $ lxc profile apply penguin defaultProfiles default applied to penguin(termina) chronos@localhost ~ $ lxc restart penguin
If the restart seems to hang, just press Ctrl+C and run it again. It worked for me. :)
You may close the terminal afterwards. With those changes you should be able to run docker just fine. At the Linux (penguin) terminal:
danielapetruzalek@penguin:~$ sudo docker run hello-world
Hello from Docker!This message shows that your installation appears to be working correctly.
To generate this message, Docker took the following steps: 1. The Docker client contacted the Docker daemon. 2. The Docker daemon pulled the "hello-world" image from the Docker Hub. (amd64) 3. The Docker daemon created a new container from that image which runs the executable that produces the output you are currently reading. 4. The Docker daemon streamed that output to the Docker client, which sent it to your terminal.
To try something more ambitious, you can run an Ubuntu container with: $ docker run -it ubuntu bash
Share images, automate workflows, and more with a free Docker ID:https://hub.docker.com/
For more examples and ideas, visit:https://docs.docker.com/get-started/
danielapetruzalek@penguin:~$
It works!
I’m still missing the Linux post-installation steps to enable running docker without sudo, but I think that’s enough for taking docker for a spin.
Trying something more serious
So, we have hello-world working, but what does that says about more complex docker environments. Luckily we have a wide range of prebuilt container images to pick from.
Messing around with Apache Spark is something I like to do often so I decided to try the jupyter/all-spark-notebook image. You can just docker pull it as usual:
$ docker pull jupyter/all-spark-notebook(output omitted for brevity)
And then run the image as:
$ sudo docker run -p 8888:8888 jupyter/all-spark-notebook
For those who are not familiar with docker, the -p parameter will map the port of the container to some port in the host. In this case I’m just exposing the 8888 port.
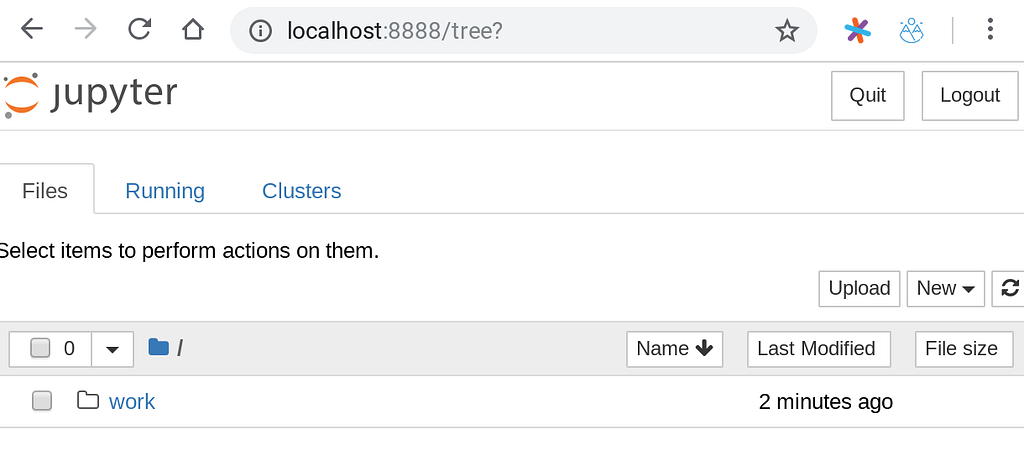
So here comes the tricky part. I’m running a docker image of Jupyter notebook with Spark support on a Linux container running on Chrome OS. Because of that I was not expecting that hitting http://localhost:8888 on my browser would actually access the Jupyter notebook, but I was wrong:
Please note that for accessing the localhost:8888 interface for the first time you need to pass a token. You may find it at the first lines of the log output from the docker run command. In my case it was:
Regarding the localhost actually pointing to the container, I had the slight impression that this wasn’t working that way a few releases ago, but I’m not 100% sure. Nevertheless, it was a great surprise.
Note: in subsequent runs the localhost mapping seemed to get lost somehow, so it seems to be unstable at this moment. One trick is to run ip a in the container and figure out the eth0 ip address and use it in place of localhost instead. I’ve only managed to restore the localhost mapping with a reboot.
Next step is to do some work in the container. I’m going to download a big text file and run a classic word count algorithm on it. I’ve chosen this file to test: http://norvig.com/big.txt
I’m using wget to download it to the container, but you could just save it to the “Linux files” in Chrome OS since it ends up in the home of your user in the container. wget isn’t installed by default, so we have to install it first and then get the file:
$ sudo apt-get install wget(...)Setting up wget (1.18-5+deb9u2) ...$ wget http://norvig.com/big.txt--2018-09-30 21:50:34-- http://norvig.com/big.txtResolving norvig.com (norvig.com)... 66.96.146.129Connecting to norvig.com (norvig.com)|66.96.146.129|:80... connected.HTTP request sent, awaiting response... 200 OKLength: 6488666 (6.2M) [text/plain]Saving to: ‘big.txt’big.txt 100%[=========================>] 6.19M 140KB/s in 41s 2018-09-30 21:51:15 (156 KB/s) - ‘big.txt’ saved [6488666/6488666]
Let’s restart the container mapping the Linux home to a directory in the container:
sudo docker run -p 8888:8888 -p 4040:4040 -v ~:/var/spark/input jupyter/all-spark-notebook
In the command above I’ve also added the mapping for the port 4040 that exposes the Spark UI, just in case.
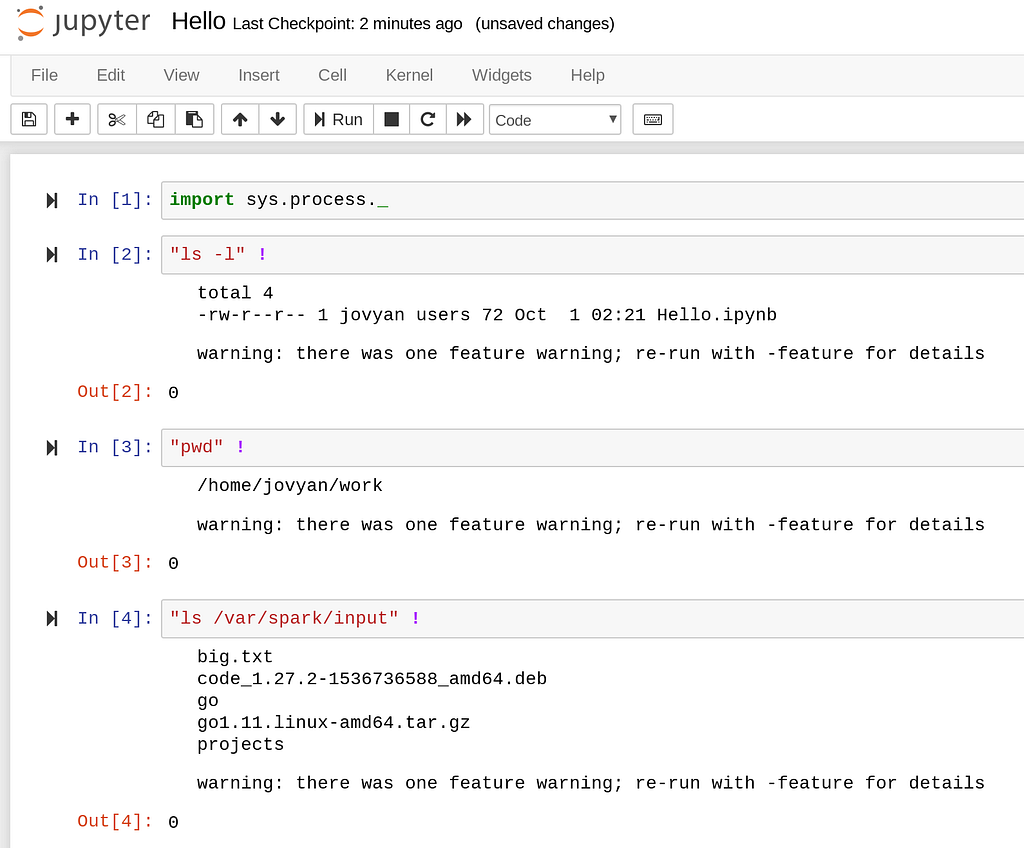
To run our workload I’m creating a notebook with an Apache Toree (Scala) kernel. I’m using the sys.process package to help us navigate inside the container.
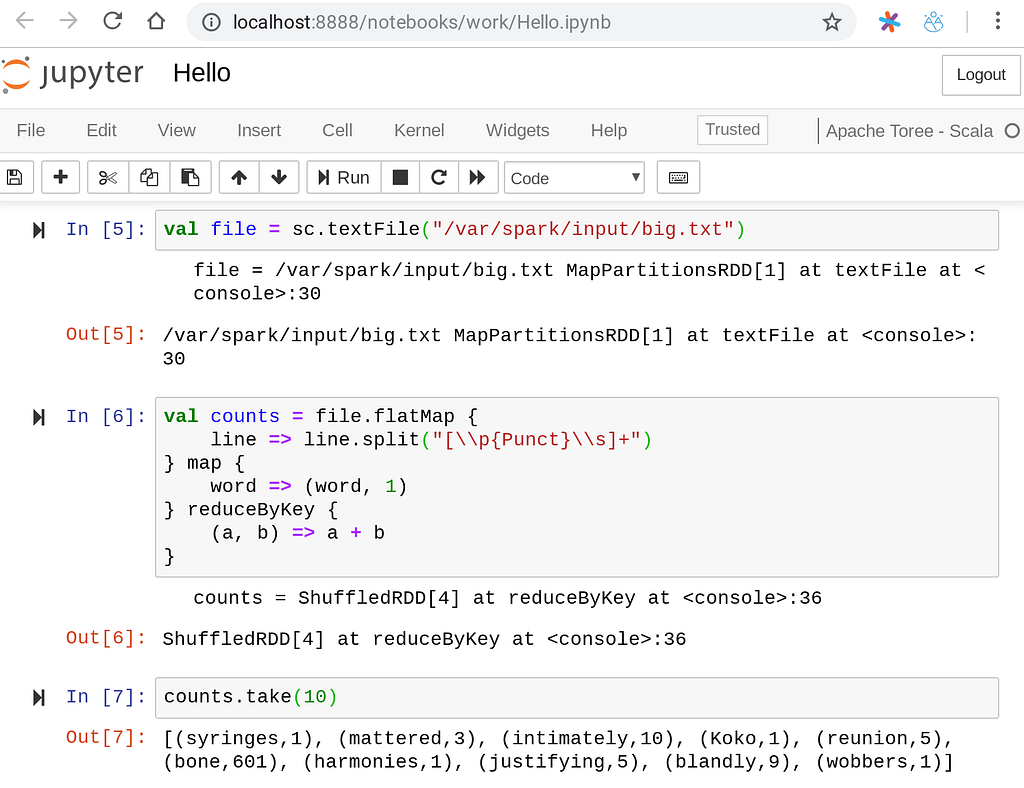
So the big.txt file is there. Now let’s try the classical word count algorithm:
Here I’m using a regular expression to split words using white space and punctuation. Now let’s print the most frequent ones:
 Since I haven’t filtered any stop words I guess that’s expected.
I’m first converting it to a dataframe to get a better interface, then on cell nine I’m using a trick to import spark.implicits._ that’s required on Jupyter notebooks. Finally, I’m printing the result using the implicit column operator (single quote) to order in descending order.
Conclusions
Yes, running complex docker images on the Pixelbook (or any modern Chromebook) is perfectly doable, but still, you will probably be facing several instability issues that you must be ready for.
I’m not sure why binding to localhost works sometimes and doesn’t work at others, but diagnosing that would require some systems and networking knowledge that I’m currently lacking. One workaround is to ignore localhost and figure the ip address of the linux penguincontainer and just use it instead. If comes to this, this reddit may come in handy for you: https://www.reddit.com/r/Crostini/comments/89x69f/is_there_a_way_to_open_ports/
During the writing of this article I’ve had to reboot the Pixelbook at least once and kill the termina container (from within crosh) a few times because the launch terminal shortcut became irresponsible. Please note that if you do reboot your chromebook you need to run the remove blacklist step again.
I’m still working my head on understanding this architecture and how to diagnose platform issues. At this moment I’m using croshto debug terminaand terminato debug penguin , but the relationship between those is not perfectly clear to me. I guess that will come with time, nevertheless it has been a fun experience to explore all of this.
Do you have any questions or comments? Please feel free to reach out using the comments field below.
Pixelbook Revisited: Running Docker Containers was originally published in Hacker Noon on Medium, where people are continuing the conversation by highlighting and responding to this story.
Disclaimer
The views and opinions expressed in this article are solely those of the authors and do not reflect the views of Bitcoin Insider. Every investment and trading move involves risk - this is especially true for cryptocurrencies given their volatility. We strongly advise our readers to conduct their own research when making a decision.


