Latest news about Bitcoin and all cryptocurrencies. Your daily crypto news habit.
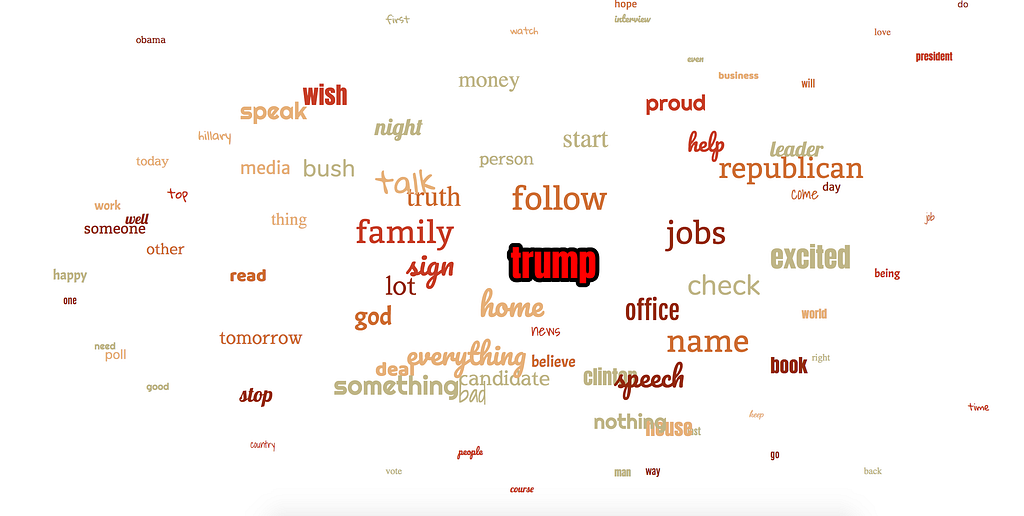
I recently became interested in data visualization and topic modeling in Python. One of the problems with large amounts of data, especially with topic modeling, is that it can often be difficult to digest quickly. What I wanted to do was create a small application that could make a visual representation of data quickly, where a user could understand the data in seconds.
The above screenshot is an example of a site I recently made which I think accomplishes this. In this example, you can search for any word. When you search, python searches through over 10,000 Donald Trump tweets, and finds the topics most frequently associated with the search query. The words that hold more weight, or are more closely related to the search term appear larger, and more centered on the page. The words that are less closely related are smaller, and further from the center.
To see this in action, here is the live version:
http://trumpsearch.herokuapp.com/
One other aspect to this site is that, each word by itself may not be an individual topic, but several words together may make up one topic. However, grouping words by topic can be difficult, and if there are a lot of words on the page, it may be difficult for a user to see which words belong to the same topic. Again, we could just make a table, and group them in columns, but then that defeats the purpose of trying to make this quick and easy to read. In the above example, if you visit the live site, each time you mouseover a word, it highlights all the words that belong to that topic. For example, if you search for “economy”, one of the results will be “disaster”. Mousing over it reveals the related words of “hillary”, “taxes” and “jobs”.
So in a matter of seconds a user can make a search, and see all the topics, and words that make up each topic.
Now, there are a lot of libraries and packages for Python that are great for topic modeling. However some of these can be very heavy and cumbersome especially if the end goal is a simple data visualization. So for this, I used Python with minimal dependencies.
For the data visualization, I’ve read a lot about D3, which seems to offer some great visualization tools. However, in this example, I used pure JavaScript/Jquery and CSS. Part of the reasoning I did this was that, again, D3 offers some great tools, but there’s also a little learning curve, and after reading through the documentation for 5 minutes, I decided I could get the look I wanted without the add-on.
The great thing about this site skeleton, is that it’s simple, and can be reused with any data set. Basically just plug and play the data, and it’s good to go, with a few minor tweaks.
If you’re interested, you can follow along below on how I set up a basic Python / Flask site, along with some ideas about Topic Modeling and Data Visualization.
File Structure
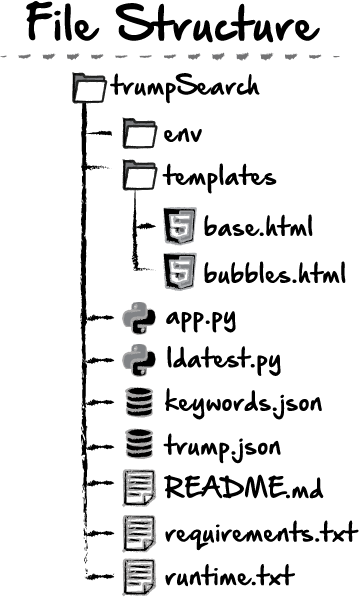
Although we haven’t started yet, it’s a good idea to have an idea of how our file and data will be structured. This will help keep things organized as we move along. Here’s the basic layout for this project:
If this is your first time doing a Python/Flask app, you can see here, we have our app.py file, which will handle the routing between our different html pages. We can accept data from forms on the front end here as well. My topic modeling, although it doesn’t use any of the NLTK or Gensim libraries, still follows some of the basic ideas of the Latent Dirichlet Allocation or LDA. And so my functionality for this part of the site is going to be in a python file which I’ll call ldatest.py. All of the environment stuff, and requirements, etc we won’t get to right away, but I’m putting it out there now, for us to keep in mind once we start on the flask side of things. I’m also going to include two json files in here. Because our data isn’t going to be too huge, I just find it easier to work with local files, and upload them as well. An alternative would be to make an api call, but I’m just not going to do that here. To start off with, I’ll be doing the topic modeling in my ldatest.py file, but of course, you can name it whatever you like.
Also, if you would like to download the json data I’ll be using, you can download them here, or feel free to use your own data.
1. Topic Modeling
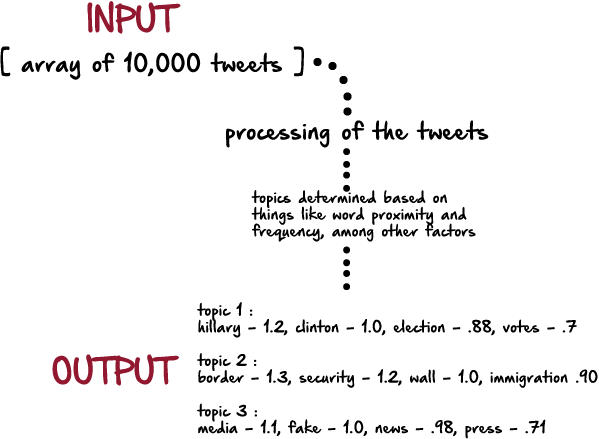
I’m not going to pretend to be an expert on topic modeling, because I definitely am not. But here’s the premise as I understand it:
If we were using a Python library like NLTK and Gensim, this might be similar to what we would see. This libraries and packages basically take all the data as input, strip them down, take out the stopwords, convert them all the the root words and present tense among other things, so that each word can be compared with more accuracy. Eventually, it determines the most relevant topics for whatever the dataset is. Each topic also has a set of words, with a numerical score, which represents the weight each word has in contributing to the topic. In the example site above, you might see this data represented in a more visual way if a user searched for something like “politics”. All of the words in the output would be on the page, but hillary, border and media would be the closest to the center. And when you mouse over each word in each topic, the other words in that topic would appear highlighted.
2. Topic Modeling without libraries/packages
Here’s my thought process in getting the above type of return data without using all of the dependencies usually required for topic modeling.
a) keyword list
True Natural Language Processing is capable of taking any dataset and extracting the topics from it. In my case however, my dataset is fairly limited. It’s focused on the realm of politics surrounding Donald Trump. So I created a keyword list. My reasoning for this is that, because this search is focused on politics, there are many words that won’t be relevant or useful to a user. For example, users likely won’t find words associated with basketball, football, the weather, or netflix very useful. However, words like policy, republican, banks, jobs, economy could be used to inform a user of topics related to a searchterm. I downloaded a list of political buzzwords for mine, and then added several of my own. To make the search more comprehensive and useful, a larger pool of keywords (500+) could be helpful.
If you downloaded my keywords.json file, you may notice that quite a few of them have a religious theme. That’s because I created this keyword list for another project, using this same site skeleton, and found that the keyword list worked pretty well for this, with some additions and adjustments.
Here’s how this process works:
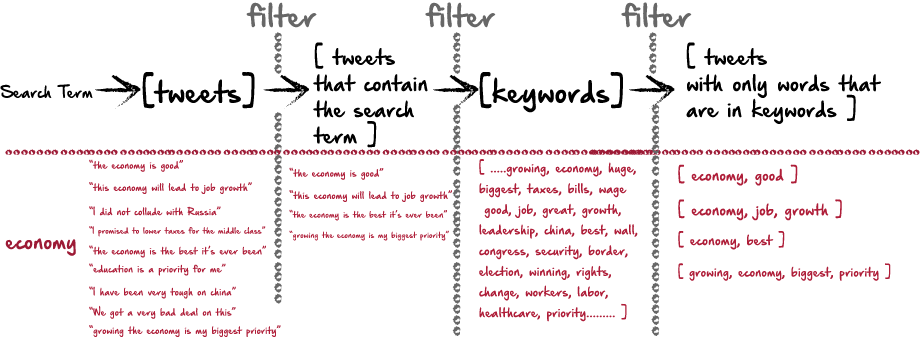
Basically, it all starts with a search term. Then, I’ll loop through the tweets and remove all the ones that don’t contain the search term. I’m left with only tweets that contain the search term. The idea is that here, we’ll have a lot of data (topics) about a search term. Then, I run these tweets against my list of keywords, and remove words from each tweet that aren’t in the keywords. This will remove unwanted words like “is”, “and”…etc…as well as words that are simply off topic, like “sports” or “celebrities” etc. Here’s how this process might work:
In Python, the code looks like this:
import jsonfrom operator import itemgetterimport operatorfrom random import randintimport re
with open('trump.json') as f: trump = json.load(f)with open('keywords.json') as f: kwrds = json.load(f)def returnTopics(s1): data = [] for t in trump: if s1 in t['text'].lower(): data.append(t['text'].lower())
At this point, we are just after the first “filter” in the diagram, having only tweets that contain the searchterm.
Then, I’ll want to filter out only the words that are in the keywords list. Python has a great way to do this, which is an intersection of two sets. This is much faster than looping through the list.
matchGroup = []verify = []for d in data: splitD = d.split(" ") matchedData = set(splitD) & set(kwrds) # print (matchedData) c = dict.fromkeys(matchedData, 0) matchedList = list(set(splitD) & set(kwrds))In the above code sample, set(splitD) & set(kwrds) gives me a hash/dict of each word that are in both sets. The data might look like this:
{'economy', 'jobs', 'america'.....}The reason I want to do this is so that I can avoid looping. I can simply treat each word as it’s own object, and count their frequency later.
However, I do also want a list for looping, which I stored as a separate variable as well.
the variable ‘c’ is what I’ll use later to send to the front end in a hash with other data.
We could just stop here…
If we stopped here, we would still be able to send the data we’ve gathered so far to the front end. We could still have a list of all the keywords, and sort them by frequency. However, the element we’re missing is the topics. For example, in the above data, one of the returned words is growth. In our chart, we would want to see what other words growth is linked to. An easy, but inefficient way to do this would be to take our final list, and loop back through the original data with each output word, and see which other keywords are in a close proximity to it. Essentially, that’s what I’ll end up doing, but in a slightly more efficient way.
for m in matchedData: if m in verify: index1 = verify.index(m) matchGroup[index1]['count'] += 1 for li in matchedList: if li in matchGroup[index1]['matches']: matchGroup[index1]['matches'][li] += 1
elif m not in verify: hashArr = { 'word': m, 'count': 1, 'matches': c } matchGroup.append(hashArr) verify.append(m)Remember our matchedData variable contains each of the words that were in both the keyword list and the tweet itself. The variable ‘m’ contains each word in the matchedData set. Let’s look at what happens in the second condition, (if m is not in verify).
elif m not in verify: hashArr = { 'word': m, 'count': 1, 'matches': c } matchGroup.append(hashArr) verify.append(m)Verify is a dummy list I’ve created, just to push data to, so that I can check if I’ve already looped through it or not. If the current word in the loop is ‘growth’, and it’s not in verify, then this is the first time I’ve looped over the word. In that case, I’ll make a hash/dict. This dict contains 3 keys:
word, which is the word itself (m).
count, which starts at 1, since this is the first time we’ve looped over this word.
matches, ( c ). This will be a hash of key value pairs. The key is a word in the data set, and the second is the numerical value for how many times it has appeared so far. For example, if the search term is “hilary” one of these hashes might include:
{'create': 0, 'do': 0, 'jobs': 0, 'clinton': 0, 'will': 0, 'hillary': 0}Finally, we append this hash to the list (matchedGroup)
and we append the word itself to the list (verify)
Next, and more complicated is the event that the current word is already in the verify list:
if m in verify: index1 = verify.index(m) matchGroup[index1]['count'] += 1 for li in matchedList: if li in matchGroup[index1]['matches']: matchGroup[index1]['matches'][li] += 1
First, we get the index at which the word appears in the verify list. In Python, these lists will remain in order, so since we are appending new words to verify and new hashes to matchGroup at the same time, these index values should be the same. Let’s assume that at this point, the ( m in matchedData ) represents the word ‘economy’. So we’ve gone to verify, and found that the index of ‘economy’ in verify is 250. So next, we go to matchedGroup[250]. This will be the hash, which contains the word, count and matched group for ‘economy’. In this hash, we select the count, matchedGroup[250][‘count’] and add 1. Then we loop through each word in the list matchedList. then we see if each word in this list is a key in the hash matchGroup[index1][‘matches’]. If it is, then we add 1 to that hash.
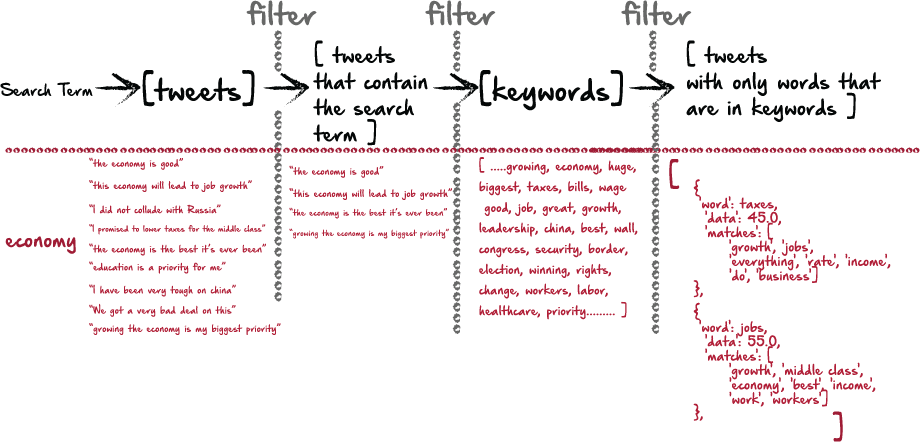
As an example, if our original search term was economy, one of the hashes we create will be ‘china’, because ‘china’ is in our list of keywords. Here’s what that hash will look like:
{'word': 'china', 'data': 6.0, 'matches': ['china', 'jobs', 'everything', 'rate', 'order', 'do', 'business']}Basically, this says that in tweets that contain ‘economy’, the word ‘china’ appeared 6 times. And in tweets that contain ‘china’, the most common keywords in that tweet were ‘china’, ‘jobs’, ‘everything’, ‘rate’, ‘order’, ‘do’, and ‘business’.
China probably isn’t a huge topic for tweets including the economy, but let’s compare that with a word like ‘deal’. Here’s the output for that word:
{'word': 'deal', 'data': 31.5, 'matches': ['deal', 'promise', 'seek', 'will']}Deal appears 31.5 times in tweets about the economy, and tweets including ‘deal’ most frequently also mention ‘deal’, ‘promise’, ‘seek’, ‘will’.
If we go back to our original site, we can see how this data is represented. If we search for ‘economy’, the word ‘China’ isn’t listed at all, as it is a very low frequency. “Deal” appears more closely to the center. And if we mouse over it, the words, ‘promise’, ‘seek’ and ‘will’ are also highlighted.
Now, the filtered and parsed data might look like this, where, when a word is searched for as input, the output begins to resemble more closely the LDA ( Latent Dirichlet Allocation ) type of data we looked at earlier. Each word gives us a count of how often it appears alongside tweets that include the search term, and we get a list of other words, which are most closely related to the word or topic.
Now, we aren’t quite done yet. First, we need to sort the data by the count. And then we’ll take a slice of only the top 80 terms, so that we don’t have to visualize data that is less related.
newlist = sorted(matchGroup, key=lambda k: k['count']) newlist.reverse() slicedList = newlist[:81]
Finally, we’ll build our finished dictionary based on the new sliced list, which contains only the most relevant words, sorted in order of frequency.
dataArr = [] for index, sort in enumerate(slicedList): if index <= 80: sorted_x = sorted(sort['matches'].items(), key=operator.itemgetter(1)) sorted_x.reverse() wordArr = [] xSlice = sorted_x[:10] for xS in xSlice: wordArr.append(xS[0]) hash2 = { 'word': sort['word'], 'data': index/2, 'matches': wordArr } dataArr.append(hash2) print (dataArr) return dataArr, s1Here, we basically repeat the process of sorting the list of words in each hash, held in the variable ‘matches’. And we take a slice of that list of just the first 10 words. Since the list is sorted, these will be the 10 highest frequency words for each subtopic. This is a good idea especially if our keyword list is really large. There could be 15 or 20 words in this list, and if the entire page is highlighted with each mouseover, it becomes difficult for the user to make sense of any unique topics.
All the code together:
import jsonfrom operator import itemgetterimport operatorfrom random import randintimport re
with open('trump.json') as f: trump = json.load(f)with open('keywords.json') as f: kwrds = json.load(f)def returnTopics(s1): data = [] for t in trump: if s1 in t['text'].lower(): data.append(t['text'].lower()) data = [re.sub('\s+', ' ', sent) for sent in data] data = [re.sub("\'", "", sent) for sent in data] # print (data) matchGroup = [] verify = [] for d in data: splitD = d.split(" ") matchedData = set(splitD) & set(kwrds) # print (matchedData) c = dict.fromkeys(matchedData, 0) matchedList = list(set(splitD) & set(kwrds)) for m in matchedData: if m in verify: index1 = verify.index(m) matchGroup[index1]['count'] += 1 for li in matchedList: if li in matchGroup[index1]['matches']: matchGroup[index1]['matches'][li] += 1elif m not in verify: hashArr = { 'word': m, 'count': 1, 'matches': c } matchGroup.append(hashArr) verify.append(m) newlist = sorted(matchGroup, key=lambda k: k['count']) newlist.reverse() slicedList = newlist[:81] dataArr = [] for index, sort in enumerate(slicedList): if index <= 80: sorted_x = sorted(sort['matches'].items(), key=operator.itemgetter(1)) sorted_x.reverse() wordArr = [] xSlice = sorted_x[:10] for xS in xSlice: wordArr.append(xS[0]) hash2 = { 'word': sort['word'], 'data': index/2, 'matches': wordArr } dataArr.append(hash2) print (dataArr) return dataArr, s1I haven’t talked yet about the ‘data’ key in the final hash that I created. What I originally intended was to have the value of the ‘data’ key be the ‘count’ of that word. Then, on the front end, I could determine how large the font was by the count. However, this proved unreliable, as the count often fluctuated in ways that were hard to predict.
Creating a Flask Template:
If we’ve created a Python file with the above code, we can run the code, calling the function, and see the output in the command line/terminal. And if this is all we want, then we can end here. However, if you do want to be able to visualize the data, we’ll need to go a step further. If you’ve never worked with Flask before, I’ll go through some of the most basic steps here in setting it up.
My project folder is called trump, and my file is called ldatest.py. after going to the command line,
1. Create a new git repo from our working directory. cd into directory.
$ git init
2. Next, we’ll set up a virtual environment for our project.
To do this, we’ll need to know the version of Python we’re running. To do this, we can go to the command line and type py, or python3, and it will let us know the version we are using. Once we know that, use the lines below to set this:
$ pyvenv-3.6 env$ source env/bin/activate
Now, in the command line/terminal we should see (env) to the left of our project directory, letting us know we are in a virtual environment. If we ever stop terminal, and restart, we can start our virtual environment again by running:
$ source env/bin/activate
3. Next, we’ll add some necessary files to our project directory:
$ touch app.py .gitignore README.md requirements.txt
In our project directory, we should have our python file, as well as app.py, .gitignore, README.md and requirements.txt all on the same level in our directory tree.
4. Next, we’ll need to install Flask:
$ pip install flask
5. Add the libraries we’ve used as dependencies to requirements.txt
$ pip freeze > requirements.txt
If, at some point we add dependencies to our project, we may get an error when we run it that it can’t locate a particular module. If this happens, it’s likely that we’ve installed a module, but haven’t updated our requirements.txt file. Simply run the above command again, and retry.
As a reminder, here’s our tree structure. Now, we’ve accomplished most of this, finishing up our ldatest.py file, as well as our app.py file. Once we tweak our app.py file, we can go in and create both our base.html and bubbles.html, and we should be finished.
from flask import Flaskapp = Flask(__name__)@app.route('/')if __name__ == '__main__': app.run()At this point we can run our flask app, but before we do that, it would be a good idea to import our function. Again, my file is called ldatest, and the def in that file is called returnTopics. So we’ll include that import at the top of app.py.
from ldatest import returnTopics
In our @app.route(‘/), we’ll want to create a def that runs the function we’ve imported. We haven’t made any templates or front end functionality, but because we want to run the function based on user input, the most straight forward way to do this is with a form. Obviously, we haven’t created that form on the front end yet, but we can go ahead and create the functionality here to accept the form data, and pass the user input from here to our function as a parameter.
Since the main page will have the form, will also need to allow for GET and POST methods on this page. Here’s one way we can accomplish all of this:
from flask import Flask, request, render_templatefrom ldatest import returnTopics
app = Flask(__name__)
@app.route('/', methods=['GET', 'POST'])def searchTopic(): return render_template('base.html')
@app.route('/bubbles', methods=['GET', 'POST'])def searchResults(): s1 = request.form['s1'] output = returnTopics(s1) return render_template('bubbles.html', result=output)
if __name__ == '__main__': app.run()
We know that our function is only taking one parameter, and we’ll pass that in as a variable ‘s1’. Where we imported our function ‘returnTopics’ earlier, we’ll also call that here, and the return from that function we’ll save as the variable ‘output’. Finally, we’ll render the template bubbles.html, and send the variable ‘output’ to the front end with ‘result’. All of this will be done with our /bubbles route, while our base route will just be the landing page.
Now again, we haven’t created any of this yet, but since the site will be fairly simple with just two pages and a form, we can go ahead and create the functionality here, and then create the pages and form.
Templates
Base.html
First, we’ll want to make our base template. I like to include all of these templates in a templates folder, as you can see from our tree structure earlier. Here’s the basic skeleton for our base.html file:
<!DOCTYPE html><html> <head> <meta charset="utf-8"> <link href="{{ url_for('static', filename='styles.css') }}" rel="stylesheet"> <script type='text/javascript'> </script> <style type="text/css"> </style> <title>Trump Search</title> </head> <body> <div id="navBar1" style="display:flex;flex-flow:row wrap;justify-content:center;align-items:center;width:100%;background-color:#e1e9f7;height:45px;"> </div> {% block content %}{% endblock %} </body></html>If you’ve written some HTML before then this should look pretty familiar. You may notice towards the bottom, but still in the body tag, we have this line:
{% block content %}{% endblock %}In our subsequent bubbles.html file, we’ll include this skelton:
bubbles.html
{% extends "base.html" %}{% block title %}i{% endblock %}{{ super() }} {% block content %}---- content goes here -----{% endblock %}The way that these html templates work, is that the bubbles.html simply extends the base. Since we have the navbar in the base file, the bubbles.html, will extend that navbar. The navbar will still appear when bubbles.html is rendered, and all of the bubbles.html content will be rendered within the {% block content %}{% endblock %} of the base.html file.
Back in app.py
In our app.py file, we included the line return render_template(‘bubbles.html’, result=output). Now, if we want to access that data on the front end template, we could simply add a script tag to our bubbles.html file, and set a variable that would hold the return data. We can do that like this:
{% extends "base.html" %}{% block title %}i{% endblock %}{{ super() }} {% block content %}<style type="text/css"> </style>
<script src="https://ajax.googleapis.com/ajax/libs/jquery/3.3.1/jquery.min.js"></script><script type='text/javascript'> $(document).ready(function(){ var graphData = {{ result|tojson }}; console.log(graphData);</script><div id="display1"></div>
{% endblock %}Here, I’ve include a <div> tag, a <script> tag and <style> tag. The return data from our function can be stored in the graphData variable, so that we can access and display as we please, and it can be rendered inside the <div> tag if we so desire.
From here on out, it’s down to basic css and javascript. And because this blog post has gone on for far too long, I’ll wrap this up shortly, after giving a few key ideas about the Data Visualization side of this equation.
Data Visualization
1 ) Font Size
If you remember earlier, the final ‘data’ key we used, and sent to the front end is set equal to the current index divided by 2. Since we’re only using the first 80 results, if there are 80 results, this means that the data key will be a number between 0 and 40 maximum. On the front end, I used this value as my font size. I created a template expression and then passed in the ‘data’ key value as a variable to be used as the font size. However, we obviously don’t want a font size of 0, so I wrote a conditional that if the index is ever less than 12, then the font size will be 12. Since I’ll bring the values into the front end in order, they will have a consistent font size, that decreases gradually. I found that this worked the best on the front end, to visually express to the user that some words are more important than others. Otherwise, you would often end up with all the words being almost identical in size, which is of little help.
2) Spacing on page
Because I wanted to keep the words of most importance, or more closely related to the search term closest to the center of the page, and the other words towards the edges of the page, I used a position:fixed css styling for all the words. The first term, or search term, I gave a top:50% value and a left:50% value, centering it on the page. I know there has to be a better way to do this, but what I ended up doing was using a for loop, and gradually changing and spacing the words out depending on the index value:
for (var i = 0; i < graphData.length; i++) { let fontSize = graphData[i].data; if (graphData[i].data > 40){ fontSize = 40; } if (graphData[i].data < 12){ fontSize = 12; } if (i == 80){ top = 40; left = 50; } if (i == 79){ top = 46; left = 65; } if (i == 78){ top = 46; left = 35; } if (i == 77){ top = 57; left = 47; }This was fairly cumbersome, since I had to do this for all 80 indices. However, the advantage is that, they are always consistently spaced on the page, and if there are ever less than 80 words, then the words are automatically spaced further and further from the center, visually indicating to a user that the current search term yielded few and loosely related results.
The Mouseover Effect
Probably the most important piece of this aside from the data itself is the mouseover. To achieve this, I wanted to highlight the related topics whenever a word is moused over. I started by creating a mouseenter and mouseleave event. If you remember, our data that we now have on the front end, looks like this for each word on the page:
{'word': 'deal', 'data': 31.5, 'matches': ['deal', 'promise', 'seek', 'will']}So, on the mouseenter event, I get the html value of the current word being moused over. Then, I loop through my data returned from our Python function, and find the matching word. This word will contain an array of words in the ‘matches’ key, which I’ll want to test against the other words on the page. I start by storing all the elements on the page that belong to this class in a variable. This variable, “allElements” is now an array of HTML elements. I’ll loop over this data, still inside my mouseenter event, and if any of the html() values in this array match any of the elements in our ‘matches’ key, I change the css class of that element to a new class, the hightlighted class.
Then, on the mouseleave event, I simply revert any of the elements that were changed, back to the original class.
var allElements = $(".hoverBtn");$( ".hoverBtn" ).mouseenter(function() { var currentWord = $(this).html(); var currentList = []; for (var i = 0; i < graphData.length; i++) { if (graphData[i].word == currentWord){ currentList = graphData[i].matches; } } $(this).removeClass('hoverBtn'); $(this).removeClass('hoverBtn2'); $(this).addClass('hoverBtn3'); for (var i = 0; i < allElements.length; i++) { if( currentList.indexOf(allElements[i].innerHTML) > -1 || allElements[i].innerHTML == currentWord) { allElements[i].className = 'hoverBtn3'; } else { allElements[i].className = 'opacity'; } }});
$( ".hoverBtn" ).mouseleave(function() { for (var i = 0; i < allElements.length; i++) { if (allElements[i].className != 'hoverBtn2'){ allElements[i].className = 'hoverBtn'; } }Styling:
Last, but not least, styling. If you visited the live site, you’ll notice that each time you search, even for the same terms, the experience is slightly different.
To achieve this look I did the following:
First, I created an array of fonts I wanted to use:
var arrFonts = [‘Slabo 27px’, ‘Sawarabi Mincho’, ‘Baloo Tammudu’, ‘Nunito’, ‘Anton’, ‘Bitter’, ‘Fjalla One’, ‘Lobster’, ‘Pacifico’, ‘Shadows Into Light’, ‘Dancing Script’, ‘Merriweather Sans’, ‘Righteous’, ‘Acme’, ‘Gloria Hallelujah’];
and imported those fonts in a link tag from google fonts:
<link href="https://fonts.googleapis.com/css?family=Acme|Anton|Baloo+Tammudu|Bitter|Dancing+Script|Fjalla+One|Gloria+Hallelujah|Lobster|Merriweather+Sans|Nunito|Pacifico|Righteous|Sawarabi+Mincho|Shadows+Into+Light|Slabo+27px" rel="stylesheet">
Then, inside each iteration of the for loop, I pick a random font from this array of fonts:
var randFont2 = arrFonts[Math.floor(Math.random() * arrFonts.length)];
And finally, in the template expression, I pass in this variable as the value of the font, via inline styling, and append it to the page:
var plot = `<a class="hoverBtn" style="Font-Family:${randFont2},sans-serif;position:absolute;top:${top}%;left:${left}%;font-size:${fontSize}px;color:${color9}">${graphData[i].word}</a>`;$('#display1').append(plot);As you can see, I passed in similar variables for the color. I used the same process by grouping sets of color schemes together based on hex values. Then, I pick an array of colors at random. Inside each loop, I pick a random color from the randomly chose array of colors, and this color is passed in as the color variable.
var greens = ['#DAA520', '#EEB422', '#CD950C', '#E6B426', '#CDAB2D', '#8B6914', '#8B6508', '#EEAD0E', '#FFCC11', '#FFAA00', '#DC8909', '#ED9121']; var purples = ['#38B8B', '#5F9F9F', '#2F4F4F', '#528B8B', '#388E8E', '#53868B', '#50A6C2', '#00688B', '#6996AD', '#33A1DE', '#4A708B', '#63B8FF', '#104E8B', '#344152', '#26466D', '#7EB6FF', '#27408B', '#1B3F8B', '#1464F4', '#6F7285', '#0000FF']; var yellows = ['#2E0854', '#7F00FF', '#912CEE', '#71637D', '#BF5FFF', '#4B0082', '#BDA0CB', '#68228B', '#AA00FF', '#7A378B', '#D15FEE', '#CC00FF', '#CDB5CD', '#4F2F4F', '#DB70DB', '#EE00EE', '#584E56', '#8E236B', '#B272A6'];
var colorArr = [blues, reds, oranges, greens, purples, yellows, skinTone1, griffindor, bluegray, downtown, lightblues, darkTones1, summertime, nightroses, coolcolors, winered, dustybeach, saltlamp, junkCarLot, autumnColors, cherrySoda]; var randColors = colorArr[Math.floor(Math.random() * colorArr.length)];
var color9 = randColors[Math.floor(Math.random() * randColors.length)];
var plot = `<a class="hoverBtn" style="Font-Family:${randFont2},sans-serif;position:absolute;top:${top}%;left:${left}%;font-size:${fontSize}px;color:${color9}">${graphData[i].word}</a>`;$('#display1').append(plot);Thanks for reading.
If you have any thoughts, or suggestions, or criticisms, feel free to leave them here. Thanks for reading.
Topic Modeling and Data Visualization with Python/Flask was originally published in Hacker Noon on Medium, where people are continuing the conversation by highlighting and responding to this story.
Disclaimer
The views and opinions expressed in this article are solely those of the authors and do not reflect the views of Bitcoin Insider. Every investment and trading move involves risk - this is especially true for cryptocurrencies given their volatility. We strongly advise our readers to conduct their own research when making a decision.

