Latest news about Bitcoin and all cryptocurrencies. Your daily crypto news habit.

Part I of this series used a real-world example backend for an app called Classy to show the advantages of ML model pipelines. It explained three architectures for sequencing components into pipelines.
In this post, we explore the nitty-gritty details of implementing these pipelines with GraphPipe and go. To keep the code simple, we’ll start by implementing the three basic architectures with toy models, and then show a full implementation of the Classy backend from the first post.
Basic Setup
You can find all of the code examples on GitHub, but the relevant code from the toy models is included below. To save you from building the examples yourself, I’ve also uploaded containers with all of the clients and servers to DockerHub. The gray text throughout the post show how to run the examples using those containers.
To begin, lets set up a couple of extremely simple GraphPipe servers in go. All of our server examples will use the same main function; only the apply method will differ. Here are the imports and the main function for all of our servers:
The gp.Serve() method introspects the types of our apply method and glues everything together for us. Our servers accept a single argument which is the port to listen on. The first server will accept a two-dimensional array of floats. It will multiply each float value in the array by two. Here is the apply method for the first server:
The second server is very similar, but it adds 1 to each value instead of multiplying by 2:
Now we can run the multiply model on port 3000 and the add model on port 4000. You can run my containerized servers as follows:
SRV=multiplyID1=`docker run -d --net=host --rm vishvananda/pipeline:$SRV 3000`
SRV=addID2=`docker run -d --net=host --rm vishvananda/pipeline:$SRV 4000`
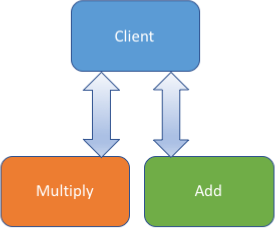
The first type of sequencing discussed in Part I was client sequencing. As expected, this puts sequencing logic into the client. We simply make the client perform requests to the multiply and add models sequentially:
To run the containerized version of this example:
CLIENT=client-sequencing-clientdocker run --net=host --rm vishvananda/pipeline:$CLIENT# Output:# [[0 1] [2 3]]# [[0 2] [4 6]]# [[1 3] [5 7]]
Note that we could also use a python client, which would give the same results:
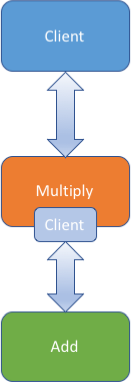
The second architecture discussed was server sequencing. In this version, the multiply model has a client that it uses to communicate with the add model as part of its calculation. To illustrate server sequencing, we need to make this new version of the multiply model that makes a call to add. Here is the code for a new server that does this:
Note that the location for the add model is hard coded. We’ll also need a new client that only makes a request to the first model:
Now we can run our new multiply server in place of the old one and make a request against it:
docker stop $ID1SRV=server-sequencing-serverCLIENT=server-sequencing-clientID1=`docker run -d --net=host --rm vishvananda/pipeline:$SRV 3000`docker run --net=host --rm vishvananda/pipeline:$CLIENT# Output:# [[1 3] [5 7]]
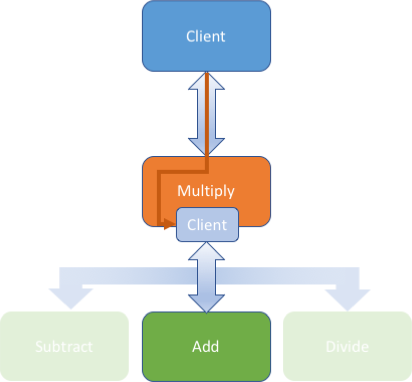
The final sequencing type we discussed was hybrid sequencing. For hybrid sequencing, our multiply server must accept config telling it where the next model is. The GraphPipe Spec allows us to pass arbitrary config data in to the model. For the internal client, we use an embedded call to gp.Remote(), just as with server sequencing:
The only difference between this version and the server sequencing version is that we pass the config value as the uri to gp.Remote() instead of using a hard-coded value. Our modified client must pass the location of the second model:
And our new version works just like the previous ones:
docker stop $ID1SRV=hybrid-sequencing-serverCLIENT=hybrid-sequencing-clientID1=`docker run -d --net=host --rm vishvananda/pipeline:$SRV 3000`docker run --net=host --rm vishvananda/pipeline:$CLIENT# Output:# [[1 3] [5 7]]
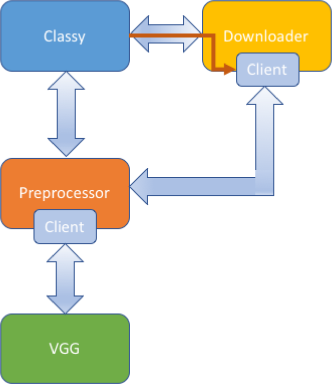
Now that you have a feel for implementing these architectures with toy models, we can play with the complete implementation of Classy. The code for this example is in the same repository. This model uses three server components: downloader, preprocessor, and vgg. The vgg container uses the graphpipe-tf model server to serve an implementation of vgg built with tensorflow, but the downloader and preprocessor look very similar to the toy servers above.
Although this implementation shows a more complicated system with logging, timeouts, error handling, and concurrency, the architecture is still using sequencing varieties that we have already seen: downloader is using hybrid sequencing, and preprocessor is using server sequencing.
To run the three components, you can use prebuilt containers from DockerHub:
docker stop $ID1docker stop $ID2
# NOTE: vgg requires 10G+ of RAM. For small machines or VMs,# try the squeezenet implementation further downSRV=vggID1=`docker run -d --net=host --rm vishvananda/pipeline:$SRV`
SRV=preprocessorID2=`docker run -d --net=host --rm vishvananda/pipeline:$SRV`
SRV=downloaderID3=`docker run -d --net=host --rm vishvananda/pipeline:$SRV`
To keep our implementation simple, our Classy client is a go application as well. As you can see, the code is quite short, so it would be easy to include in a native mobile application. The Classy client allows you to pass in either local images or urls and returns a class for each image passed. To use it, simply pass the filenames or urls as arguments. Note that the client doesn’t support mixing urls and filenames. Here is an example of sending in a url:
DOMAIN=https://farm8.staticflickr.comIMAGE=7457/16344626067_1e89d648a6_o_d.jpgARGS=$DOMAIN/$IMAGEdocker run --net=host --rm vishvananda/pipeline:classy $ARGS# Output:# image 0 is class 235: German shepherd, German shepherd dog, German# police dog, alsatian
And here is an example with a local file:
wget -nc $DOMAIN/$IMAGE -o shepherd.jpgARGS=images/shepherd.jpgMNT="-v $PWD:/images/"docker run $MNT --net=host --rm vishvananda/pipeline:classy $ARGS# Output:# image 0 is class 235: German shepherd, German shepherd dog, German# police dog, alsatian
To show the flexibility of the deployment, we can replace our vgg implementation with a squeezenet implementation by just changing the model server and the preprocessor:
docker stop $ID1docker stop $ID2
SRV=squeezeID1=`docker run -d --net=host --rm vishvananda/pipeline:$SRV`
SRV=preprocessor-squeezeID2=`docker run -d --net=host --rm vishvananda/pipeline:$SRV`
docker run $MNT --net=host --rm vishvananda/pipeline:$CLIENT# Output:# image 0 is class 235: German shepherd, German shepherd dog, German# police dog, alsatian
As you can see, neither the downloader nor the client implementation needed to change to support our new model. Our preprocessor abstraction makes it so the client doesn’t have to care that squeezenet expects a different input size with channels first data ordering; it simply sends in raw jpgs or urls.
Conclusion
This post made the theory of machine model pipelines concrete by implementing them with GraphPipe. Reusable chunks of computation are a valuable tool when building AI systems. As more and more models are deployed with a consistent interface, we expect to see more complex pipelines emerge. Get started building your own pipelines!
Machine Learning Model Pipelines: Part II was originally published in Hacker Noon on Medium, where people are continuing the conversation by highlighting and responding to this story.
Disclaimer
The views and opinions expressed in this article are solely those of the authors and do not reflect the views of Bitcoin Insider. Every investment and trading move involves risk - this is especially true for cryptocurrencies given their volatility. We strongly advise our readers to conduct their own research when making a decision.


