Latest news about Bitcoin and all cryptocurrencies. Your daily crypto news habit.

Sequelize is possibly one of the best NodeJS ORM library that is available for developers to use. However, just like any tool or framework, there are some issues which we run into when we first get started with Sequelize. Their documentation is pretty exhaustive with a list of all the features that they provide, in this article we will see a very coherent way of setting up a project with Sequelize and how we can apply changes to our models based on our evolving application(s).
Project Setup
In most of the applications, you would be creating (or use a pre existing) API application which is built using a NodeJS based framework such as ExpressJS or NextJS.
In our example, we are going to focus solely on Sequelize and not have any dependency on the NodeJS framework(s). To do this, let us first create a blank NodeJS project. To do so, create a your project folder sequelize-setup and then run the following command at the root of the folder. Answer the questions that are prompted regarding your projects description.
npm init
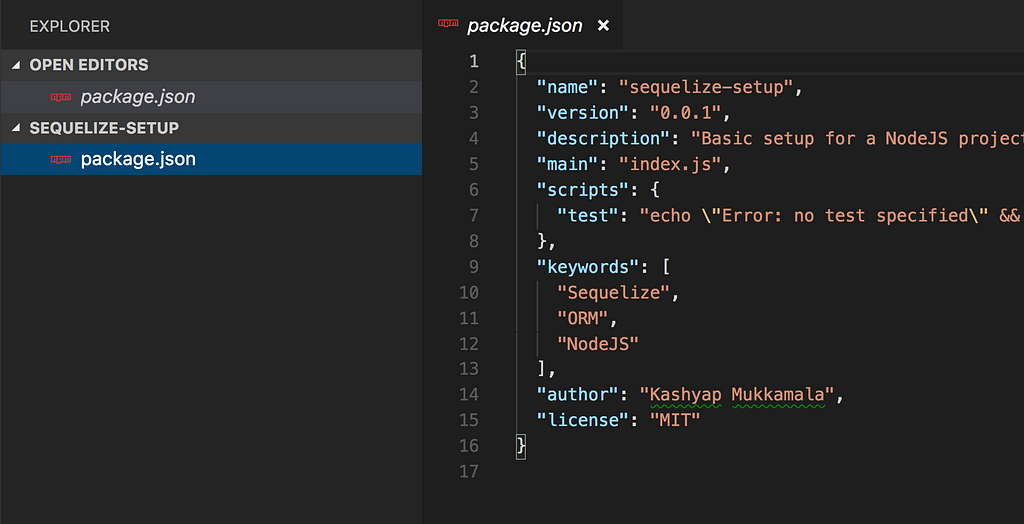
Once you have answered all the questions, you will see the basic package.json file generated at the root
Now, to be able to use Sequelize in our project, we will need to install Sequelize and the corresponding database client for the database of our choosing. We need the database client because Sequelize is simply a library which implements the ORM technique to manipulate and query the data in an Object Oriented fashion and does not contain additional layers to interact with the database underneath.
npm i -S sequelize pg
In this example we will be using Postgres for which the installation instructions are available here, however, the easiest way to install a service is using Homebrew. So install Homebrew and then run the following commands to set up your Postgres.
The role that we just setup in the Postgres DB is the username and password that can be used to connect to any databased in the future with Superuser privileges.
We will also be using Postico to provide the GUI for the database so download it here.
Initialize Sequelize
To be able to set up a Sequelize based project and run it successfully, we will need the following:
- Config — configuration necessary to run Sequelize
- Migrations — files containing any and all changes that we make to our tables
- Models — structure of our tables and their properties
- Seeders — to initialize our tables with default data
To have the necessary files in place, we can either create these folders manually or a better alternative is to simply use the Sequelize CLI to do so.
To install the cli, run the following command:
npm install --save sequelize-cli
We can now utilize the cli which can be found at node_modules/.bin/sequelize. For simplicity, I am going to omit the node_modules/.bin/ prefix and use only the sequelize keyword moving forward with all the commands.
To initialize the project with the CLI, run the following command on Terminal at root of your project:
sequelize init
and it logs the following:
Sequelize CLI [Node: 8.10.0, CLI: 4.0.0, ORM: 4.38.0]
Created “config/config.json”
Successfully created models folder at “/sequelize-setup/models”.
Successfully created migrations folder at “/sequelize-setup/migrations”.
Successfully created seeders folder at “/sequelize-setup/seeders”.
which is essentially our config + empty folder to contain the models, migrations and seeders.
Config
The config folder as expected, contains a file called config.json which has the default object that is generated, since we are only worried about the development flow, remove test and production entries from the config.json object which leaves us with the following:
As you can see from above, we specified the dialect to be postgres and the username and password are the same which were configured in the project setup. Since we are running the database locally, the host IP is localhost (127.0.0.1).
This config can now be used to perform any and all subsequent interactions with postgres.
Creating Database
One of the use cases of having the config is to create the database necessary. Now that we have postgres service up and running, we need to create the database first which can subsequently hold our tables. This database is represented against the database keyword in our config. To create the database using Sequelize, we can simply run the following command:
sequelize db:create
and this logs the following:
Sequelize CLI [Node: 8.10.0, CLI: 4.0.0, ORM: 4.38.0]
Loaded configuration file “config/config.json”.
Using environment “development”.
Database database_development created.
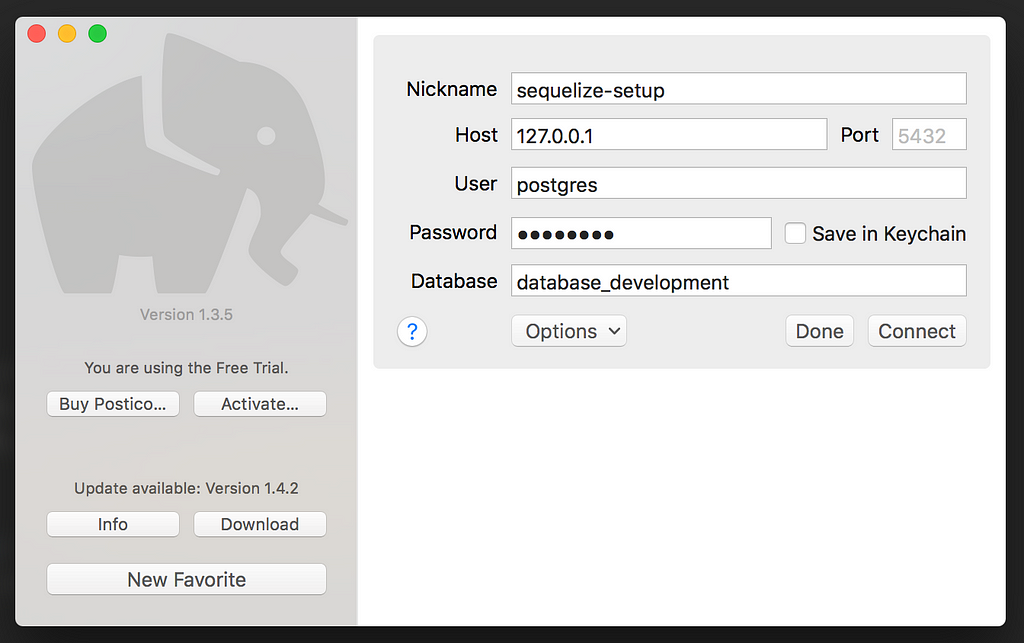
Now to verify the creation, we are going to use Postico which we downloaded earlier. Open Postico and click on New Favorite which opens the panel to configure the database connection, enter the database name which we just created along with the username and password needed to connect to this database.
Click on connect button and you will land on the tables view of this Database which at the moment should be empty.
Models
We are now ready to create our first model i.e. an entity which we will be mapping against a table. Creating models is again a very easy task if you use the Sequelize CLI. We will be creating a very simple and generic entity such as User with the properties firstName and lastName. To generate the User simply run the following command:
sequelize model:generate --name User --attributes firstName:string,lastName:string
And you see the following result:
Sequelize CLI [Node: 8.10.0, CLI: 4.0.0, ORM: 4.38.0]
New model was created at /sequelize-setup/models/user.js .
New migration was created at /sequelize-setup/migrations/20180719190326-User.js .
Now that our first model and migration is created, let us take a quick look at what the generated files contain.
The user model that is generated under the models folder contains the definition of our User with the properties we defined and it contains a placeholder called associate within which we can define any future associations.
And the migration that is created under the migrations folder:
You can see that this file contains a few extra fields than what we anticipated, this is because the first time a model is created, its corresponding migration is to create the model as a table. So when we created the model for User, Sequelize is automatically recommending that we create the table Users with the requested properties (firstName and lastName) and the additional properties such as id, createdAt and updatedAt.
Interesting thing to note is that the migration is made up of two parts: up and down. On closer observation we learn that up returns the promise that we want to execute when the migration is being applied and down contains the migration we want to perform when it is being undone. So pretty much we specify the opposites in the up and the down functions.
There is also a reason why the migration file name contains a timestamp at the beginning. With Sequelize CLI we can generate many migration files and can apply or undo them as we see fit. More on this later.
Applying Migration
We have the User model and initial migration for it available. To run this migration and create the table, simply run the following command:
sequelize db:migrate
which logs the following:
Sequelize CLI [Node: 8.10.0, CLI: 4.0.0, ORM: 4.38.0]
Loaded configuration file “config/config.json”.
Using environment “development”.
== 20180719190326-create-user: migrating =======
== 20180719190326-create-user: migrated (0.054s)
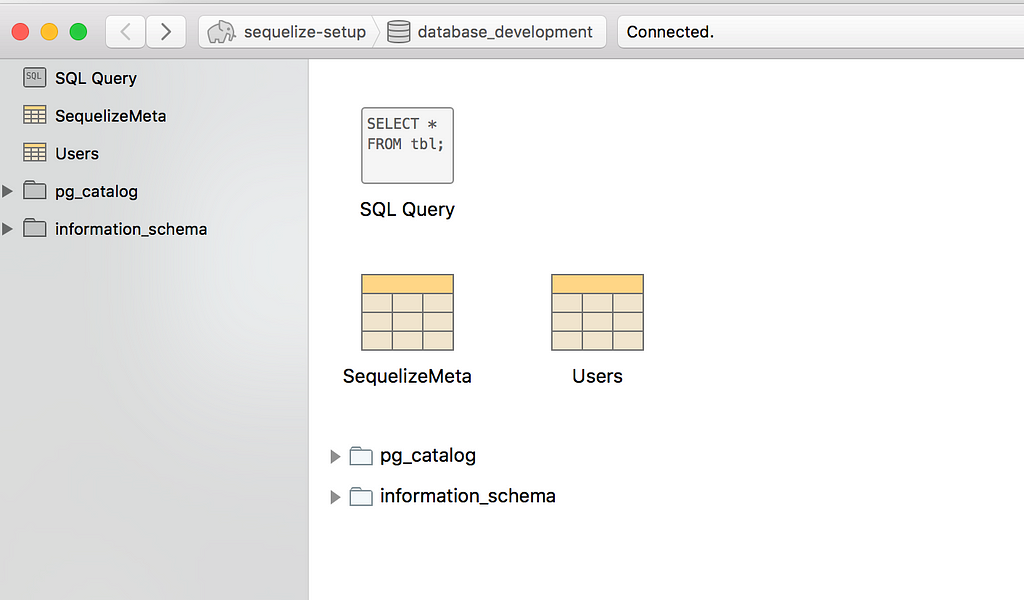
switch to Postico to verify the changes:
We can see that it contains 2 things as of now, the Users table as expected and the SequelizeMeta table which contains a list of all the migration that have been applied to this database.
Seeders
Our DB is setup, our User model and table has been setup, the next logical step is to add some data to this table, so let us do that. We will again be using Sequelize CLI to generate the seeders necessary:
sequelize seed:generate --name create-users
We are simply running a command to generate a seeder which logs the following:
Sequelize CLI [Node: 8.10.0, CLI: 4.0.0, ORM: 4.38.0]
seeders folder at “.../sequelize-setup/seeders” already exists.
New seed was created at .../sequelize-setup/seeders/20180719192307-create-users.js .
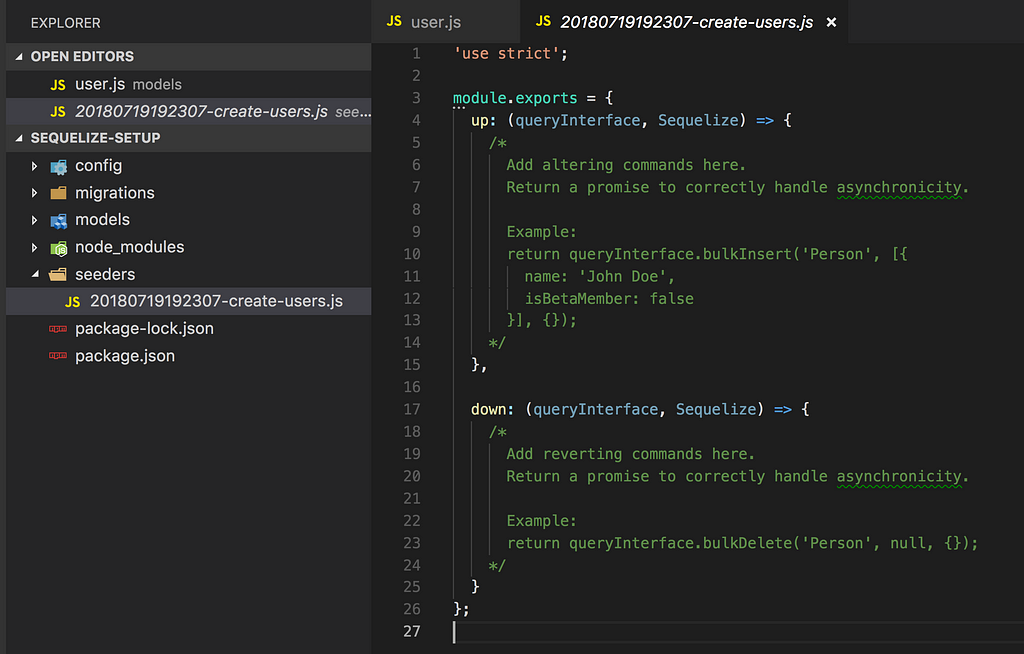
The file in its pristine format does not contain much except that it carries the same structure of a migration file i.e. with an up and a down function:
But unlike a initial migration, the seeder is not populated with the actual functionality that we want it to possess, instead it contains a vague example of what we might be able to do, which in this case is bulkInsert and bulkDelete.
Running Seeder
We can now create the logic necessary within our seeder file to add the data of our choice to the Users table
And to run the seeder, we can use the Sequelize CLI again. With the seeders we get more granular control and run a particular seeder file if we want or we can run them all if necessary. In our current scenario we are going to run all.
Small gotcha that we need to keep in mind is that the seeder is going to run against the structure specified in the migration and not in the model i.e. do not exclude any field that you want to show up in the database tables. If you have skipped a field which is set to a NOT NULL constraint is going to throw you an error.
Keeping the above in mind, our seeder for the Users table can be created as follows:
And we can run this with the following command:
sequelize db:seed:all
Which outputs the success message when complete:
Sequelize CLI [Node: 8.10.0, CLI: 4.0.0, ORM: 4.38.0]
Loaded configuration file “config/config.json”.
Using environment “development”.
== 20180719192307-create-users: migrating =======
== 20180719192307-create-users: migrated (0.009s)
We can validate the same using Postico in the Users table:
Changes and Modifications
A lot of the times, especially in the early stages of your application development, the structure of the entities are not nailed down and there are several scenarios in which we need to introduce changes. For instance, in this case we have only the firstName and lastName field in the Users table. Let us change that.
We will add a new columns called age and email. For that, first let us create a new migration file using the Sequelize CLI:
sequelize migration:generate --name user-updates
This logs the newly generated file path:
Sequelize CLI [Node: 8.10.0, CLI: 4.0.0, ORM: 4.38.0]
migrations folder at “.../sequelize-setup/migrations” already exists.
New migration was created at .../sequelize-setup/migrations/20180719202036-user-updates.js .
In this file, we will now add both the changes that we need to make during both the up and the down phase:
We are simply adding/removing the columns and returning it as a promise from our migrations (notice the chaining of promises). When we run this migration:
sequelize db:migrate
We see the expected result:
Sequelize CLI [Node: 8.10.0, CLI: 4.0.0, ORM: 4.38.0]
Loaded configuration file “config/config.json”.
Using environment “development”.
== 20180719204635-user-updates: migrating =======
== 20180719204635-user-updates: migrated (0.018s)
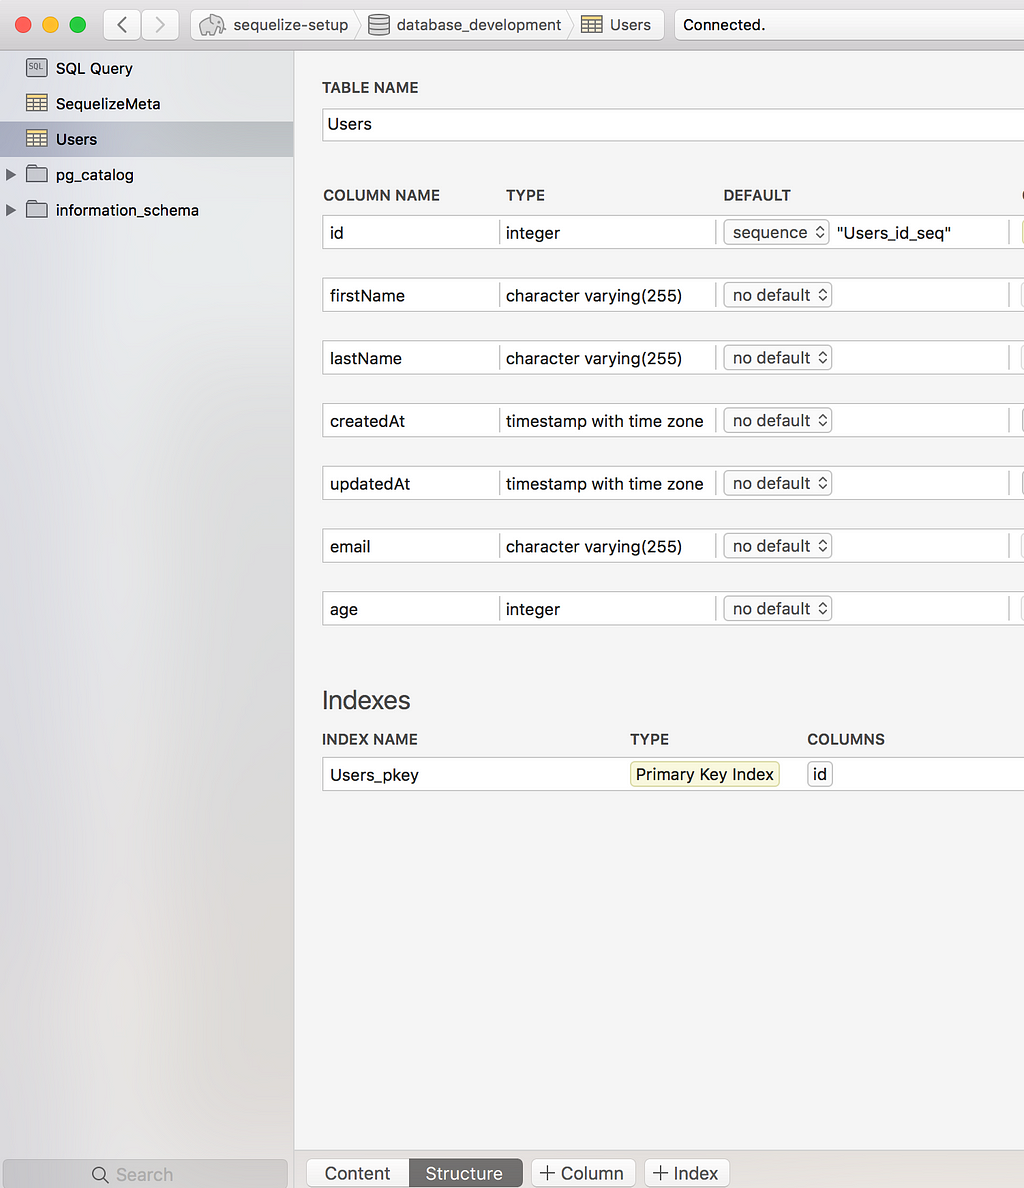
and we can verify it in Postico as well:
Although we have specified some rules (validations), they don’t really show up in the database (obviously) because sequelize applies those rules while we are trying to access the model to read or update. We will explore that in a separate article.
Updating Model
Although we have created the migration and run it, if we update the seed and run it, we will see the data as expected. Let us create a new seeder file using the CLI:
sequelize seed:generate --name add-email-age
Which logs the output as follows, note the filename here:
Sequelize CLI [Node: 8.10.0, CLI: 4.0.0, ORM: 4.38.0]
seeders folder at “.../sequelize-setup/seeders” already exists.
New seed was created at .../sequelize-setup/seeders/20180719210102-add-email-age.js .
Let us add the new fields to this seeder, which would look very similar to the existing seed file with minor updates:
Now to run this, we will only pick this file and run it as we already have added the data from the previous seeder file:
sequelize db:seed --seed 20180719210102-add-email-age
This allows us to run only the one file and the output can be seen on Postico:
Now that we have the data as expected, let us now add a small script to try to query the data. At the root of the project, create a file called index.js and add the following logic to query the users based on their age:
We can get the Users now and when we log this, we see that the logged user is missing the email and the age field.
Kashyap-MBP:sequelize-setup kashyap$ node index.js
Executing (default): SELECT “id”, “firstName”, “lastName”, “createdAt”, “updatedAt” FROM “Users” AS “User” WHERE “User”.”age” >= 20;
{ id: 2,firstName: ‘Jane’,
lastName: ‘Doe’,
createdAt: 2018–07–19T21:08:51.998Z,
updatedAt: 2018–07–19T21:08:51.998Z }
This is because we have not updated the model to be in sync with our migration file which was used to update the columns of the Users table. Let us first update the model with the same fields:
When we re-run the index.js file which we ran earlier to query the Users table:
Kashyap-MBP:sequelize-setup kashyap$ node index.js
Executing (default): SELECT “id”, “firstName”, “lastName”, “email”, “age”, “createdAt”, “updatedAt” FROM “Users” AS “User” WHERE “User”.”age” >= 20;
{ id: 2,firstName: ‘Jane’,
lastName: ‘Doe’,
email: ‘jane.doe@email.com’,
age: 20,
createdAt: 2018–07–19T21:08:51.998Z,
updatedAt: 2018–07–19T21:08:51.998Z }
Now we can see that it prints the entire structure of the user object as expected.
Conclusion
Sequelize has some very powerful features which when leveraged correctly can make the development process a lot easier. In this article we have explored some fairly straightforward options of getting our development process ironed out. There are more complex migrations which can be applied to Sequelize which I will talk about another article.
Full code base can be found here.
Please leave questions and comments in comments section below.
Overcoming Sequelize hiccups was originally published in Hacker Noon on Medium, where people are continuing the conversation by highlighting and responding to this story.
Disclaimer
The views and opinions expressed in this article are solely those of the authors and do not reflect the views of Bitcoin Insider. Every investment and trading move involves risk - this is especially true for cryptocurrencies given their volatility. We strongly advise our readers to conduct their own research when making a decision.
