Latest news about Bitcoin and all cryptocurrencies. Your daily crypto news habit.
Traffic routing between functions using Fn Project and Istio

In this article, I’ll explain how I implemented version based traffic routing between Fn Functions using Istio service mesh.
I’ll start by explaining the basics of Istio routing and the way Fn gets deployed and runs on Kubernetes. In the end, I’ll explain how I was able to leverage Istio service mesh and its routing rules to route traffic between two different Fn functions.
Be aware that the explanations that follow are very basic and simple — my intent was not to explain the in-depth working of Istio or Fn, instead I wanted to explain enough, so you could understand how to make routing work yourself.
Istio routing 101
Let’s spend a little time to explain how Istio routing works. Istio uses a sidecar container (istio-proxy) that you inject into your deployments. The injected proxy then hijacks all network traffic going in or out of that pod. The collection of all these proxies in your deployments communicate with other parts of the Istio system to determine how and where to route the traffic (and bunch of other cool things like traffic mirroring, fault injection and circuit breaking) .
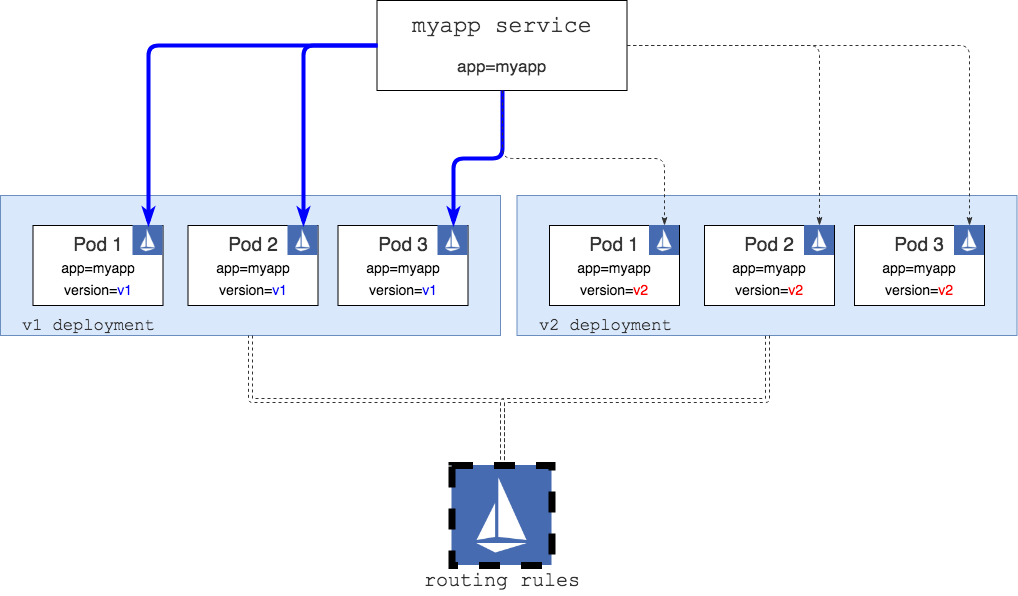
To explain how this works, we are going to start with a single Kubernetes service (myapp) and two deployments of the app that are version specific (v1 and v2).
 Service routing to all app versions
In the figure above, we have themyapp Kubernetes service that has a selector set to app=myapp — this means that it will look for all pods that have the app=myapp label set and it’s going to route the traffic to them. Basically, if you do a curl myapp-service you will get a response back either from a pod running the v1 version of the app or from a pod running the v2 version.
We also have two Kubernetes deployments there — these deployments have the myapp v1 and v2 code running. In addition to the app=myapp label, each pod also has the version label set to either v1 or v2.
Everything in the diagram above is what you get with Kubernetes out of the box.
Enter Istio. To be able to do more intelligent and weight-based routing, we need to install Istio and then inject the proxy into each of our pods as shown in another awesome diagram below. Each pod in the diagram below has a container with an Istio proxy (represented by the blue icon) and the container where your app runs. In the diagram above, we only had one container running inside each pod — the app container.
 Pods with Istio proxy sidecarsNote that there’s is much more to Istio than shown in the diagram. I am not showing other Istio pods and services that are also deployed on the Kubernetes cluster — the injected Istio proxies communicate with those pods and service in order to know how to route traffic correctly. For an in-depth explanation of different parts of Istio, see the docs here.
If we could curl the myapp service at this point, we would still get the exact same results as we did with the setup in the first diagram — random responses from v1 and v2 pods. The only difference would be in the way the network traffic is flowing from the service and to the pods. In the second case any call to the service ends up in the Istio proxy and then proxy decides (based on any defined routing rules) where to route the traffic to.
Just like pretty much everything else today, Istio routing rules are defined using YAML and they look something like this:
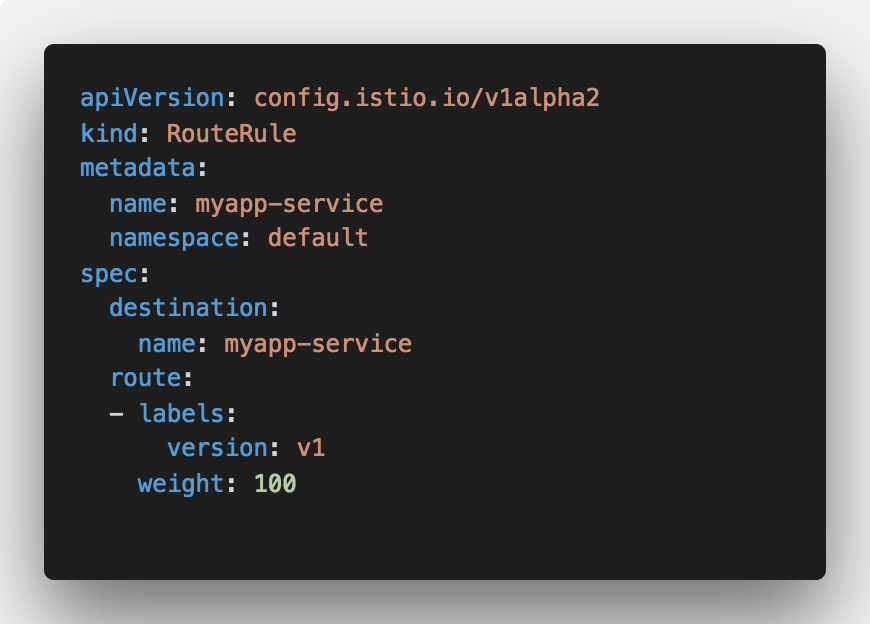 Route all traffic coming to myapp-service to pods, labeled “v1”
The above routing rule takes requests coming to myapp-service and re-routes them to pods labeled version=v1 . This is how the diagram with the above routing rule in place would look like:
The big Istio icon at the bottom represents the Istio deployment/services where, amongst other things, the routing rules are being read from. These rules are then used to reconfigure Istio proxy sidecars running inside each pod.
With this rule in place, if we curl the service we only get back the responses from the pods labeled version=v1(depicted by blue connectors in the diagram).
Now that we have an idea on how routing works, we can look into Fn, get it deployed an see how it works and if we could use Istio somehow to set up the routing.
Fn Functions on Kubernetes
We are going to start with a basic diagram of how some pieces of Fn look like on Kubernetes. You can use the Helm chart to deploy Fn on top of your Kubernetes cluster.
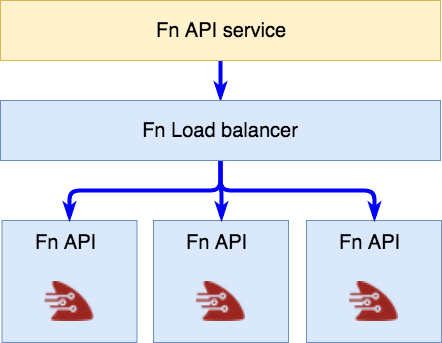 A simple representation of Fn on Kubernetes
The Fn API service at the top of the diagram is the entry point to the Fn and it’s used for managing your functions (creating, deploying, running, etc.) — this is the URL that’s referred to as FN_API_URL in the Fn project.
This service, in turn, routes the calls to the Fn load balancer (that is, any pods marked with role=fn-lb). The load balancer then does it’s magic and routes the calls to an instance of the fn-service pod. These are deployed as part of a Kubernetes daemon set and you will usually have one instance of the pod per Kubernetes node.
With these simple basics out of the way, let’s create and deploy some functions and think about how to do traffic routing.
Create and deploy functions
If you want to follow along, make sure you have Fn deployed to your Kubernetes cluster (I am using Docker for Mac) and Fn CLI installed and run the following to create the app and a couple of functions:
# Create the app foldermkdir hello-app && cd hello-appecho "name: hello-app" > app.yaml
# Create a V1 functionmkdir v1cd v1fn init --name v1 --runtime gocd ..
# Create a V2 functionmkdir v2cd v2fn init --name v2 --runtime gocd ..
Using the above commands, you’ve created a root folder for the app, called hello-app. In this folder we create two folders with a single function each — v1 and a v2. Boilerplate Go functions are created using the fn init with Go specified as a runtime — this is how the folder structure looks like:
.├── app.yaml├── v1│ ├── Gopkg.toml│ ├── func.go│ ├── func.yaml│ └── test.json└── v2 ├── Gopkg.toml ├── func.go ├── func.yaml └── test.json
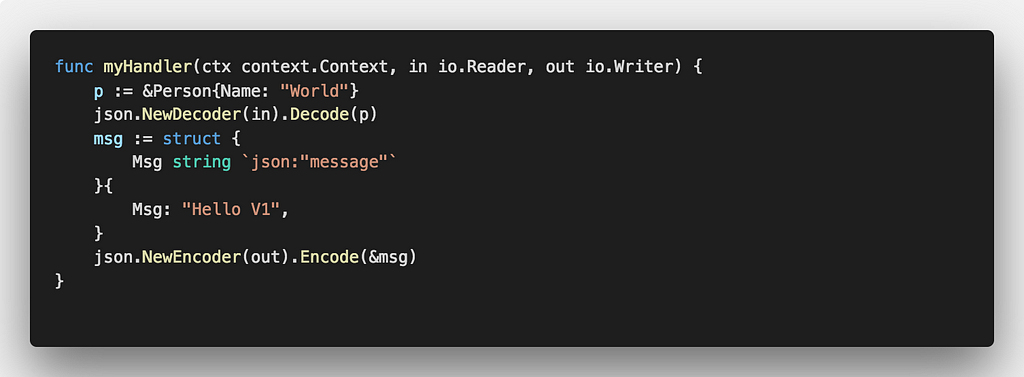
Open the func.go in both folders and update the message that gets returned to include the version number — the only reason we are doing this is so we can quickly distinguish which function is being called. Here’s how v1 func.go should look like (Hello V1):
Once you made these changes, you can deploy the functions to the Fn service running on Kubernetes. To do so, you have to set the FN_REGISTRY environment variable to point to your Docker registry username.
Because we are running Fn on Kubernetes cluster, we can’t use locally built images — they need to be pushed to a Docker registry that’s accessible by the Kubernetes cluster.
Now we can use the Fn CLI to deploy the functions:
FN_API_URL=http://localhost:80 fn deploy --all
Above command assumes the Fn API service is exposed on localhost:80 (this is by default if you’re using Kubernetes support in Docker for Mac). If using a different cluster, you can replace the FN_API_URL with the external IP address of the fn-api service.
After Docker build and push is completed, our functions are deployed to the Fn service and we can try to invoke them.
Any function deployed to the Fn service has a unique URL that includes the app name and the route name. With our app name and routes, we can access the deployed functions at http://$(FN_API_URL)/r/hello-app/v1 . So, if we want to call the v1 route, we could do:
$ curl http://localhost/r/hello-app/v1{"message":"Hello V1"}
Similarly, calling the v2 route returns the Hello V2 message.
But where does the function run?
If you look at the pods that are being created/deleted while you’re calling the functions, you’ll notice that nothing really changes — i.e. no pods get created nor deleted. The reason is that Fn doesn’t create functions as Kubernetes pods as that would be too slow. Instead, all Fn function deployment and invocation magic happens inside the fn-service pods. The Fn load balancer is then responsible for placing and routing to those pods to deploy/execute the functions in the most optimized way.
So, we don’t get Kubernetes pods/services for functions, but Istio requires us to have services and pods we can route to… what do we do and how can we use Istio in this case?
The idea
Let’s take the functions out of the picture for a second and think about what we need for Istio routing to work:
- Kubernetes service — an entry point to our hello-app
- Kubernetes deployment for v1 hello-app
- Kubernetes deployment for v2 hello-app
As explained at the beginning of the article in Istio Routing 101, we’d also have to add a label that represents the version and the app=hello-app label to both of our deployments. Selector on the service would have the app=hello-app label only — the version specific labels would then be added by the Istio routing rules.
For this to work, each version specific deployment would need to end up calling the Fn load balancer at the correct route (e.g. /r/hello-app/v1). Since everything runs in Kubernetes and we know the name of the Fn load balancer service we could make this happen.
So we need a container inside our deployments that, when called, forwards calls to the Fn load balancer at a specific path.
Here’s the above idea represented in a diagram:
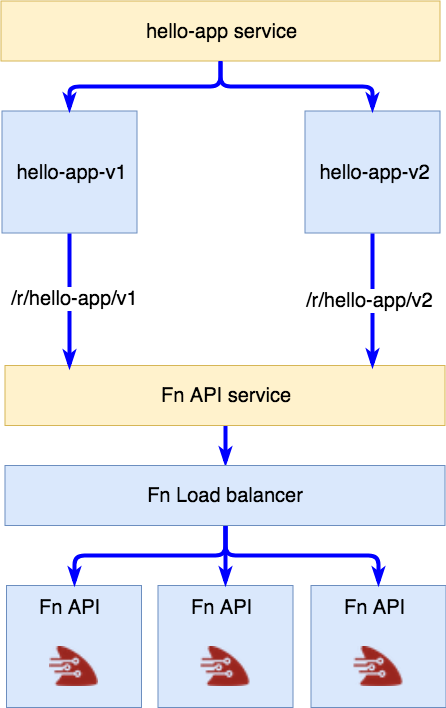 Version specific deployments calling the Fn API service at exact path
We have a service that represents our app and two deployments that are version specific and route directly to the functions running in the Fn service.
Simple proxy
To implement this we need some sort of a proxy that will take any incoming calls and forward them to the Fn service. Here’s a simple Nginx configuration that does exactly that:
events { worker_connections 4096;}http { upstream fn-server { server my-fn-api.default; }server { listen 80;location / { proxy_pass http://fn-server/r/hello-app/v1; proxy_set_header X-Real-IP $remote_addr; proxy_set_header X-Forwarded-For $remote_addr; proxy_set_header Host $host; } }}To explain the configuration: we are saying whenever something comes in to /, pass that call to http://fn-server/r/hello-app/v1, where fn-server (defined as an upstream), is resolved to my-fn-api.default — this is the Kubernetes service name for fn-api that runs in the default namespace.
The parts in bold are the only things we need to change in order to do the same for v2.
I’ve created a Docker image with a script that generates the Nginx configuration based on the upstream and route values you pass in.The image is available on Docker hub and you can look at the source here.
Deploying to Kubernetes
Now we can create the Kubernetes YAML files for the service, deployments and the ingress we will use to access the functions.
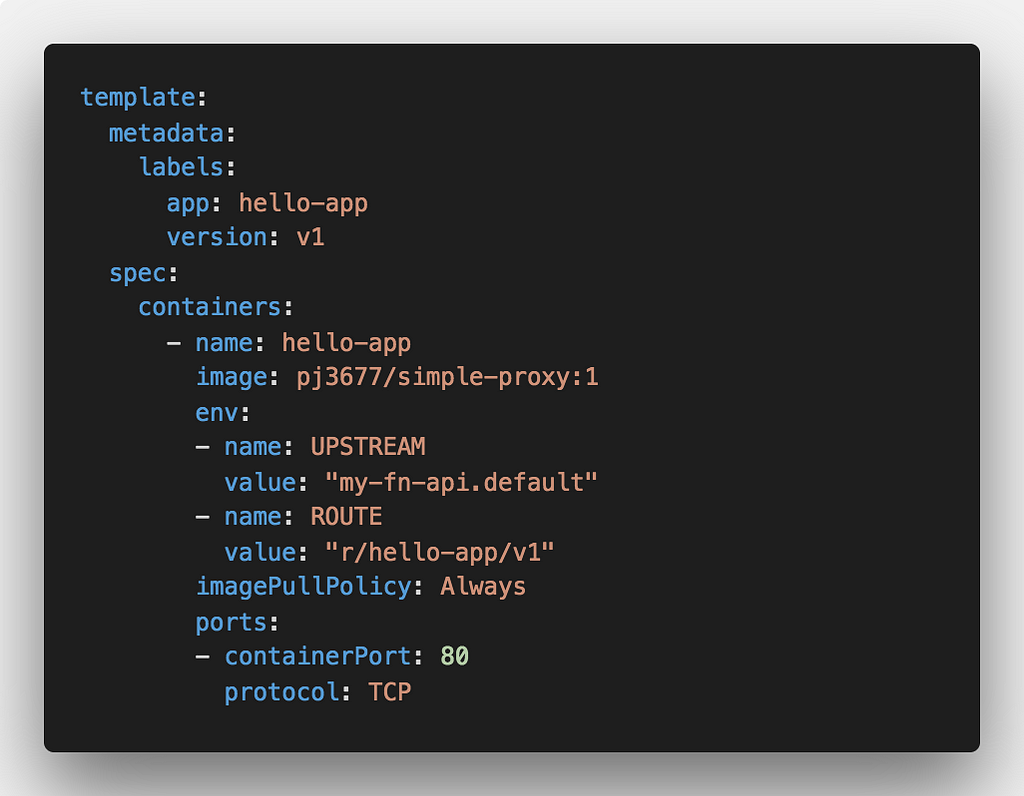
Here’s an excerpt from the deployment file to show how we set up the environment variable for UPSTREAM and ROUTE and the labels.
The UPSTREAM and ROUTE environment variables are read by the simple-proxy container and an Nginx configuration gets generated based on those values.
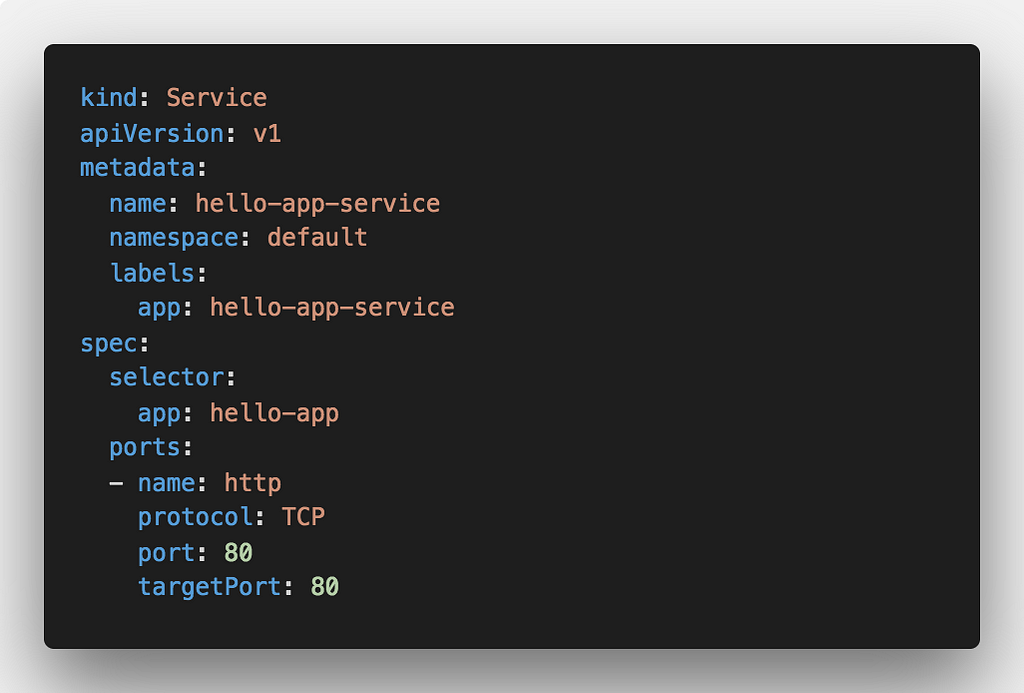
The service YAML file is nothing special either — we just set the selector to app: hello-app :
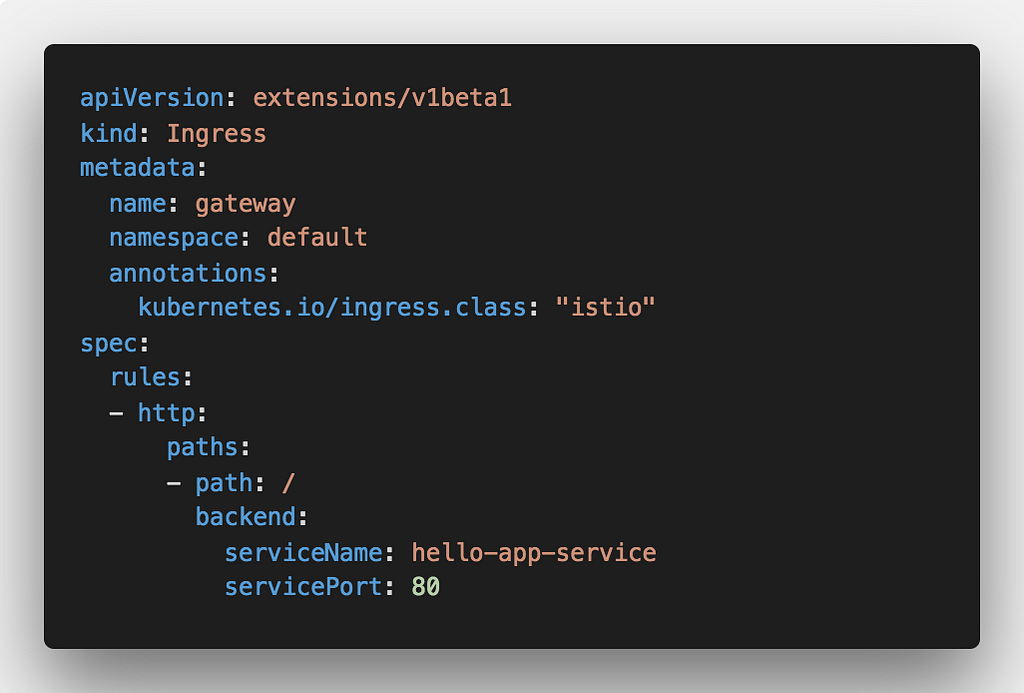
Final part is the Istio ingress where we set the rule to route all incoming traffic to the backend service:
To deploy these, you can use kubectl for ingress and the service and istioctl kube-inject for the deployments in order to inject the Istio proxy.
With everything deployed, you should end up with the following Kubernetes resources:
- hello-app-deployment-v1 (deployment with simple-proxy image that points to v1 route)
- hello-app-deployment-v2 (deployment with simple-proxy image that points to v2 route)
- hello-app-service (service that targets v1 and v2 pods in hello-app deployments)
- ingress that points to the hello-app-service and is annotated with “istio” ingress class annotation
Now if we call the hello-app-service or if we call the ingress we should be getting random responses back from v1 and v2 functions. Here’s a sample output of calls made to the ingress:
$ while true; do sleep 1; curl http://localhost:8082;done{“message”:”Hello V1"}{“message”:”Hello V1"}{“message”:”Hello V1"}{“message”:”Hello V1"}{“message”:”Hello V2"}{“message”:”Hello V1"}{“message”:”Hello V2"}{“message”:”Hello V1"}{“message”:”Hello V2"}{“message”:”Hello V1"}{“message”:”Hello V1"}{“message”:”Hello V1"}{“message”:”Hello V2"}
You’ll notice that we randomly get back responses from V1 and from V2 — this is the exactly what we want at this point!
Istio rules!
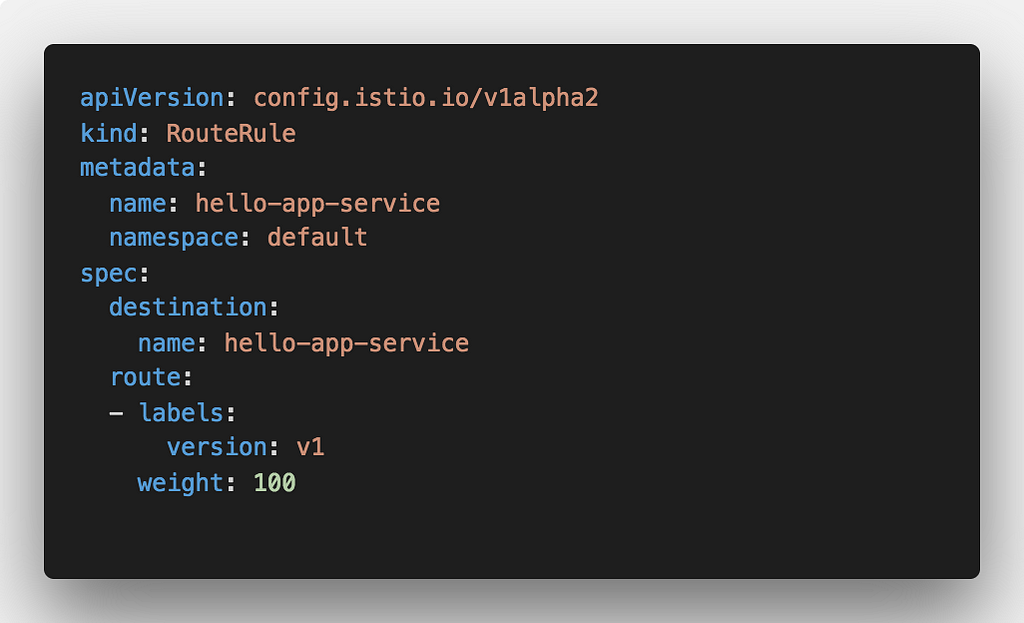
With our service and deployments up and running (and working) we can create Istio route rules for Fn functions. Let’s start with a simple v1 rule that will route all calls (weight: 100) to the hello-app-service to pods that are labeled v1:
You can apply this rule by running kubectl apply -f v1-rule.yaml The best way to see the routing in action is to run a loop that continuously calls the endpoint — that way you can see the responses go from mixed (v1/v2) and all v1.
Just like we did v1 rule with 100 weight, we can similarly define a rule that routes everything to v2 or a rule that routes 50% of traffic to v1 and a 50% of traffic v2 as shown in the demo below.
Once I’ve proved that this works with simple curl commands, I stopped :)
Luckily, Chad Arimura took it a bit further in his article about the importance of DevOps to Serverless (spoiler alert: DevOps is not going away). He used Spinnaker to do a weighted blue-green deployment of Fn functions that were running on an actual Kubernetes cluster. Check out the video of his demo below:
Conclusion
Everyone could agree that service mesh is and will be important in the functions world. There’s a lot of neat benefits one can get if using a service mesh — such as routing, traffic mirroring, fault injects and a bunch of other stuff.
The biggest challenge I see is the lack of developer-centric tools that would allow developers to leverage all these nice and cool features. Setting up this project and demo to run it a couple of times wasn’t too complicated.
But this was 2 functions that pretty much return a string and do nothing else. It was a simple demo. Just think about running hundreds or thousands of functions and setting up different routing rules between them. Then think about managing all that. Or rolling out new versions and monitoring for failures.
I think there are great opportunities (and challenges) ahead in making functions management, service mesh management, routing, [insert other cool features] work in a way so it’s intuitive for everyone involved.
Thanks for Reading!
Any feedback on this article is more than welcome! You can also follow me on Twitter and GitHub. If you liked this and want to get notified when I write more stuff, you should subscribe to my newsletter!
Traffic routing between Fn functions using Fn Project and Istio was originally published in Hacker Noon on Medium, where people are continuing the conversation by highlighting and responding to this story.
Disclaimer
The views and opinions expressed in this article are solely those of the authors and do not reflect the views of Bitcoin Insider. Every investment and trading move involves risk - this is especially true for cryptocurrencies given their volatility. We strongly advise our readers to conduct their own research when making a decision.
