Latest news about Bitcoin and all cryptocurrencies. Your daily crypto news habit.
 Photo by Jefferson Santos on Unsplash
Deep Learning on Ubuntu 18.04 isn’t officially supported since the CUDA Libraries aren’t officially supported by the OS yet.
However, if you still want to try out DL on Ubuntu, Here are the setups:
Note: I assume, you have all hardware ready and in place.Ubuntu has been installed.
Update and Upgrade
$ sudo apt-get update$ sudo apt-get upgrade
Install Nvidia Drivers
- The Latest Drivers should work fine.
- Add the Nvidia PPA
$ sudo add-apt-repository ppa:graphics-drivers/ppa
- On 18.04, you do not need to update the repositories. After you add a PPA, this is done automatically.
- Next, Install the Latest Drivers (396 ATM)
$ sudo apt install nvidia-driver-396
- The nvidia-settings should be installed by default, incase you still need to manually install it
$ sudo apt install nvidia-settings
- Reboot and Check if Drivers are installed correctly by running:
nvidia-smi
- If you get an output with details of your GPU, everything is setup.
Pitfall:
- Incase your Ubuntu gets stuck in a “boot loop”:- Press Ctrl+Alt+F3 (Note: on 16, its ctrl+alt+f1 to get tty1)- Purge the drivers
sudo apt-get purge nvidia-*
- Reboot
Install Conda
- To install the Latest version of Conda, we’ll use a handy Script by Kaggle Master Mikel
curl https://conda.ml | bash
Install CUDA
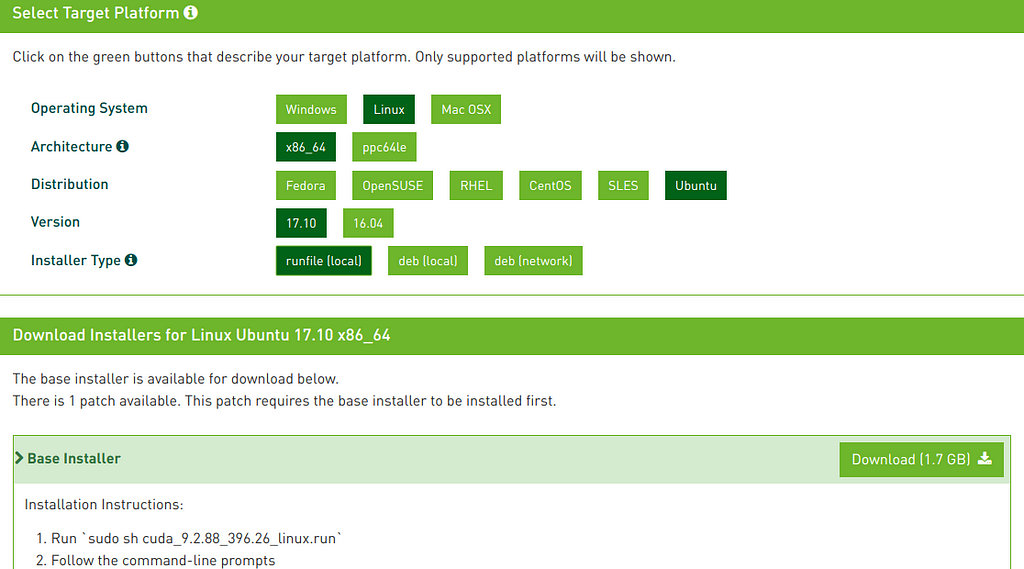
- The Trick to this is downloading CUDA version for Ubuntu 17.04
- Download CUDA from here.
- I’m Setting up CUDA 9.0 (Since it’s recommended by FAST AI. Note: The current latest version is 9.2)
- Download the runfile(local)
- Open Terminal and Change directory to Downloads.
- Change Executable Permissions for the Installer.
- Run it.
$ cd Downloads$ chmod +x ./cuda_9.0.176_384.81_linux.run$ sudo ./cuda_9.0.176_384.81_linux.run
- Press Space to Scroll Down and accept the terms and conditions
- Typeyes to the Prompt “Install with an unsupported configuration”
- Type no when prompted “Install NVIDIA Accelerated Graphics Driver for Linux-x86_64 384.81?”.
- Keep the defaults.
- Reboot
- After Reboot, check CUDA Version
nvcc -V
This should prompt the Installed CUDA Version
- Incase of a Boot Loop problem, purge the drivers and try again.
Set Paths
export PATH="/home/User/anaconda3/bin:/usr/local/cuda/bin:$PATH"export LD_LIBRARY_PATH="/usr/local/cuda/lib64:$LD_LIBRARY_PATH"source ~/.bashrc
Install Cudnn
- Download the Cudnn version supported by your installed CUDA Version from Here (you will need an Nvidia Account for this)
- Once downloaded,we are going to unpack the archive and move it the contents into the directory where we installed CUDA 9.0:
tar -zxvf cudnn-9.0-linux-x64-v7.tgzsudo cp -P cuda/lib64/* /usr/local/cuda-9.0/lib64/sudo cp cuda/include/* /usr/local/cuda-9.0/include/esudo chmod a+r /usr/local/cuda-9.0/include/cudnn.h
Setup FastAI
- To setup Fast AI Environment.
- Git Clone their repo
- Conda Env Update
- Source activate
$ git clone https://github.com/fastai/fastai$ cd fastai$ conda env update
Setup (Other/Any) Environment
- Pip install or conda install using the requirements.txt or req.yml files.
pip install -r <Link>
Quick Test
- Checking if CUDA devices are accessible inside a Library.
- PyTorch has a function to Check CUDA device(s)
torch.cuda.is_available()
This should return a True.
That’s it. You’re done!
If you found this article to be useful and would like to stay in touch, you can find me on Twitter here.
Ubuntu 18.04 Deep Learning Environment Setup was originally published in Hacker Noon on Medium, where people are continuing the conversation by highlighting and responding to this story.
Disclaimer
The views and opinions expressed in this article are solely those of the authors and do not reflect the views of Bitcoin Insider. Every investment and trading move involves risk - this is especially true for cryptocurrencies given their volatility. We strongly advise our readers to conduct their own research when making a decision.
