Latest news about Bitcoin and all cryptocurrencies. Your daily crypto news habit.
If you are a user of applications like Periscope, Instagram and Facebook, then you may have noticed they have a feature in their live streams where anytime someone likes the live content, the ‘likes’ float on your screen. This article will show you how you can implement the realtime floating hearts feature on your iOS application using Swift and Pusher.
Here is a screen recording of what we will be achieving in this tutorial using Swift and Pusher.
From the recording, you can see that when the like button is tapped, the likes float to the top and they are also replicated on another device viewing the video being played.
Now, let’s begin the journey.
Requirements
To follow along in this tutorial you will need the following things:
- Knowledge of Swift and Xcode storyboards.
- Xcode installed on your machine.
- A Pusher application — you can create a free Pusher account here.
- Node.js and NPM installed on your machine.
- Cocoapods installed on your machine — install it using Ruby by running: gem install cocoapods.
Hopefully, you have all the requirements checked off. Let’s get started.
Creating the floating hearts application in Xcode
Launch Xcode and in there create a new project. We are going to call the app streamlove (yes, it’s lame we know). When you are done with the initial setup, close Xcode and launch terminal. cd to the root directory of your application and run pod init. This will create a Podfile in the root directory. Open it in your text editor and replace the code there with the following:
platform :ios, '9.0' target 'streamlove' do use_frameworks! pod 'PusherSwift', '~> 4.0' pod 'Alamofire', '~> 4.4' end
After that save and close the file and run the command pod install. This should start installing all the dependencies required for the application we are creating. Now open the streamlove.xcworkspace file in Xcode.
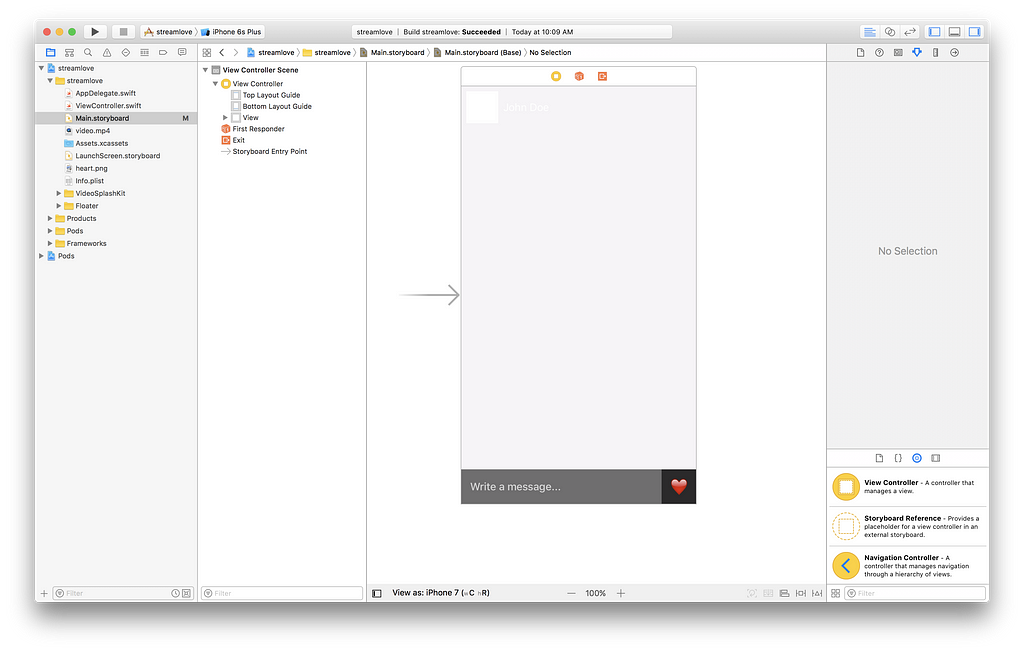
The next thing we need to do is design our applications storyboard. Open the Main.storyboard file. We are going to add some mock views because we do not really want to implement anything on them and they are just there for the aesthetics. The main things we will focus on are the button and the background video. After designing our storyboard, this is what we hope to have:
In this storyboard, we have a button to the bottom right of the screen, and that button has an @IBAction in the ViewController so you will need to ctrl+drag to make the connection between the button and the ViewController.
This should add the @IBAction to the ViewController as shown below:
@IBAction func hearted(_ sender: Any) { // This function will be fired every time the button is tapped! }Creating a background looping video in iOS using Swift
Next, we will create the video background that will just simulate a live stream (since creating an actual live stream falls far out of the scope of this article). Open the ViewController file and paste the following in it:
import UIKit import PusherSwift import Alamofire
class ViewController: VideoSplashViewController { override func viewDidLoad() { super.viewDidLoad() loadVideoStreamSample() } private func loadVideoStreamSample() { let url = NSURL.fileURL(withPath: Bundle.main.path(forReDisclaimer
The views and opinions expressed in this article are solely those of the authors and do not reflect the views of Bitcoin Insider. Every investment and trading move involves risk - this is especially true for cryptocurrencies given their volatility. We strongly advise our readers to conduct their own research when making a decision.

