Latest news about Bitcoin and all cryptocurrencies. Your daily crypto news habit.

Sections:
- Intro / requirements
- Packet forwarding setup
- Building c-lightning and bitcoin-cli
- Installing Lightning Charge
- Installing nanopos for a point-of-sale solution
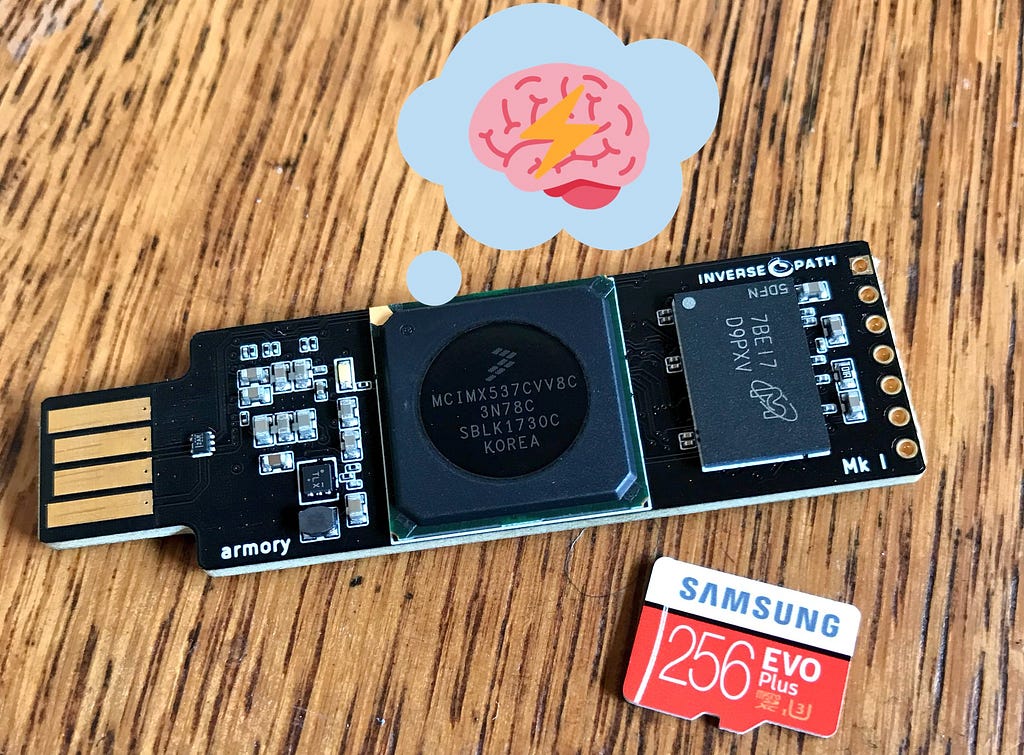
The Inverse Path USB Armory is a unique device among the now-popularized SoC-powered category of hardware, which includes the Raspberry Pi and the Rock64. Like the other systems, it is relatively underpowered in terms of computing ability. However, its uniqueness comes from its compact form factor and its components. The Armory requires no power adapter or wall socket; it only needs a USB port to plug into to function. The Armory powers itself via USB and also communicates to its host device in the same manner — via an emulated Ethernet connection. The Armory utilizes the NXP i.MX53 ARM® Cortex™-A8 processor running at 800 Mhz. It also includes 512 MB of DDR3 RAM and a microSD card slot for storage.
The USB armory board has been created by Inverse Path to support the development of a variety of security applications.The capability of emulating arbitrary USB devices in combination with the i.MX53 SoC speed, the security features and the flexible and fully customizable operating environment, makes the USB armory the ideal platform for all kinds of personal security applications.The transparency of the open and minimal design for the USB armory hardware facilitates auditability and greatly limits the potentiality and scope of supply chain attacks. From: https://inversepath.com/usbarmory
A good use case that takes advantage of the form factor, the power-over-USB, and the emulated Ethernet-over-USB is a portable Bitcoin Lightning wallet. With this configuration, users can setup a device that runs c-lightning and stores their private keys on a portable platform that is easily plugged into existing hardware such as Raspberry Pis that run bitcoind. Also, another scenario is if a user has a laptop they run a full node on. The Armory can simply be plugged in and the user can then transact over the Lightning Network and run Lightning-powered applications (LApps).
Another use case for this setup is for adding processing power to an underpowered device such an older laptop or Raspberry Pi. This way, the Armory acts as a sort of co-processor for Lightning!
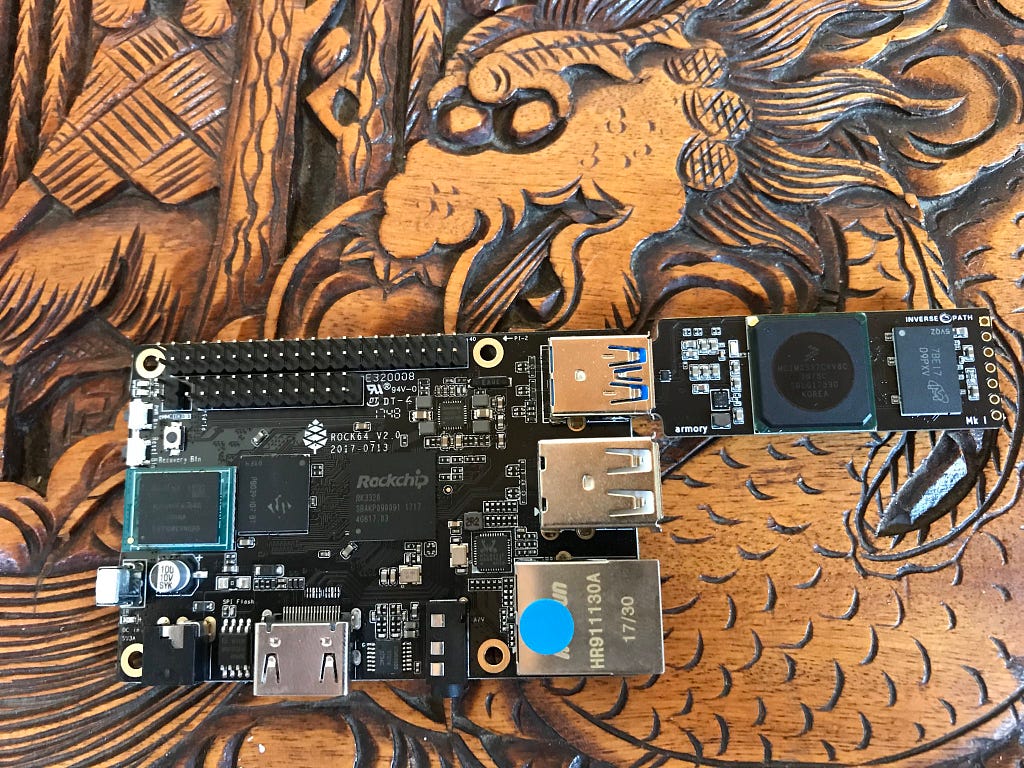
 An Armory connected to a Rock64
Requirements:
- An Inverse Path USB Armory
- microSD card of 4GB or greater capacity with the official Debian base image installed
- A USB host device (laptop, workstation, or RPi-like)
- bitcoind running on your LAN, or elsewhere with access credentials for RPC
Preparing the Armory for installation:
All that is needed for lightningd to communicate with a remote bitcoind is bitcoin-cli , which drastically reduces the time needed to build on the Armory. Cross-compiliation is possible, but that is out of the scope of this guide. In order to build only bitcoin-cli, the Bitcoin code needs to be pulled from its Github repository. But, before that can be done, packet forwarding must be enabled on the host device (the device the Armory is plugged into).
Networking:
The Armory (if using the official Debian base image), when plugged in and booted, creates a virtual interface that emulates an Ethernet connection. Once configured, the Armory and its USB host can communicate with each other as if they were on the same LAN (since they technically are). It is up to the USB host to allow the Armory’s packets to be forwarded or not, which if allowed enables the Armory to open Lightning Network channels with other nodes outside of the local network. Packet forwarding is also required to install build tools and dependencies.
Windows:
Instructions for enabling packet forwarding (also known as Connection Sharing) for Windows 7, 8, and 10 can be found here.
MacOS:
MacOS instructions can be found here.
Linux:
Note: On Ubuntu 16.04, the Network Manager did not interfere. Other distributions’ configurations might, however.
From the Linux instructions:
Enable masquerading for outgoing connections:
# iptables -t nat -A POSTROUTING -s 10.0.0.2/32 -o wlan0 -j MASQUERADEenable IP forwarding:
# echo 1 > /proc/sys/net/ipv4/ip_forward
Plug in the Armory, and notice the blinking white LED. This means the Armory is running. The “heartbeat” LED blinks more quickly as the Armory is being utilized.
Now, ssh into your Armory with the Debian base image’s default credentials (user and password are both usbarmory)
$ ssh usbarmory@10.0.0.1
Ping a public address to see if your Armory is routed correctly:
$ ping 8.8.8.8
If successful, you will receive replies:
PING 8.8.8.8 (8.8.8.8) 56(84) bytes of data.64 bytes from 8.8.8.8: icmp_seq=1 ttl=60 time=46.3 ms64 bytes from 8.8.8.8: icmp_seq=2 ttl=60 time=48.0 ms64 bytes from 8.8.8.8: icmp_seq=3 ttl=60 time=48.1 ms64 bytes from 8.8.8.8: icmp_seq=4 ttl=60 time=71.5 ms
Great!
Building c-lightning:
$ sudo apt update && sudo apt -y upgrade
Once that is finished, reboot the Armory for good measure in case there is a kernel update:
$ sudo reboot
Now, begin installing the build tools and dependencies needed to compile bitcoin-cli and c-lightning :
$ sudo apt-get install -y \ autoconf automake build-essential git libtool libgmp-dev \ libsqlite3-dev python python3 net-tools libsodium-dev \ pkg-config libssl-dev libevent-dev \ libboost-system-dev libboost-filesystem-dev \ libboost-chrono-dev libboost-program-options-dev \ libboost-test-dev libboost-thread-dev tmux curl
Clone the c-lightning repository:
$ git clone https://github.com/ElementsProject/lightning.git
Navigate to the local repository:
$ cd lightning
Then start the build:
$ make
Once that is finished, navigate to the usbarmory user’s home directory:
$ cd ~/
Download the Bitcoin Core 0.16.0 source code archive, SHA256SUMS.asc, and import the Core maintainer’s gpg key to verify the hashes. Finally, decompress the archive:
$ wget https://bitcoincore.org/bin/bitcoin-core-0.16.0/bitcoin-0.16.0.tar.gz
$ wget https://bitcoincore.org/bin/bitcoin-core-0.16.0/SHA256SUMS.asc
$ gpg --recv-key 90C8019E36C2E964
$ gpg --verify SHA256SUMS.asc
$ sha256sum -c --ignore-missing SHA256SUMS.asc# should output an "OK"
$ tar zxvf bitcoin-0.16.0.tar.gz
Excellent!
Now, on to building bitcoin-cli .
Building bitcoin-cli:
Navigate to the Bitcoin source code directory and start the build process:
$ cd bitcoin-0.16.0/
$ ./autogen.sh
While running autogen.sh , a flood of warning messages about locales may occur. This can be remedied by setting a locale:
$ sudo dpkg-reconfigure locales
# Select something like en_US.UTF-8 and hit Ok
Continuing the build process:
$ CFLAGS="-march=native" ./configure --disable-wallet
-march=native tells our compiler, gcc , to auto-detect the Armory’s processor and enable optimizations specific to that processor. It helps squeeze out any increases in performance the ARM processor has, which is important because this processor is relatively slow.
bitcoind is not being built, so libdb is not needed. Pass --disable-wallet to build without wallet support ( c-lightning will be the wallet in this configuration).
Now, build bitcoin-cli :
$ make src/bitcoin-cli
Finally, copy the freshly built bitcoin-cli binary to /usr/local/bin :
$ sudo cp src/bitcoin-cli /usr/local/bin
$ whereis bitcoin-cli
# Should return "/usr/local/bin/bitcoin-cli"
Connecting the Armory to bitcoind via RPC:
c-lightning uses bitcoin-cli to send raw transactions to bitcoind for various reasons such as opening, force-closing, or mutually-closing channels. Since c-lightning is running on the Armory, it requires bitcoin-cli as well. However, bitcoin-cli needs to be able to communicate to bitcoind , so create and add appropriate items to the Armory’s, and the USB host’s, bitcoin.conf :
On the USB host, or the device elsewhere that has bitcoind running, specify the following items in bitcoin.conf :
rpcuser= <username>rpcpassword= <yourpasswordnotthisone>rpcallowip= <the Armory's IP address>
Save those changes, then create the Armory’s bitcoin.conf , and add the following items:
$ nano ~/.bitcoin/bitcoin.conf
In bitcoin.conf :
rpcuser= <username from before>rpcpassword= <password from before>rpcconnect= <USB hosts's IP (10.0.0.2)>
Substitute 10.0.0.2 for the IP address bitcoind may be listening on (eg. 192.168.0.254)
Attempt to query bitcoind from the Armory:
$ bitcoin-cli -getinfo
If successful, a response will be returned with the relevant information (block height, difficulty, etc.)
Awesome!
Running c-lightning:
Now that everything is built, configured, and networked correctly, c-lightning can be run.
Start a tmux session and then start lightningd :
$ tmux$ ./lightning/lightningd/lightningd --network testnet --log-level debug$ ./lightning/cli/lightning-cli getinfo
Note: pass --network bitcoin instead, if you’re #reckless.
If lightningd starts outputting Adding block <block number> , and lightning-cli returns the current block height (among other information), the Armory is successfully setup!
lightning-cli may now be used to generate new addresses for depositing/withdrawing bitcoin, and to open/close Lightning Network channels!
Lightning Charge:
LApps are Lightning-powered applications that utilize the instant payments that the Lightning Network provides. Recently released LApps include those listed here on Blockstream’s blog: https://blockstream.com/2018/03/29/blockstreams-week-of-lapps-ends.html
To run these LApps, Lightning Charge needs to be installed on the Armory.
Lightning Charge is a micropayment processing system written in node.js. It exposes the functionality of c-lightning through its REST API, which can be accessed through JavaScript and PHP libraries. From: https://blockstream.com/2018/01/16/lightning-charge.html
Lightning Charge requires c-lightning and nodejs . Install them now:
$ curl -sL https://deb.nodesource.com/setup_8.x | sudo -E bash -
$ sudo apt-get install -y nodejs
Permissions errors might occur due to the nodesource.com-provided nodejs package. To work around this, do the following:
$ mkdir ~/.npm-global$ npm config set prefix '~/.npm-global'
Add the following to ~/.profile:
$ export PATH=~/.npm-global/bin:$PATH
Finally:
$ source ~/.profile
Then simply use npm to install Lightning Charge, and run charged :
$ npm install -g lightning-charge
$ charged --api-token <a secret token>
charged will then be running on the default port of 9112!
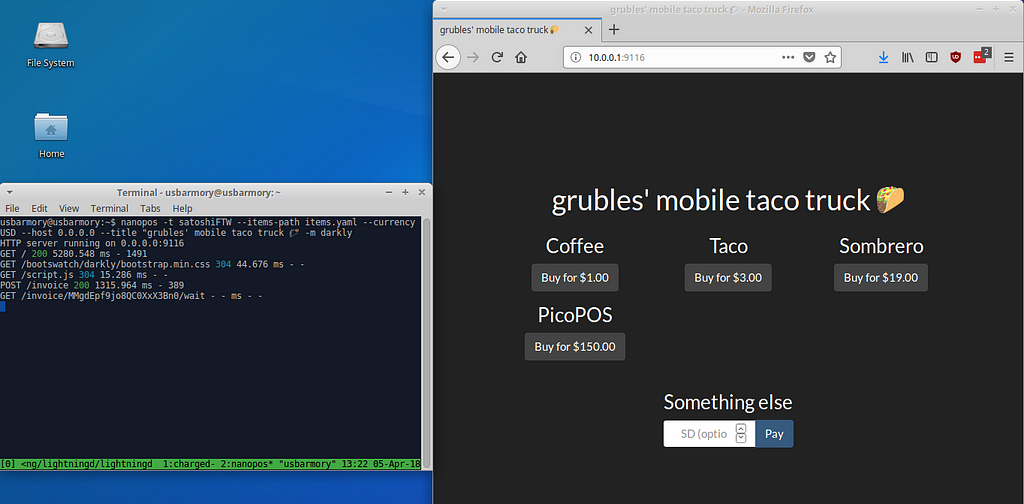
Installing the nanopos LApp to turn your Lightning module into a micro point-of-sale solution:
nanopos is easily installed with npm :
$ npm install -g nanopos
Edit an items.yaml file with the products for sale, specify a currency with --currency , and then run nanopos :
$ nanopos -t <charge API token> --items-path items.yaml --currency USD
The title of the rendered page can be changed with --title , and there are an assortment of themes available at bootswatch.com that can be chosen with -m .
Now c-lightning , charged , and the nanopos LApp are all running on the portable Armory!
Once done transacting, simply shutdown the Armory and unplug it in order to store it for transporting. When ready to transact again, plug it back in, ssh in, and fire up c-lightning again. This can be configured to use a bitcoind running on a VPS or similar public-facing hosting service to further increase portability (only the Armory is needed versus an accompanying workstation/laptop/host with bitcoind ).
The Armory can also run in “standalone mode”, which requires no USB host for connectivity or power (it is still powered via USB, however). This enables other cool use cases like a much more portable battery-powered and WiFi-enabled configuration!
Thanks for reading!
-grubles
How to build your own portable plug-in Lightning node! was originally published in Hacker Noon on Medium, where people are continuing the conversation by highlighting and responding to this story.
Disclaimer
The views and opinions expressed in this article are solely those of the authors and do not reflect the views of Bitcoin Insider. Every investment and trading move involves risk - this is especially true for cryptocurrencies given their volatility. We strongly advise our readers to conduct their own research when making a decision.

