Latest news about Bitcoin and all cryptocurrencies. Your daily crypto news habit.
Near two months ago I started learning MongoDB seriously. At Growthfunnel.io we use MongoDB, and we need to scale our system for a large volume of data(approximately 6TB+) and high throughput. Sharding, database clustering it was all new to me, so I started learning. The purpose of this article is sharing and validating my knowledge with the community. I’m not an expert on any of this. I’m just sharing what have I have learned.
This tutorial explains step by step how to create a MongoDB sharded cluster. We will deploy this demo on a single machine.
Prerequisites:
- MongoDB — 3.6.2
- OpenSSL
- NodeJS
- Bash
- Basic knowledge of mongodb sharding
What is database sharding anyway?
Sharding is a process of splitting data across multiple machines that separate large database into smaller, faster, easily managed parts called data shards. The word shard means a small part of a whole cluster.
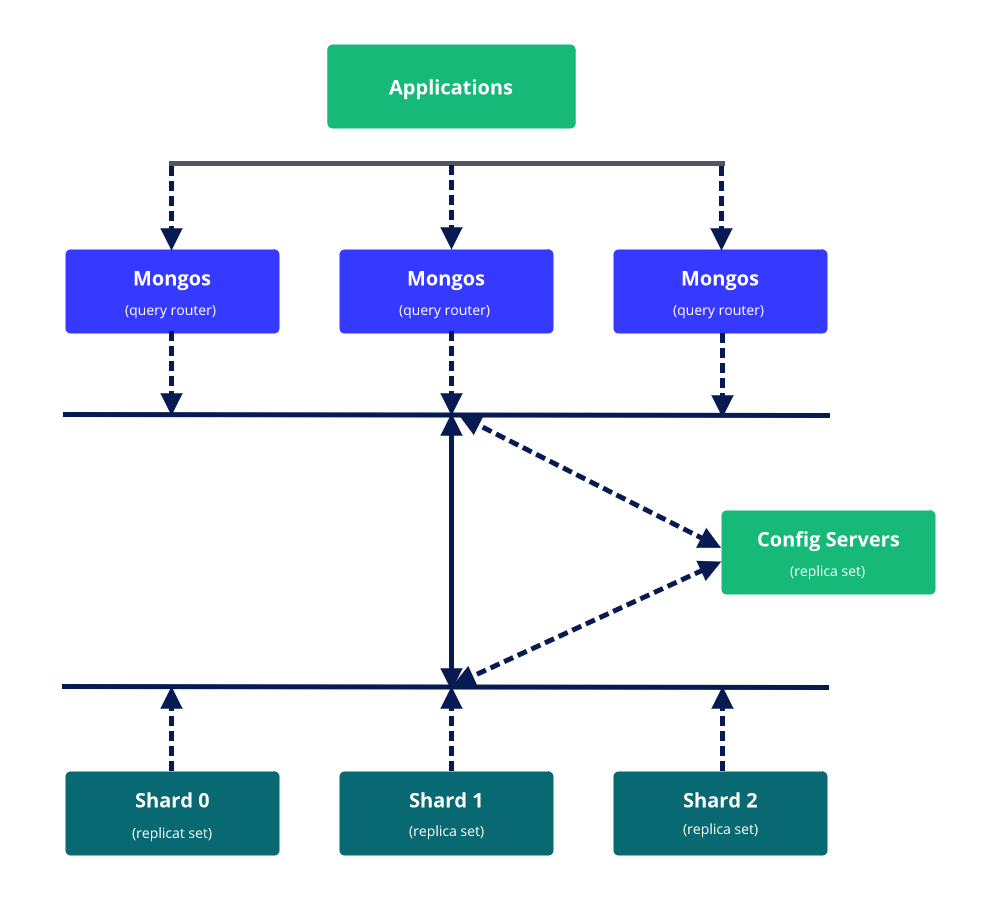
Our sharding architecture
Our sharded cluster will run on a single machine, each component will start on separate process & port. This cluster partitioned into three shards, each shard contains two data members and one arbitrary member. Each shard replica has:
- 1 Primary member
- 1 Secondary member
- 1 Arbitrary member
Prepare the environment
1. Install MongoDB from official documentation.2. Configure hostname
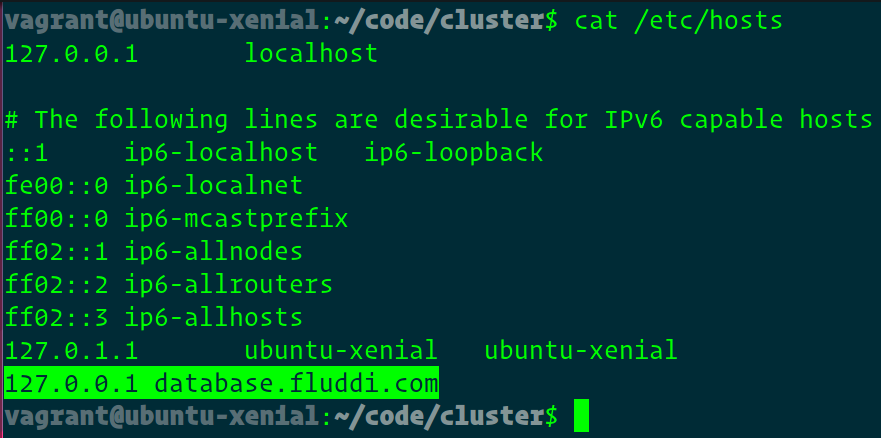
Append this line 127.0.0.1 database.fluddi.com into /etc/hosts file; database.fluddi.com will be our database hostname.
echo '127.0.0.1 database.fluddi.com' | sudo tee --append /etc/hosts
 3. Make sure data directory & Log directory have read and write permissions
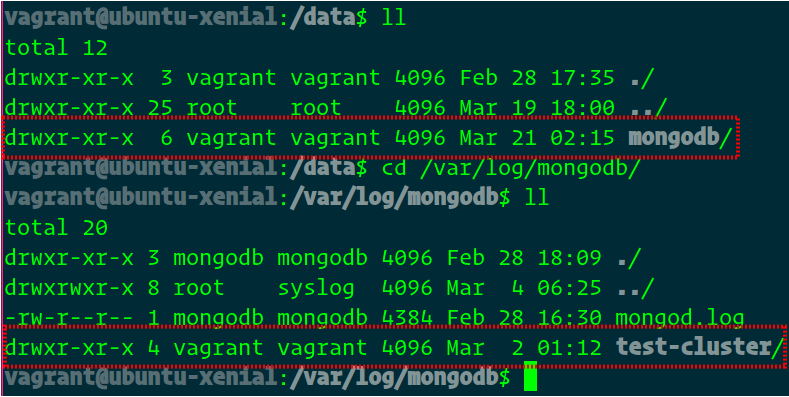
Create data directory and log directory and own these directories to your user for reading & writing. For my case my user and usergroup name is vagrant.
mkdir -p /data/mongodb /var/log/mongodb/test-clustersudo chown -R vagrant:vagrant /data/mongodbsudo chown -R vagrant:vagrant /var/log/mongodb/test-cluster
 4. Clone mongodb-sample-cluster repo
This repo contains configuration files for the cluster.
git clone https://github.com/joynal/mongodb-sample-cluster
confs directory contains cluster components configurations; You can customize for your needs. Make sure that your data directory & log directory have read & write permission. By default data directory pointed on /data/mongodb/ & log directory pointed on /var/log/mongodb/test-cluster/.
Generate self signed SSL certificate
1. Generate certificate authority
Let’s generate a self-signed certificate for the sharded cluster, this is only for this demonstration. For production use, your MongoDB deployment should use valid certificates generated and signed by a single certificate authority. You or your organization can generate and maintain an independent certificate authority, or use certificates generated by a third-party SSL vendor.
sudo mkdir -p /opt/mongodb
Now own this directory, use your user and usergroup name.
sudo chown -R vagrant:vagrant /opt/mongodb
OK, let’s create a certificate authority. Generate a private key for CA certificate and keep it very safe.
cd /opt/mongodbopenssl genrsa -out CA.key 4096
Now self-sign to this certificate.
openssl req -new -x509 -days 1825 -key CA.key -out CA.crt
This will prompt for certificate information.
 2. Generate certificate for cluster members
Generate private key & CSR.
openssl genrsa -out certificate.key 4096openssl req -new -key certificate.key -out certificate.csr
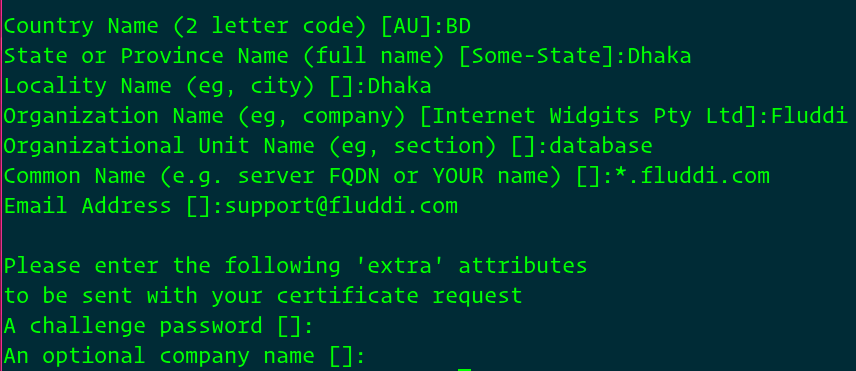
This will prompt for information, make sure domain name support wildcard domain.
Now self sign it.
openssl x509 -req -days 1825 -in certificate.csr -CA CA.crt -CAkey CA.key -set_serial 01 -out certificate.crt
Output will be something like this:
Signature oksubject=/C=BD/ST=Dhaka/L=Dhaka/O=Fluddi/OU=database/CN=*.fluddi.com/emailAddress=support@fluddi.comGetting CA Private Key
Create .pem file.
cat certificate.key certificate.crt > certificate.pem
3. Generate client certificates
Each client certificate must have a unique & different SAN from cluster member certificate. Otherwise, MongoDB will consider it as a cluster member. Each certificate belongs to a MongoDB x.509 user, more details.
OK, let’s generate two certificates by following the previous step, just make sure OU is different.
- For Web app
openssl genrsa -out client.key 4096openssl req -new -key client.key -out client.csr
Everything will be same as member certificate only OU will be different.
Organizational Unit Name (eg, section) []:webapp
- For Database admin
openssl genrsa -out admin-client.key 4096openssl req -new -key admin-client.key -out admin-client.csr
Everything will be same as member certificate only OU will be different.
Organizational Unit Name (eg, section) []:appadmin
Now change all files permission to read-only.
cd /opt/mongodb/chomod 400 *
Create the config server replica set
Create data directories, replace $DB_PATH with your actual DB path.
mkdir -p $DB_PATH/config/rs0 $DB_PATH/config/rs1 $DB_PATH/config/rs2
Change directory to mongodb-sample-cluster code repo, you just have cloned.
cd ~/mongodb-sample-cluster
Start all member of config server replica set.
mongod --config ./confs/config/r0.confmongod --config ./confs/config/r1.confmongod --config ./confs/config/r2.conf
Connect to one of the config servers.
mongo --port 57040 --ssl --host database.fluddi.com --sslPEMKeyFile /opt/mongodb/certificate.pem --sslCAFile /opt/mongodb/CA.pem
Initiate the replica set.
rs.initiate({ _id: "cfg", configsvr: true, members: [ { _id : 0, host : "database.fluddi.com:57040" }, { _id : 1, host : "database.fluddi.com:57041" }, { _id : 2, host : "database.fluddi.com:57042" } ]})Create the shard replica sets
Deploy shard 0
Create data directories for replica instances.
mkdir -p /data/mongodb/shard0/rs0 /data/mongodb/shard0/rs1 /data/mongodb/shard0/rs2
Start each member of the shard replica set.
mongod --config ./confs/shard0/r0.confmongod --config ./confs/shard0/r1.confmongod --config ./confs/shard0/r2.conf
Connect to one member of the shard replica set.
mongo --port 37017 --ssl --host database.fluddi.com --sslPEMKeyFile /opt/mongodb/certificate.pem --sslCAFile /opt/mongodb/CA.pem
Initiate the replica set.
rs.initiate({ _id: "s0", members: [ { _id : 0, host : "database.fluddi.com:37017" }, { _id : 1, host : "database.fluddi.com:37018" }, { _id : 2, host : "database.fluddi.com:37019", arbiterOnly: true } ]})It will return something like:
{"ok": 1}Deploy shard 1
Create data directories, replace $DB_PATH with your actual db path.
mkdir -p $DB_PATH/shard1/rs0 $DB_PATH/shard1/rs1 $DB_PATH/shard1/rs2
Start each member of the shard replica set.
mongod --config ./confs/shard1/r0.confmongod --config ./confs/shard1/r1.confmongod --config ./confs/shard1/r2.conf
Connect to one member of the shard replica set.
mongo --port 47017 --ssl --host database.fluddi.com --sslPEMKeyFile /opt/mongodb/certificate.pem --sslCAFile /opt/mongodb/CA.pem
Initiate the replica set.
rs.initiate({ _id: "s1", members: [ { _id : 0, host : "database.fluddi.com:47017" }, { _id : 1, host : "database.fluddi.com:47018" }, { _id : 2, host : "database.fluddi.com:47019", arbiterOnly: true } ]})Deploy shard 2
Create data directories, replace $DB_PATH with your actual db path.
mkdir -p $DB_PATH/shard2/rs0 $DB_PATH/shard2/rs1 $DB_PATH/shard2/rs2
Start each member of the shard replica set.
mongod --config ./confs/shard2/r0.confmongod --config ./confs/shard2/r1.confmongod --config ./confs/shard2/r2.conf
Connect to one member of the shard replica set.
mongo --port 57017 --ssl --host database.fluddi.com --sslPEMKeyFile /opt/mongodb/certificate.pem --sslCAFile /opt/mongodb/CA.pem
Initiate the replica set.
rs.initiate({ _id: "s2", members: [ { _id : 0, host : "database.fluddi.com:57017" }, { _id : 1, host : "database.fluddi.com:57018" }, { _id : 2, host : "database.fluddi.com:57019", arbiterOnly: true } ]})Connect a mongos to the cluster
mongos --config ./confs/mongos/m1.conf
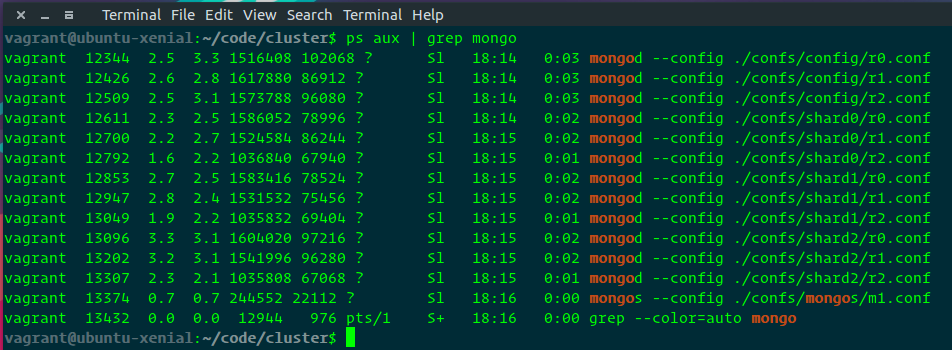
View mongod & mongos processes.
ps aux | grep mongo
Now we are ready to add databases and shard collections.
Add shards to the cluster
Connect a mongo shell to the mongos.
mongo --port 27018 --ssl --host database.fluddi.com --sslPEMKeyFile /opt/mongodb/certificate.pem --sslCAFile /opt/mongodb/CA.pem
1. Create a admin user
db.getSiblingDB("admin").createUser( { user: "admin", pwd: "grw@123", roles: [ { role: "userAdminAnyDatabase", db: "admin" }, { role : "clusterAdmin", db : "admin" } ] })Lets authenticate,
db.getSiblingDB("admin").auth("admin", "grw@123")2. Add shard members
sh.addShard("s0/database.fluddi.com:37017")sh.addShard("s1/database.fluddi.com:47017")sh.addShard("s2/database.fluddi.com:57017")3. Add x509 user for webapp and administration
db.getSiblingDB("$external").runCommand( { createUser: "emailAddress=support@fluddi.com,CN=*.fluddi.com,OU=appadmin,O=Fluddi,L=Dhaka,ST=Dhaka,C=BD", roles: [ { role : "clusterAdmin", db : "admin" }, { role: "dbOwner", db: "fluddi" }, ], writeConcern: { w: "majority" , wtimeout: 5000 } })db.getSiblingDB("$external").runCommand( { createUser: "emailAddress=support@fluddi.com,CN=*.fluddi.com,OU=webapp,O=Fluddi,L=Dhaka,ST=Dhaka,C=BD", roles: [ { role: "readWrite", db: "fluddi" }, ], writeConcern: { w: "majority" , wtimeout: 5000 } })Enable sharding for a database
Before you can shard a collection, you must enable sharding for the collection’s database. Enabling sharding for a database does not redistribute data but make it possible to shard the collections in that database.
Once you enable sharding for a database, MongoDB assigns a primary shard for that database where MongoDB stores all data before sharding begins.
Enable sharding on a database, in this demo I’m using the namefluddi
sh.enableSharding("fluddi")Shard collection
1. Shard the collection
You need to enable sharding on a per-collection basis. Determine what you will use for the shard key. Your selection of the shard key affects the efficiency of sharding.
Now connect to mongos with a client certificate & authenticate.
mongo --port 27018 --ssl --host database.fluddi.com --sslPEMKeyFile /opt/mongodb/admin-client.pem --sslCAFile /opt/mongodb/CA.pem
Authenticate user,
db.getSiblingDB("$external").auth( { mechanism: "MONGODB-X509", user: "emailAddress=support@fluddi.com,CN=*.fluddi.com,OU=appadmin,O=Fluddi,L=Dhaka,ST=Dhaka,C=BD" } )Create a collection in fluddi database.
use fluddidb.createCollection("visitors")Create an index of visitors collection.
db.visitors.ensureIndex({"siteId": 1, "_id": 1})Let’s shard the collection. I’m choosing a compound key.
sh.shardCollection("fluddi.visitors", {"siteId": 1, "_id": 1})Check the cluster status.
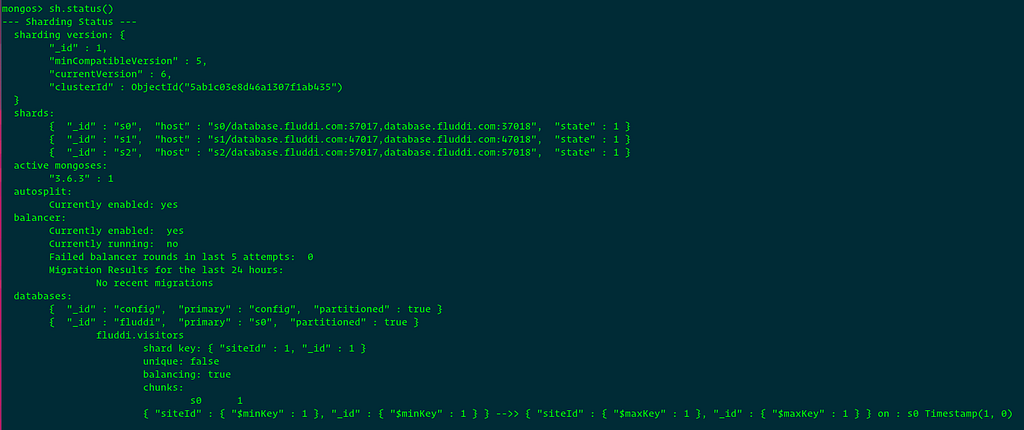
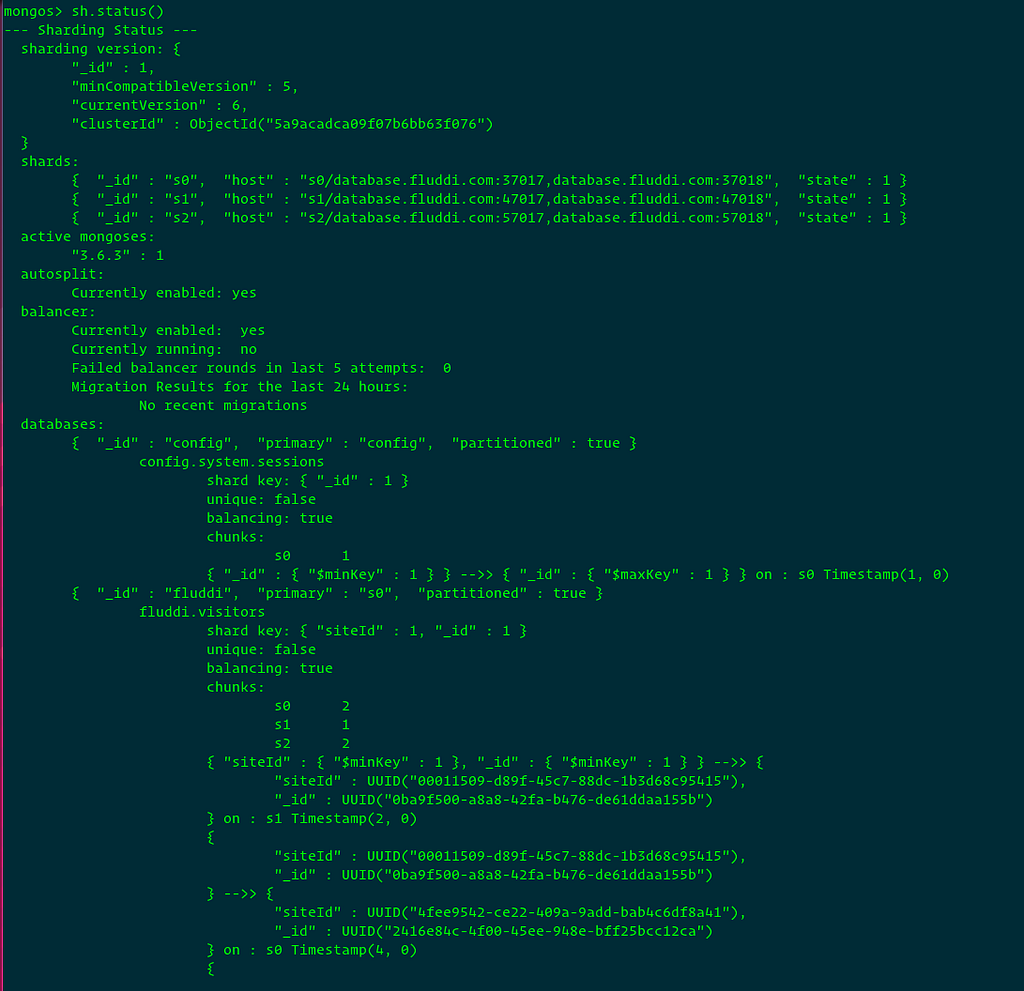
sh.status()
Sample output:
Make chunk size smaller for demonstration purpose. Otherwise, you will need to generate a large volume of data. That is only for demonstration purpose, don’t do this in production.
use configdb.settings.save( { _id:"chunksize", value: 8 } )Now chunk size will be 8MB.
Generate some dummy data (Optional)
Go to mongodb-sample-cluster code directory, you cloned.
- Configure .env file, follow .env.example
- Install packages, use npm i or yarn
- Run node index.js, this will generate 50000 visitor records
Now again connect to mongos with a client certificate & authenticate.
mongo --port 27018 --ssl --host database.fluddi.com --sslPEMKeyFile /opt/mongodb/admin-client.pem --sslCAFile /opt/mongodb/CA.pem
Authenticate user,
db.getSiblingDB("$external").auth( { mechanism: "MONGODB-X509", user: "emailAddress=support@fluddi.com,CN=*.fluddi.com,OU=appadmin,O=Fluddi,L=Dhaka,ST=Dhaka,C=BD" } )Check cluster status.
sh.status()
Sample output:
Bind IP address
If you deployed hole things on a remote machine and wanted to access the database from your computer or you want to connect a web app from another server, you need to bind IP address. Change bindIp to 0.0.0.0 . Now mongos will listen on all the interfaces configured on your system.
Before you bind to other IP addresses, consider enabling access control and other security measures listed in Security Checklist to prevent unauthorized access.
Terminology
Replica set: A group of mongod processes that maintain the same data set.Primary: Replica member accept writes.Secondary: Pull and Replicates changes from Primary (via oplog).
Thanks for reading. Hope you guys enjoyed this article and got the idea. On my code repo, I included a init script to automate whole sharding setup process, take a look at it.
Credits
I borrowed some text from following links because it suits better than my version.
- http://searchcloudcomputing.techtarget.com/definition/sharding
- https://cloudmesh.github.io/introduction_to_cloud_computing/class/vc_sp15/mongodb_cluster.html
Create a MongoDB sharded cluster with SSL enabled was originally published in Hacker Noon on Medium, where people are continuing the conversation by highlighting and responding to this story.
Disclaimer
The views and opinions expressed in this article are solely those of the authors and do not reflect the views of Bitcoin Insider. Every investment and trading move involves risk - this is especially true for cryptocurrencies given their volatility. We strongly advise our readers to conduct their own research when making a decision.
