Latest news about Bitcoin and all cryptocurrencies. Your daily crypto news habit.
(Comments)
 A sliding window with magnifier
TL: DR, We will dive a little deeper and understand how the YOLO object localization algorithm works.
I have seen some impressive real-time demos for object localization. One of them is with TensorFlow Object Detection API, you can customize it to detect your cute pet — a raccoon.
Having played around with the API for a while, I began to wonder why the object localization works so well.
Few online resources explained it to me in a definitive and easy to understand way. So I decided to write this post my own for anyone who is curious about how object localization algorithm works.
This post might contain some advanced topics but I will try to explain it as beginner friendly as possible.
Into to Object Localization
What is object localization and how it is compared to object classification?
You might have heard of ImageNet models, they are doing really well on classifying images. One model is trained to tell if there is a specific object such as a car in a given image.
An object localization model is similar to a classification model. But the trained localization model also predicts where the object is located in the image by drawing a bounding box around it. For example, a car is located in the image below. The information of the bounding box, center point coordinate, width and, height is also included in the model output.
Let’s see we have 3 types of targets to detect
- 1- pedestrian
- 2 — car
- 3 — motorcycle
For the classification model, the output will be a list of 3 numbers representing the probability for each class. For the image above with only a car inside the output may look like [0.001, 0.998, 0.001]. The second class which is the car has the largest probability.
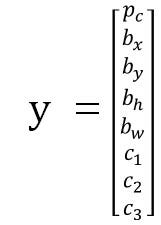
The output of the localization model will include the information of the bounding box, so the output will look like
- pc: being 1 means any object is detected. If it is 0, the rest of output will be ignored.
- bx: x coordinate, the center of the object corresponding to the upper left corner of the image
- by: y coordinate, the center of the object corresponding to the upper left corner of the image
- bh: height of the bounding box
- bw: width of the bounding box
At this point, you may have come up an easy way to do object localization by applying a sliding window across the entire input image. Kindly like we use a magnifier to look one region of a map at a time and find if that region contains something that interests us. This method is easy to implement and don’t even need us to train another localization model. Since we can just use a popular image classifier model and have it look at every selected region of the image and output the probability for each class of target.
But this method is very slow since we have to predict on lots of regions and try lots of box sizes to in order to have a more accurate result. It is computationally intensive so it is hard to achieve good real-time object localization performance as required in an application like self-driving cars.
Here is a trick to make it a little bit faster.
If you are familiar with how convolutional network works, it can resemble the sliding window effect by holding the virtual magnifier for you. As a result, it generates all prediction for a given bounding box size in one forward pass of the network. Which is more computationally efficient. But still, the position of the bounding box is not going to be very accurate based on how we choose the stride and how many different sizes of bounding boxes to try.
credit: Coursera deeplearning.ai
In the image above, we have the input image with shape 16 x 16 pixels and 3 color channels(RGB). Then the convolutionalonal sliding window shown in the upper left blue square with size 14 x 14 and stride of 2. Meaning the window slide vertically or horizontally 2 pixels at a time. The upper left corner in the output gives you the upper left 14 x 14 image result. If any of the 4 types of target objects are detected in the 14 x 14 section.
If you are not completely sure what I just talked about the convolutional implementation of the sliding window, no problem. Because the YOLO algorithm we explain later will handle them all.
Why do we need Object Localization?
One apparently application, self-driving car, real-time detecting and localizing other cars, road signs, bikes are critical.
What else can it do?
What about a security camera to track and predict the movement of a suspected person entering your property?
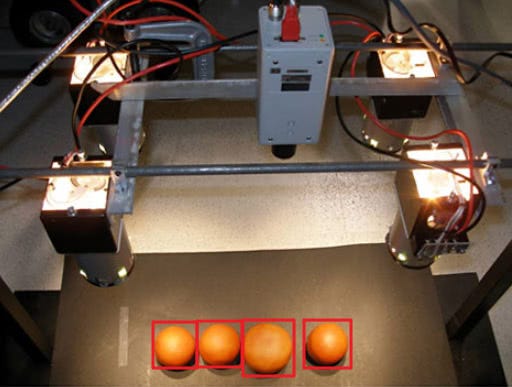
Or in a fruit packaging and distribution center. We can build an image based volume sensing system. It may even use the size of the bounding box to proximate the size of an orange on the conveyer belt and do some smart sorting.
Can you think of some other useful application for object localization? Please share your cool ideas below!
Stay tuned for the second part in the series “Gentle guide on how YOLO Object Localization works with Keras (Part 2)”.
Share on Twitter Share on Facebook
Originally published at www.dlology.com. For more deep learning experiences!
Gentle guide on how YOLO Object Localization works with Keras (Part 1) was originally published in Hacker Noon on Medium, where people are continuing the conversation by highlighting and responding to this story.
Disclaimer
The views and opinions expressed in this article are solely those of the authors and do not reflect the views of Bitcoin Insider. Every investment and trading move involves risk - this is especially true for cryptocurrencies given their volatility. We strongly advise our readers to conduct their own research when making a decision.


